|
Olympus E-30 A Technical Review and Reference |
|
|
My other articles related to the |
|
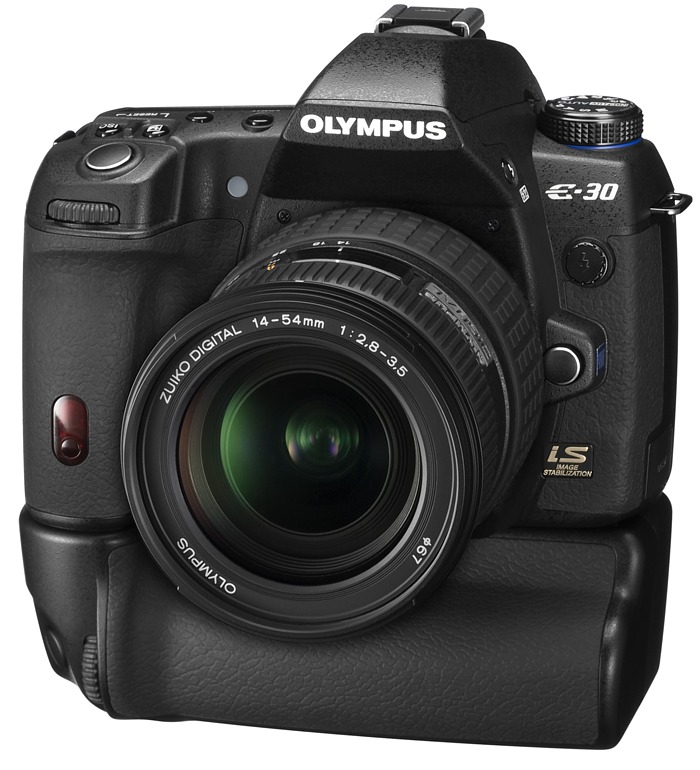
It has been a year since my review of the E-3, introduced by Olympus as the professional-class flagship of their digital SLR line. Now it is time for an equally detailed (and, possibly, opinionated) review and reference of another DSLR from the same stable: the E-30, released in January, 2009. This camera aims at an advanced amateur/enthusiast who may be put off by the larger weight, size, and price tag of the E-3, but still would like more capabilities and higher performance than those offered by the Olympus "entry-level" model, the E-520 (or its slightly older sibling, the E-510).
Note the quotes in "entry level". In my book, the most visible entry-level feature of the E-520 is the price; the camera delivers most pleasing results and offers a very wide range of options and adjustments. The E-30 is basically a less rugged and more economical, but equally capable, version of the E-3. For a brief comparison of both models (including also references to the E-510/E-520), you may refer to another article: Olympus E-30: A First Look. This will give you a general idea what this camera is about, before jumping head first in the detail. |
|
Table of Contents: | |||
|
After a new flagship of the Olympus SLR line, the E-3, was introduced in late 2007, expectation were raised that some of its technology will "trickle down" to a smaller, lighter, and less expensive version, aimed at an advanced amateur. The savings in all three these aspects were expected to be made by forgoing the weather-proof, magnesium alloy body and reducing the size and/or magnification of the prism viewfinder. Many advanced amateurs are perfectly happy with the E-520, a relatively minor update to the E-510 which I've been using (and enjoying a lot) since the summer of 2007. Still, any camera is designed within some size/weight and cost limitations, and raising these will allow to improve the specs, performance, and image quality; these are just facts of life. In early 2008 I spent six weeks with an E-3, using it quite extensively with a 12-60 mm ZD lens. (Here is a full review.) I liked most things about it, especially the results it consistently delivered, but ultimately I decided against buying one. The main reason was that the camera's bulk and weight were to much for my liking; a personal thing, of course, but enjoying photography is a personal thing. Of less (not critical but not to be dismissed) importance were some aspects of the user interface, notably the absence of the mode dial, necessitating a use of the press-and-turn metaphor to switch between exposure modes. Hoping that the rumors and expectations about a "two-digit" E-System model will materialize, I held my breath. |
.x.jpg)
|
.x.jpg)
| |
| (Promotional images by Olympus) | ||
|
Finally, in November of 2008 Olympus announced an upcoming release of the E-30: a smaller and lighter sibling of the E-3, inheriting most of its technology, and adding some minor improvements: after all, the engineers had an extra year to tweak the existing solutions. And yes, the E-30 has a mode dial! This sounded like a camera for my needs, so I decided to try it out. This article is a result of that. Note on model names: Looks like Olympus is following a convention here: one-digit numbers for top-shelf cameras (professional, advanced amateur), three digits for "budget" ones (I will not say "entry level", because this rather describes a photographer, and the E-xxx models do not suffer from the common "entry-level" limitations), and two digits for an intermediate range (still, more suitable for an experienced user than for a beginner). Let me also be clear that the E-30 has nothing in common with the E-10 and E-20 from a few years ago, except for all being SLRs made by Olympus. What makes them so different is that the older models were using 2/3" sensors (half the linear size of Four Thirds), and did not have interchangeable lenses — an entirely different breed. Here I do not limit myself to just quoting this or that piece of the manufacturer's specifications (like, for example, these); wherever possible, I'm trying to verify the Olympus' claims, explicitly listing any discrepancies. I am also including some data items not published by Olympus and, in addition to my usual commentary, explanations, and plain bitching (where applicable). |
|
Construction, finish, and feel:
Polycarbonate plus fiberglass
(Images by Olympus) |
Olympus does not mention any kind of a metal frame within the body, which was usual in their earlier "economy" models. Therefore, unless proven to the contrary, I'm assuming there is no such internal frame (not to mention a metal chassis like in the E-3).
A closer look at the two promotional images at the left seems to confirm this: no metal frame like the one in, say, the E-500. This may (or may not) affect the dimensional stability of the body; I'm a bit worried about that. The camera shape is a bit less sculpted than that of the E-3; in particular, the left side of the body, where the hand supporting the lens rests; there is just less room to do that. The control display on top is, still, tilted backward, which I like. The grip fits just right my, medium-sized, hands. A small indentation near its top accepts the medium finger, leaving the index one to operate the controls; some ingenious sculpting on the back works equally well with the thumb. I always thought I preferred smaller cameras, but this one fits better then the E-510, E-500 or E-300 (even if for smaller, lighter cameras this is less important). With the size and weight more manageable than those of the E-3, it feels better to me, too. This is, perhaps, the most subjective part of my impressions on the camera. Your feelings on it may vary, but a number of friends who tried to handle it concur with me on what I just said. Best check for yourself. The card compartment does not have a lock lever like in the E-3, but the cover itself has to slide out before it can be opened. I like this solution: it seems to be more robust than a spring-loaded latch used in the E-xxx (although I never experienced any problems with that one). | ||||||||||||||||||||||||||||
|
The exterior polycarbonate finish is good, very similar to the E-510/E-520, if not as impeccable as that in the E-3.
The camera's front is covered with a rubberized, grippable layer, so is the thumb rest area in the back. The remaining surfaces (including, but not limited to, the finder hood and top plate) have a crinkled matte surface, similar to other recent Olympus models. | ||||||||||||||||||||||||||||
|
Weatherproofing: No | This is one of the areas where Olympus decided to cut on weight, size, and price. If you want weatherproofing, get the E-3. Personally, I prefer a smaller body, even without this feature. | ||||||||||||||||||||||||||||
Body size (W×H) and weight:
|
The size difference is really visible only in the vertical dimension, where the E-30 is 9 mm shorter than the E-3. Some of the difference is due to the smaller prism protrusion in the new camera.
I'm not quoting the body depth here, as it is not really meaningful in comparisons: it is usually the lens which defines the overall depth of the camera. While I would prefer seeing the E-30 size reduced even more (say, to the size of the Nikon D90), in my hands it handles better than the E-3, without a doubt. Much of that difference can be attributed to shrinking the camera down. Here is a quick comparison of the E-30 against the other models from Olympus, as well as against two current competing models from Canon and Nikon. (The weight figures include batteries and memory cards.)
| ||||||||||||||||||||||||||||
|
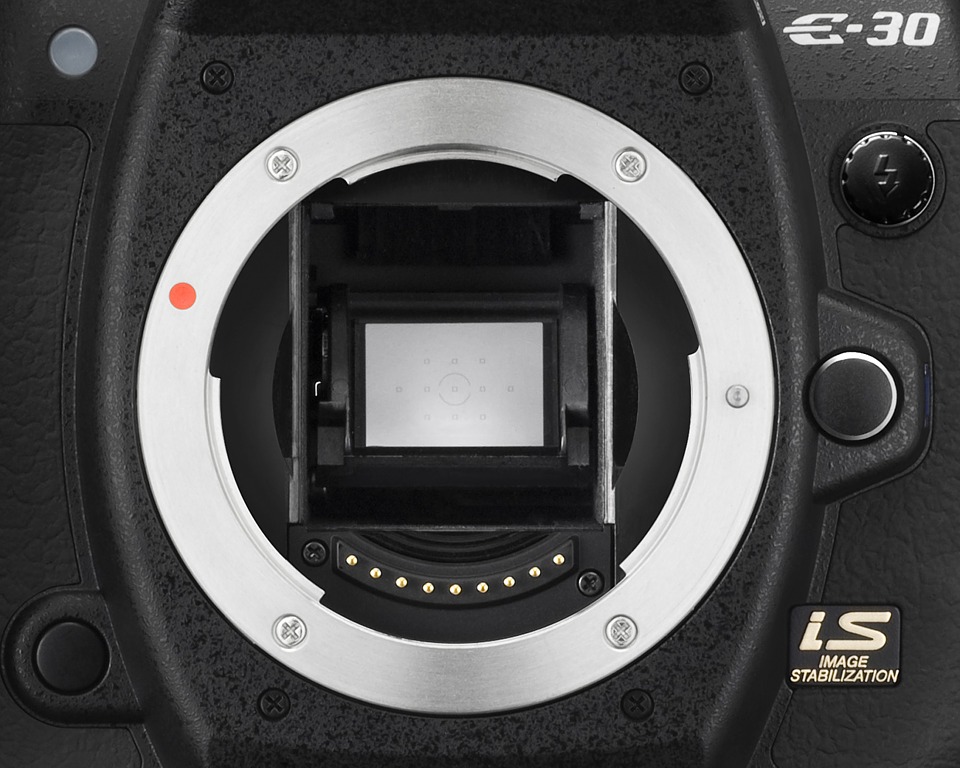
Lens mount:
Four Thirds standard
(Photo by Olympus) |
The Four Thirds standard specifies, in addition to the sensor frame size, the mechanical and electronic linkage between the camera body and compatible lenses. It was introduced in 2003, with the release of the E-1. The only camera makers supporting it so far are Olympus and Panasonic:
While any Four Thirds lens will work and autofocus on any Four Thirds body, some confusion may arise due to the fact that Olympus and Panasonic use different approaches to Image Stabilization. When using a body/lens combination by different manufacturers, the following has to be kept in mind:
While this is a small issue, I believe Panasonic went in the wrong direction here. Another minor incompatibility is related to the recently introduced contrast-detection autofocus in the Live View mode (this is available in Olympus SLRs from the E-420/E-520 and E-30 onwards; not, for example, the E-3 or E-510). This is supported only by the most recent Olympus lenses:
The first two of these were introduced with the E-410 and E-510 in 2007; the next two are from 2008, and the ZD II is a recent update of the first Four Thirds "standard zoom", originally introduced with the E-1 back in 2003. The manufacturer's decision to release a new version of this (excellent) lens indicates that contrast-detection AF compatibility cannot be provided by just a firmware update to an existing lens. Three Leica/Panasonic lenses are also listed as ready for CD AF. Now the good news. The optical quality of Olympus lenses ranges from good to outstanding. The less expensive offerings cut down more on specs than on performance, and the mid-to-high ones are just uniformly pleasing. In particular, the 7-14 mm, 12-60 mm, and 50 mm Macro ZD are among most desirable lenses on any platform, regardless of brand and price (some people say the same about the 50-200 mm ZD with which I have only a limited experience). This may be enough of a reason (if not the only one) to consider investing in a Four Thirds system. A great lens from twenty years ago is still a great lens; a great digital camera from five years ago is quite obsolete today, easily matched by entry-level offerings from almost any manufacturer. |
|
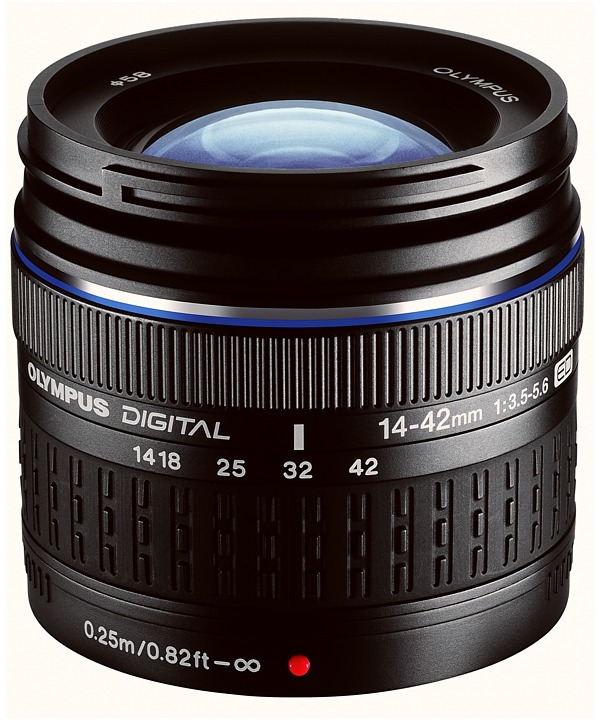
Bundled lens:
14-42 mm, F/3.5-5.6 ZD ED
(Photo by Olympus) |
As of this writing (January, 2009), the E-30 is sold as a body only, or bundled with the "economy kit" 14-42 mm F/3.5-5.6 ZD ED (whatever!) zoom, at just $100 extra. There are hopes for a kit including the 14-54 mm F/2.8-3.5 ZD II; while this combination would make perfect sense, I have yet to see it advertised.
Such a kit is sold on some markets already: I've got a report that it is offered in Latvia, just $120 above the one with the 14-42 mm ZD. (On the other hand, the camera itself is more expensive there.) It is all too easy to dismiss the 14-42 mm ZD as just another cheap piece of plastic; actually, in spite of inexpensive construction (plastic mount!), it turns out to be a respectable performer within its modest specifications. The lens is incredibly small and lightweight: just 61 mm long at 190 g. To get an idea how well it may perform, have a look at my E-510 Image Samples and More Samples, where it was used for most of the shooting; the results from the E-30 may be only better. If you do not have this lens already, then spending just $100 to get it is a no-brainer. Besides, with this lens you get imager (contrast-detection, see here) autofocus, not available with most better ones. Most probably, however, you will also want to get a higher-quality, all-around zoom to go with the E-30. There are two obvious choices here:
|
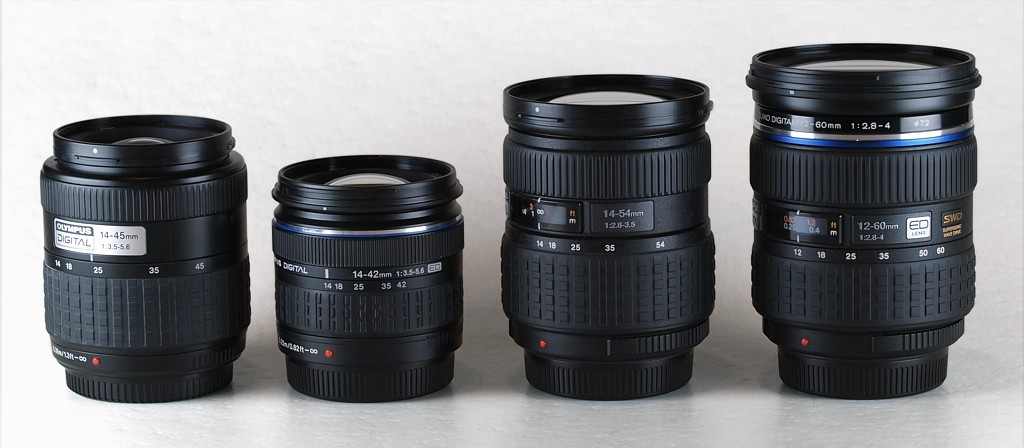
All four "standard" zooms by Olympus: 14-45, 14-42, 14-54, and 12-60 mm ZD. |
|
This is where things get tricky. Both lenses are great performers; I have used the original 14-54 mm for a number of years and I'm very happy with it (yes, I'm aware some people were disappointed with it, but I never had any complaints). The "II" version is optically identical (the only difference being a rounded aperture shape, which should improve the bokeh rendition), so it is really easy to recommend. But then I've tried the 12-60 mm: [...] it was a love affair on first sight [...]. Great resolution on- and off-axis, well-controlled chromatic aberration, moderate geometric distortion at the wide end I am thrilled. For more on this jewel of a lens, see its review and my E-3 samples: Part 1 and Part 2, as well as the E-30 sample page. Yes, it is heavier and bigger than the 14-54 mm (575 g and 99 mm in length, compared to 435 g and 88 mm), but the two extra millimeters at the wide end is nothing to sniff at, either! This is why I wanted a 12-60 mm ZD with my E-30. The decision was made easier by the fact that the lens dropped considerably in price over the last year: from $950 to $736; compare this with $600 for the "new" 14-54 mm (B&H, January, 2009) — a difference of just $136 (a dinner for two), and the choice is quite easy. True, the lens will not do contrast-detection AF in the Live View mode, but this is not something I really need (and then I can use the 14-42 mm ZD). | |
|
Using legacy lenses:
Yes, with adapter
E-30 with a 75 mm F/1.5 Zeiss Biotar from the early Sixties, in Exakta mount |
Almost any legacy (pre-digital) lens can be used on Four Thirds cameras, having a smaller backfocus distance than any other SLR system (except for Micro 4/3). All you need is a proper mechanical adapter, addressing the mechanical incompatibility of lens mounts. Details and more references can be found in another article here.
Exposure automation will work, albeit it would require stepped-down metering (with the aperture closed down to the working value), but autofocusing, obviously, will not. Unfortunately, the E-30, like all previous Olympus DSLRs, will not confirm the manual focus. On the positive side, image stabilization will work just fine with legacy lenses (the focal length has to be entered manually, though, as the camera has no means of knowing it otherwise). (The latter feature is relatively new in the Olympus line; it was introduced in a firmware update to the E-510 and E-3 in 2008.) |
|
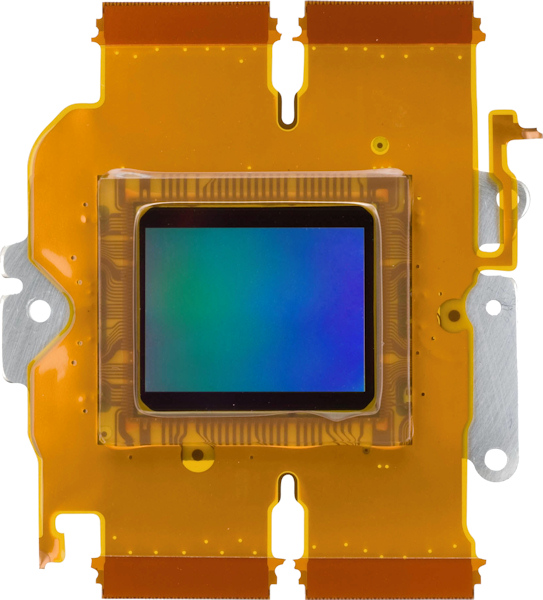
Sensor type:
Live MOS (NMOS)
|
NMOS stands for "negative-channel metal oxide semiconductor", way beyond my limited knowledge of solid-state physics. Anyway, nobody seems to be using CCD imagers any more, even if these may be capable of providing better images (all other things equal).
The sensor is made by Panasonic, and the term "high-speed" often used in promotional literature may (but does not have to) mean something. My Google search did not find any specification sheet for this sensor, but one may suspect that the same chip is used in the Panasonic G1 introduced in 2008. |
|
Effective sensor size:
17.3 x 13.0 mm
|
This size (a part of the Four Thirds standard) is just a tad smaller than the common APS-C format used in most digital SLRs. In the vertical dimension (and this is what counts for most of the standard print sizes), the difference is 13.8% (Canon APS-C: 14.8×22.2 mm).
Note that the aspect ratio is 4:3. All other digital SLRs on the market use the more elongated ratio of 3:2, while 4:3 is a rule in non-SLR digital cameras, still ignored by most photofinishers (in the smallest print size offered, that is). For a more detailed discussion of sensor size issues, see here. |
|
Pixel count:
12 megapixels |
The number of photosites used in the generated RGB image is about 12.2 million (exactly: 12,192,768). In terms of "binary" megabytes (where "mega" means 220, or 1,048,576), this is 11.63 megapixels.
Increasing the pixel count from 10 to 12 MP is, I suspect, a marketing ploy. People still count pixels, people still want more pixels, even if these pixels are not filled with image detail. Increasing the resolution of analog-to-digital conversion from 12 to 14 or 16 bits per channel could, I believe, bring more benefit to image quality. That's, contrary to often-voiced opinion, not a matter of increased dynamic range, but of less rounding noise in image processing, see Color Depth below. In Bayer matrix cameras (read: all except Sigmas based on the Foveon sensor) the actual information captured by the camera is about one third of the nominal pixel count: for every pixel in the image two out of three RGB components are interpolated from the neighbors. For more, see When Is a Megapixel Not a Megapixel. |
|
Native image size:
4032×3024 pixels | This is, as mentioned above, the 4:3 aspect ratio, more practical for most uses than the 3:2 one used in other DSLR lines. I suspect that the sensor sports a resolution of 4096×3072 (4k×3k), but the excess is not used in raw-to-RGB conversion. |
|
Color depth:
12 bits per RGB component |
Some recent cameras use 14 bits per color in analog-to-digital conversion. While the difference is not significant in the final image (displays use only 8 bits per channel anyway, and the differences are unlikely to show in prints), the increased depth reduces losses and artifacts in the image pipeline, a more significant improvement than just increasing pixel count from 10 to 12 MP.
All current Olympus DSLRs use 12 BPC, and here is what others do:
Interestingly enough, Canon decided to downscale back to 12 BPC in their recent 1000D. Processing speed issues? Maybe the gain is just not worth the trouble? |
|
Capture sensitivity:
ISO 100 to 3200 |
This is the same range as in the E-3, or 1 EV higher than in the E-510 or E-520.
See also ISO Settings in the Exposure Control section. |
|
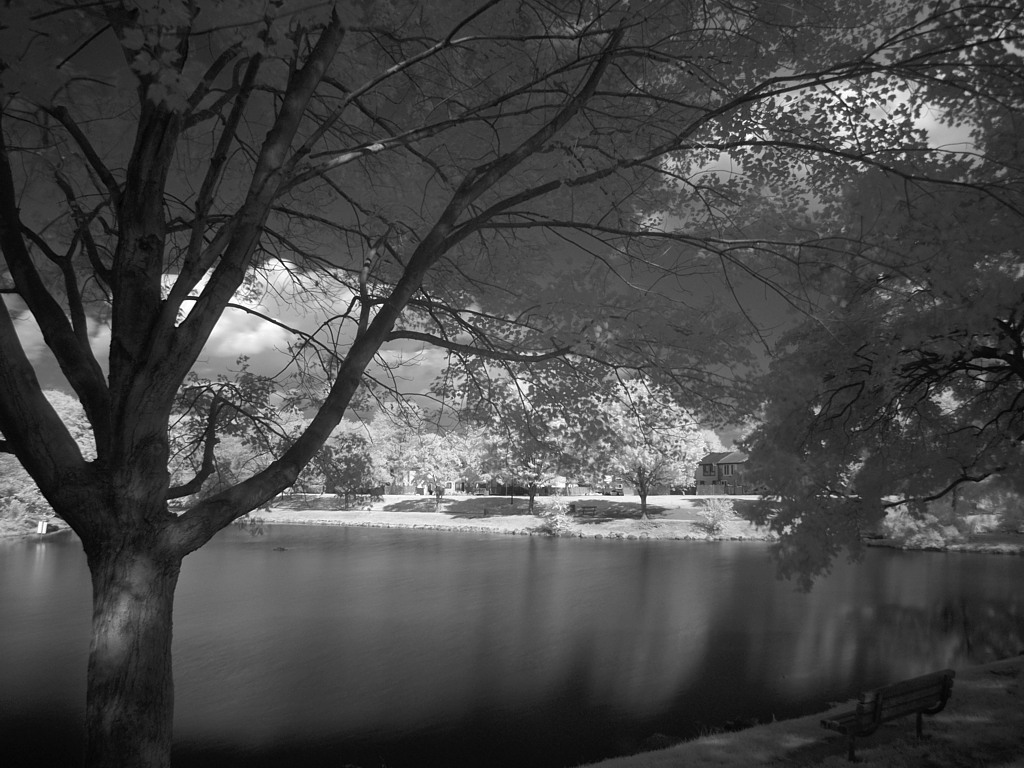
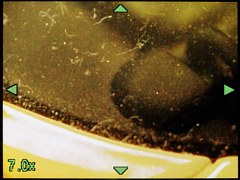
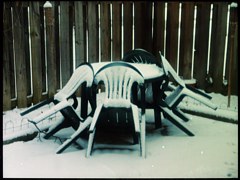
Infrared sensitivity:
R72 exposure factor of about 2500× (11.3 EV)
14-42 mm ZD, Hoya R72 filter 8 seconds at F/5.6, ISO 100 Desaturated and equalized |
This is less than a half of the IR sensitivity of other Olympus SLRs I've used, including the E-3 (which needed a 10 EV offset). This makes the E-30 just barely usable for this kind of photography; obviously, the designers are trying to remove any IR contamination of the visible-light image by making the anti-IR filter in front of the sensor more restrictive. This is understandable, as the camera is designed for visible-light work, but it makes life harder for those of us who work against the rules.
A typical IR exposure with the E-30 (sunny mid-day) is 4 seconds at F/4, ISO 100, with the R72 filter used.
For most the Olympus cameras I've checked, I've been using the same lake view (see at left) on a sunny afternoon, so the results should be roughly comparable. For this particular picture re-shot in visible light I needed an exposure Scenes with less direct sunlight usually require a higher offset, being less rich in infrared. Therefore treat my numbers just as a starting point to your own experiments. Still, if you must, you can do it. The AF and AE circuitry should still work (although the light level, affected by the IR filter is below the official low limit of both). Interestingly, when the regular AE circuitry does the reading, the infrared exposure should be about 6 EV above the indicated one; when AE is computed from imager data (Live View with compatible lenses), the adjustment should be 1 EV below: a huge difference! |
|
Dust removal:
Yes, ultrasonic.
|
A dedicated (piezoelectric?) micromotor vibrates the protective filter in front of the sensor with an ultrasonic frequency; this shakes most of the dust off, giving it a chance to be trapped on sticky strips on the bottom of the mirror chamber. (These should be replaced every three years by Olympus service.) The system is activated every time the camera is turned on (or wakes up from the sleep state). It adds a slight delay to the boot-up time, not a problem in my book.
When originally introduced with the E-1, the solution was dismissed by other manufacturers as a non-essential feature. Now everybody offers it. This system works. I never had any persistent specks in shooting with the E-300, E-500, E-510, and E-3, and I never had to clean the protective filter by hand. A good habit (not just for this reason) is to change lenses when the camera is off, so that the anti-dust cycle will be run before any further use. A comparative study of anti-dust systems was published by Róbert Irházy at PixInfo.com; according to it, Olympus is more effective than others here (some do not seem to work at all). |
|
Sensor cleaning option:
Yes |
Selecting this from the menu raises the mirror and opens the shutter, exposing the protective filter in front of the sensor, so that it can be cleaned. I never needed this with any of my previous Olympus SLRs.
(Warning: it the battery runs out of charge in this state, the shutter and mirror may return to the working position, with disastrous results!) |
Image file format:
|
ORF files are compressed using a lossless compression scheme. This allows for smaller raw file sizes. According to Olympus, ORF files are, on average, close to 14 MB in size (about 70 frames per 1 GB of storage) — this varies from one frame to another, depending on how well does the particular image submit to the compression process; images with less detail will usually compress more efficiently.
For more on the raw format, refer to another article.
|
JPEG compression:
|
Again, the actually achieved compression ratios will vary from one frame to another; these are just "nominal" values provided by Olympus.
With my previous Olympus cameras I found that the 1:4 compression is good enough for anything I do; therefore I switch to 1:2.7 only for critical applications (like image samples for analysis). The 1:8 compression may be adequate for vacation snapshots, and I really would not recommend going to 1:12. |
Average file size (full resolution):
|
Again, these are some ballpark figures quoted by Olympus. The numbers I see are quite close; for example, my lake scenes compressed at 1:2.7 use, on average, just below 8 MB per file, while my tabletop scenes at 1:4 — about 5.2 MB. My ORF files (11-12 MB) are smaller than Olympus indicates, but this may be due to low detail contents in scenes for which I've been using this format.
In other words, a memory card will hold about 175 1:4 JPEGs, the format I consider good enough for most applications, per gigabyte. |
Image size (pixels):
|
Except for the first (native) size, all others are the same as in the E-3 or E-5x0/E-4x0 cameras. Obviously, these smaller sizes are interpolated down from the original capture.
My advice is to use only the native (12 MP) size and forget about the others, for a number of reasons. Consider yourself warned. The image captured on the sensor is actually a few dozen pixels larger in each dimension. This is normal; the manufacturers usually discard this information because the raw-to-RGB conversion (more exactly: Bayer demosaicing) would have to be done differently for those edges. Some third-party converters, however, handle this, providing a slightly larger final result, about 1-2% extra each side. I don't know exactly, what is that margin in the E-30 as so far I only used Olympus software for the task. |
Image quality presets:
|
This affects the pixel size and compression of your images as stored to the card.
The E-30 (like the E-3 before it) does not allow for direct and independent setting of JPEG image size and compression. Instead, you have to choose (or "register") four size/compression combinations, and only these will be accessible from the Control Panel (or, the hard way, from the menu system). Each of these four presets will be available alone, or together with ORF (two files), in addition to the ORF-only setting. Defining a preset boils down to choosing the image size (Large, Medium, or Small) and compression (Superfine..Basic) in one of the Settings menus. The meaning of Medium and Small is defined in yet another menu option (Large is hardwired to the native image size). For reasons that escape me, Olympus stubbornly refers to the Middle image size. Perhaps they are in a medium of a language crisis? I consider all this too much of a hassle about a feature of little, if any, usefulness. Why not using just two independent settings accessible from the Control Panel, without downsampling at all:
This would be simpler, faster, and safer. A couple of years ago my buddy, who makes the best audiophile speakers in the world, spent a whole evening shooting for his product catalog. Only the next morning he discovered that all images were in the 1024×768 resolution. |
Storage medium:
|
Each card has its own slot, and switching between both can be done on the fly, from the Control Panel.
Without a real reason, I like having two slots: better than carrying a spare. What I do not like is that the second slot is for xD-Picture cards, a stillborn monstrosity, used only by Olympus (Fuji ditched it last year). These are slower, more prone to compatibility problems, and limited in size; just the worst possible choice — see my xD-Picture article. Still, the upside is that you have some extra storage when running out of Compact Flash storage in the field; you can also copy files between cards if needed. Too bad Olympus did not switch to the SD card type. |
|
Writing speed:
Up to 0.4 s per raw image |
No, this is not a typo; more exactly, the value I've got for a recent 8 GB SanDisk Extreme IV card was 0.42 s (with an accuracy better than 0.01 s).
To bring some order and precision to speed measurements, I bought a Chinese mechanical stopwatch ($50) and designed a new measurement procedure, very accurate and independent on operator's reaction speed. There is a new article on card-writing speeds, with more detail. Here are the results for some cards, with accuracy better than 1%:
How does this compare with the E-3 and E-510? For the same card I've clocked the E-510 at 0.61 s per frame, and E-3 — at 0.42 s. It has to be remembered, however, that these cameras generate 10-megapixel images at about 10 MB each, while the average raw file for the E-30 was 11.5 MB. The article mentioned above contains all that data and more. |
|
Computer interface:
USB 2.0, storage-class device |
Starting from the E-510/E-410, Olympus cameras support the USB 2.0 High Speed specification, which is the full speed (sic!) USB 2.0 is capable of.
This is as opposed to the USB 2.0 Full Speed, which is actually the speed of USB 1.1. Do not ask me why this naming is used by the industry committee who set the standard: Full Speed is not really full speed. The nominal data transfer rate is 480 megabits/second for High Speed, 12 Mb/s for Full Speed, and 1.4 Mb/s for Low Speed; the actual one depends on devices involved. "Storage-class device" means that the camera is seen as an external disk drive when connected to a computer (or another compatible device). Do not take this for granted: some manufacturers do not offer this feature; most notably Canon (including their latest models). With those you must install a proprietary software before images can be transferred, or you may resort to using an external card reader. I really do not understand the reasons behind that. A quick test: transferring 1.66 GB of data in 210 files via USB from the E-30, using a 2 GB Extreme IV CF card, to my Core Duo laptop took 261 seconds, so the effective rate was 6.3 MB/s. Using the same card and computer with the E-3 resulted in 4.8 MB/s, so it looks like Olympus engineers did some strange and wonderful things to their circuitry, improving transfer speeds by 30% — not too shabby! For the record: all this was done under Windows Vista, with all resource-hungry background processes (like drive indexing and shadowing) disabled. With a new (8 GB) Extreme IV, the same files were transferred at 6.9 MB/s, so it is clear that the USB connection is not the critical bottleneck here. More, repeating the latter experiment on my desktop computer shaved another 5 seconds off the process, resulting in 7.1 MB/s. Mb stands for megabit; MB — for megabyte; 1 MB = 8 Mb; there is some, perhaps intentional, confusion due to the fact that while bytes (or megabytes) are commonly used for most purposes, transfer speeds are usually quoted in Mb/s (not MB/s). |
ISO Settings:
|
The ISO setting, or the effective camera sensitivity to light, can be adjusted manually in increments of 1 EV or 1/3 EV (the step itself is a preference setting).
This step is set independently from the one used in exposure adjustment: some photographers, including myself, prefer to control exposure parameters with a step of 1/3 EV, and ISO — just 1 EV. Separate step settings accommodate both groups while not adding to complexity. There are a few preferences which the user may change to affect the way in which the automatic ISO adjustment is being done.
When set to Auto, the ISO value will be adjusted by the camera's autoexposure system. While Olympus does not explain how it is being done, it looks like in the shutter or aperture priority exposure modes this is used just as a safety valve: the ISO is moved off the selected base value only if proper exposure could not be achieved otherwise at a given value of the controlled parameter. In program exposure, the ISO is adjusted upwards as soon as the shutter speed nears the handholdable limit (assumed to be 1/2F, one over the focal length doubled); at the high end of the exposure range it works as described above. Auto-ISO in the manual exposure mode makes it no longer manual: the camera will try to adjust the ISO so that the user-selected shutter speed and aperture will provide proper exposure. Actually, this is exactly like the Shutter and Aperture Priority mode in the Pentax K-7, praised in some reviews I've seen, except that it does not use a separate slot on the mode dial. We have to remember, however, that the ISO setting affects image quality (noise, contrast, dynamic range, detail), and the range of really usable ISOs on the E-30 is limited to 2-3 EV (up to ISO 400 or 800, but no higher), so the feature is not really useful. Well, it is disabled by default. While I remain skeptical about the usefulness of the auto-ISO feature, except in all-auto, idiotensicher cameras, the implementation offered here by Olympus is unobtrusive and reasonable. I just wish it were better documented in the manual. |
Light metering:
|
Full-aperture TTL metering has been commonly used in SLRs for the last 45 years. The light is measured at full aperture to provide a brighter viewfinder image.
Exposure accuracy may suffer if the aperture closes not quite exactly to the desired value (the mechanism may wear down with time). To avoid that, some cameras (Minolta XD series comes to mind) used to do a last-instant measurement after the aperture closes down. I do not know if Olympus uses this trick, but the E-30 (like all other Olympus SLRs I've tried) does not suffer from any exposure inconsistencies. The camera uses a matrix of 49 (7×7) sensors to read the light off the viewing screen, like in other recent Olympus SLRs. This also is a common solution; its downside is that the measurement may be off with legacy lenses (i.e., ones not designed for the Four Thirds standard). Also, changing the viewing screen to a different type may require a correction to be introduced. The metering in E-30 seems to be accurate and consistent. This, of course, does not free the photographer from judicious use of exposure compensation, depending on the subject and on the desired image tonality. |
Metering modes:
|
ESP (Electro-Sensitive Pattern) is a fancy (and meaningless) name for the matrix metering used in Olympus cameras in the last 20 years. The technology changes, the name stays.
Name aside, the 49-point system is quite smart, capable of detecting high contrast and/or backlighting in the scene, and adjusting the exposure appropriately. Still, no such system is foolproof, and the first thing a photographer has to learn about a new camera is the exposure compensation for its metering system. Luckily, matrix metering remains largely unchanged in Olympus SLRs since the E-410/E-510, so I was feeling at home with the E-30 right away. The ESP has an additional flavor, referred to as ESP+AF, in which greater weights are assigned to image areas close to the AF sensor (or sensors) actually used. This is, however, not accessible from the basic camera interface (direct buttons, Control Panel), requiring another search in the menu system. What would be wrong with one more option in one place? The center-weighted mode does its averaging of the 49 readings with emphasis on the frame center. Many photographers, especially those from the "old school", feel better using this approach, as it does not involve any hidden (and undocumented) algorithms. Spot metering uses just one of the 49 sensors to measure the light in the central 2% (according to Olympus) of the frame; the approximate metering area is shown as a circle in the viewfinder. If you know what you are doing, this may bring most rewarding results. Highlight Spot and Shadow Spot are like Spot, but they assume that the spot is aimed at highlights or shadows of the scene, so the system applies an offset up or down, respectively, to the measured exposure. Unfortunately, Olympus does not consider us worthy of knowing that offset. All it would take is just one line in the manual, like "Hi Spot assumes that the measured area is 3 EV above mid-gray" — but with some experimenting you can get the hang of where to aim the spot in these modes. Actually, I never bothered; instead, I am using just the regular spot with exposure compensation ("set the face at +1 EV"); it is simpler and more controllable. |
|
Metering range:
EV 1 to 20 in all metering modes (ISO 100, F/2.0 lens) |
This can be said in a simpler way: at ISO 100, the low end of the metering range corresponds to an exposure of two seconds at the lens maximum aperture, regardless of what that aperture is.
This time will be cut in half for each doubling of the ISO setting. For example, at ISO 200 the longest measured exposure will be one second (with any lens, again). The actual performance seems somewhat (one to two F-stops) better than these official numbers. Most probably, Olympus (and others) require a given accuracy at the claimed low-light limit. Other cameras in this class have similar specs. For example:
|
Exposure control modes:
|
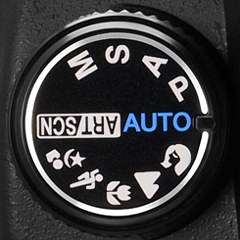
The choice of exposure modes (accessible via the mode dial, a welcome change from the E-3!) is more like the one in the E-520/E-420, a step back, I would say. Olympus assumes that the users of the new camera will be less advanced than those who bought the E-3.
Auto is the all-use general shooting mode, essentially the same as Program (see below), except that it disables the program shift feature and reverts all settings to their defaults — still allowing you to modify them. Any modifications will last only until you leave the Auto mode, when the camera will revert to whatever you have set before entering it; entering Auto again brings the unmodified defaults back. Therefore Auto may be understood as Program+Reset, or a panic button. It actually works well in this capacity — in some other cameras All Auto (or its equivalent) disables most of the adjustments, therefore becoming an "idiot mode". One may only ask if Auto is the right name — maybe Pgm Reset would be better? The only difference is that the regular Program has persistent settings... |

E-30 exposure program |
The program mode adjusts both shutter and aperture to match the light level. How this is done, is shown with the black line in this graph (borrowed from the User Manual). As the scene becomes brighter (EV numbers are shown at diagonal lines), the shutter and aperture settings change as follows:
The manual describes the graph as referring to an F/3.5 lens. Wrong: the maximum aperture is, clearly, F/2.8 here. Too much cut-and-paste from the E-3 manual? Program Shift allows for use of faster or slower shutter speeds while keeping the exposure at the same level: moving the central (slanted) segment of the line to the right or to the left, respectively. This is done by turning the control wheel (depending on preferences set), and the lines for a shift of ±1 EV are shown in gray. Program shift also moves the "limited aperture" region (horizontal line section [3] as described above) up or down; line section [1] is, obviously, moved up only if the shift is towards slower shutter speeds. In the original posting of this article I suspected an error in the shift diagram, but I've checked it to be OK; it looks like either the shift algorithm has been changed since the original firmware for the E-510, or the similar graph in that camera's manual is wrong. Program shift is not that useful: for more control over aperture and/or shutter speed I prefer to use aperture or shutter priority. In addition, the shift is only shown by a "Ps" mark in (all three) data displays, with no indication on its magnitude or direction. If you do not remember what shift has been set, the fastest way to reset it to zero is by turning the mode dial back and forth: a clumsy solution. By default the shift is accessed via either control dial, but this can be re-assigned in a number of ways.
Aperture and shutter priority: No, I won't offend your intelligence describing these two. Manual exposure is metered: the exposure compensation scale (in all three data displays) shows how much over or under the "right" exposure your current shutter/aperture settings are. This is more useful than it may seem, even in this age of automation and instant gratification: set the exposure for the first frame in a series and have it consistent for others under the same light, without the camera readjusting it depending on the variations in subject tonality. Yes, you could get the same effect using the AE Lock set up to act as a toggle (memory lock), but I'm not feeling good changing preferences on the fly: too easy to forget to change them back. Manual timing (bulb) exposure is also accessible from the manual mode as one of the speed settings. It allows for manual shutter timing up to 30 minutes: press the release to open, let go to close (or use a remote control). |
(Image by Olympus) |
Dedicated programs (or Easy Shooting Modes) occupy five slots on the mode dial; these are: Portrait, Landscape, Macro, Sport, and Night+Portrait. They are similar to the Auto mode, allowing for parameter adjustments, but resetting all to defaults upon entry.
The manual does not elaborate how these programs are optimized for each application: if you want to shoot a portrait, turn the dial to the little head icon and press the big, shiny button — don't you bother your pretty little head. I am a bit surprised to see these in the E-30: this indicates a camera intended for beginners' market. On the other hand, there is no room left on the mode dial for user-defined modes, what a shame. Scene and Art Modes are not, strictly speaking, exposure modes, as they also involve specific image processing. The only reason I'm mentioning them here is that they are accessed from the mode dial; there is a separate write-up of this subject in the Image Processing section. |
|
Adjustment step:
1/3, 1/2, or 1 EV |
This is the step for the exposure settings controlled by the user (e.g., aperture in aperture priority); the variables controlled by the camera are adjusted continuously. The choice is a part of user preferences.
A reminder: 1 EV corresponds to a factor of 2× in exposure (amount of light reaching the sensor); 1/2 EV is 1.41× (square root of 2), and 1/3 EV — 1.26× (cubic root of 2). This means that 1/3 EV is as precise as needed for most applications, and that's the value used most often. |
|
Exposure compensation:
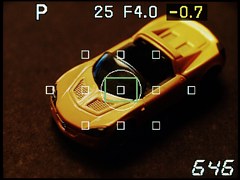
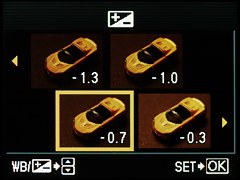
From -5 to +5 EV. |
The compensation uses 1/3, 1/2, or 1 EV increments, as per a preference setting. Its magnitude is shown in all three data displays (viewfinder, status panel, Control Panel) on a quasi-analog scale; the Control Panel also shows the numeric value. The scale extends only from -3 to +3 EV which is OK with me: larger adjustments are rare.
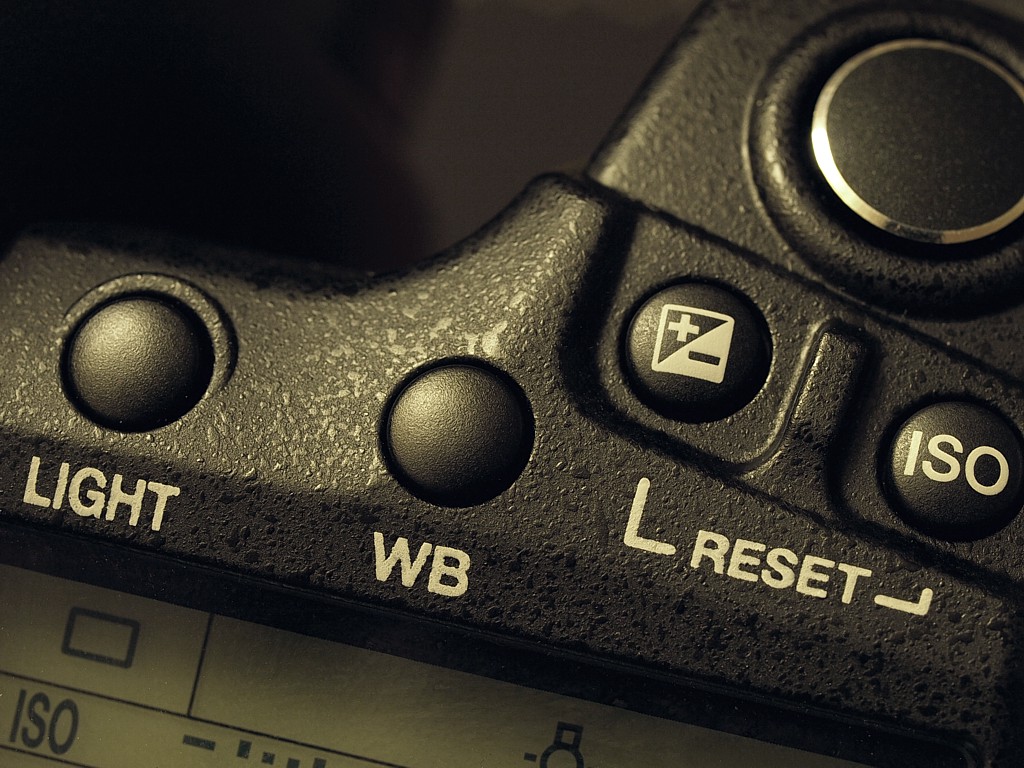
A minor quirk of the analog scale in the viewfinder and status panel is that it is always drawn in 1/3 EV steps; this leads to an inaccurate display if the process itself uses steps of 1/2 EV: 1/2 EV is shown as 1/3 EV, the next step as 1 EV, then 1 1/3 EV, 2 EV, etc. This is because these displays are of the segment (as opposed to pixel) type. Caused by limited capabilities of segment displays, this is a feature, not a malfunction. Exposure compensation is adjusted with one of the control dials while (or shortly after) the dedicated [+/-] button next to the shutter release is pressed. It can be also re-assigned to one of the dials alone, i.e., without the button. This is quite practical: it is not easy to turn this dial by accident. I had it set this way on the E-3, and now also on the new camera. This, however, may depend on how you hold the body, so you may have a different experience. In addition to exposure compensation, the E-30 also allows to introduce another, global (and hidden) correction, or offset, to the metered autoexposure. (This was not available in any of the previous Olympus cameras.) This correction may range from -1 to +1 EV in 1/6 EV increments, and is defined independently for pattern, center-weighted, and spot metering. While at first this may seem redundant, it makes perfect sense, separating a general preference (for brighter or darker images) from individual adjustments which depend on the scene being photographed. The finer step and limited range are also justified. A nice, even if not critically important, feature. |
|
Exposure bracketing:
(Image by Olympus) |
Autoexposure bracketing is activated by pressing the Pressing these two buttons, both at the far left of the body, is a bit cumbersome, whether you try to do it with your left thumb alone, or with both thumbs. Using the drive mode and [+/-] would be better (in addition to being more logical). Still, in the E-520 this had to be done through the menu system; so what we have in the E-30 is an improvement. The difference between neighboring frames can be set to
For shooting sequences to be merged into a single HDR (high dynamic range) image, it would It would be useful to have also an option of 2 EV here. Exposure adjustment in a bracketed sequence depends on the exposure mode: in shutter priority the aperture is changed between frames; in aperture priority the shutter speed, and in program — both in the same degree. My major complaint about exposure bracketing remains unchanged since the E-3: it does not automatically switch the camera to the sequential mode; this has to be done separately. If not, you will have to count the frames exposed, or refer to the status display to see if the sequence has been completed. I believe a single shutter press should trigger the whole sequence, period; anything else is clumsy and error-prone. Olympus had that right in the E-10/E-20, years ago; I see no reasons behind this change. ISO bracketing changes the effective exposure by adjusting the ISO down and up from the value set (shutter speed and aperture remain the same). Three frames are shot, with the ISO difference between them selectable as 1/3, 2/3, or 1 EV (no 1/2 EV option). A bracketed ISO value from outside of the 100..3200 range will be truncated to that range, of course. Flash bracketing can be useful if you want to change the flash-to-ambient light ratio. If the flash is the sole light source, the effect will be identical to that of AE bracketing. Note: only one type of bracketing can be active at a time. Setting another one resets the previous one. |
|
Autoexposure lock:
Yes |
This feature remains unchanged from the E-30 and E-510/E-520 — if it ain't broke, don't fix it.
Normally, the autoexposure locks when you half-press the shutter release, and so does autofocus. If you want to separate these two functions, press and hold the To accommodate various preferences and working habits, Olympus allows to customize the lock functions in a number of ways.
All this may look complicated, but it needs to be done just once; this is not something you will keep changing from one session to another. For details, refer to the proper section of my E-30 customization article. |
|
Multiple exposures:
Yes, up to four frames |
Two, three, or four pictures can be overlaid and merged into a single final image; the camera can adjust individual exposures to provide a reasonably well-exposed total. Alternatively, you can select a raw image to serve as a base for such an overlay, and Live View can be then used for more accurate composition of the combined effect.
The same can be done, and better (with a wider degree of adjustments and interactive preview of results they provide), in postprocessing: almost any image editor provides this functionality. |
|
Type:
Mechanical, focal-plane, electronic control
|
A standard in digital SLRs. Olympus does not specify what is the shutter made of (metal, plastic, carbon fiber?).
This is a different shutter than the one used in the E-510 or E-520; most probably an "economy" version of the assembly used in the E-3. That one was professional grade, rated at 150,000 exposures; this one does not carry any such rating. With the life span of digital cameras defined rather by obsolescence than mechanical wear, I don't think this makes a practical difference. To reach 100,000 frames you need to shoot 100 pictures every day for three years. Check also my article describing how a focal plane shutter works. |
Speeds:
|
This whole range is available in all exposure modes but, depending on aperture and/or ISO setting, the lowest speeds may become inaccessible because of limits on the autoexposure range. When set by hand (shutter priority or manual exposure), the increment is 1/3, 1/2, or 1 EV (same as exposure adjustment step, see Exposure Control); in other exposure modes the camera adjusts the speed continuously. The 30-minute manual timing (bulb) mode limit is not hardwired; it can be changed in the preferences to a number of values from one minute up, with eight minutes being the default. The term "bulb" is a reminder of times when you had to open the shutter manually, fire a flash (a single-use bulb containing magnesium filaments), and then close the shutter. |
|
Max. flash synch speed:
1/250 s |
When used with a dedicated TTL flash, the camera will set the shutter speed to 1/250 s or slower.
This "official" value is on the safe side: I believe the actual one it to be 1/320 s or a bit faster; see the Flash section. |
|
Release:
Soft-touch, electronic | Not as nice as on the E-3 (not to mention the E-20), but adequate. |
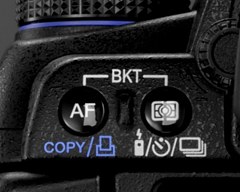
Modes available:
|
Switching between these modes is done by pressing the button marked The self-timer delay can be set to 2 or 10 seconds, and the IR remote delay — to 0 or 2 seconds. There is no audible or visible confirmation that the shutter release was fully pressed and the countdown has started; a red light on the camera front (sharing the orifice with the external WB sensor) starts blinking only two seconds before the exposure. I would prefer a solution used on many cameras: slow blinking to start with, fast (or continuous light) just before. The countdown can be canceled by pressing the drive mode button again. If the mirror lock is enabled, each drive mode will have a "locked" flavor, which will double the number of modes to scroll through; see my criticism below. |
Sequential rate:
|
With the sequential shooting mode active, the camera will keep taking pictures as long as the shutter release is down, unless the memory buffer fills up. Only then the rate will slow down to match the card writing speed. The shooting can be resumed even if the buffer is still being written out.
The "low-speed" frame rate can be pre-set from the Settings menu to 1..4 FPS. The fast rate of 5 FPS is at par with the E-3, a step up from 3 FPS on the E-510 or 3.5 FPS on the E-520. For comparison, the Canon 50D tops at 6 FPS, and Nikon D90 at 4 FPS, which puts the E-30 approximately in the same league. According to the specs, the buffer is large enough to hold 12 raw images; this limits the length of a high-speed sequence. As the ORF files are now compressed, the actual number of frames fitting into the buffer will vary. My Chinese stopwatch procedure (see Writing Speed in the Storage section) shows that, indeed, for the slowest cards I've tried (xD-Picture, what else?) the sequence slows down after 12 frames. For the fastest card in my collection, the 8 GB Sandisk Extreme IV of 2008 vintage, I've got 16 frames at the full speed before the rate drops down to 2.4 FPS. This is understandable, as the camera unloads the buffer while it is still being filled, and writing to that card is impressively fast. For JPEGs, this depends on compression set and on the image detail: for full size, 1:2.7 or 1:4 files, expect up to 20 frames at full rate with a fast card, and then a throttled, unlimited flow at about 3 FPS. Looks like at these writing speeds the CPU usage for JPEG compression is already becoming a factor. In these tests I used manual focus and exposure, just in case. In the sequential mode with single AF, focus and exposure are set before the first frame only, and then kept unchanged so that they do not slow the camera down. In the continuous AF mode the camera keeps refocusing between frames, which brings the effective frame rate down. Actually, except for some applications (sports, wildlife, including children), I consider 3 FPS fast enough. Still, autobracketing at 5 FPS is nice, especially when the subject is moving. |
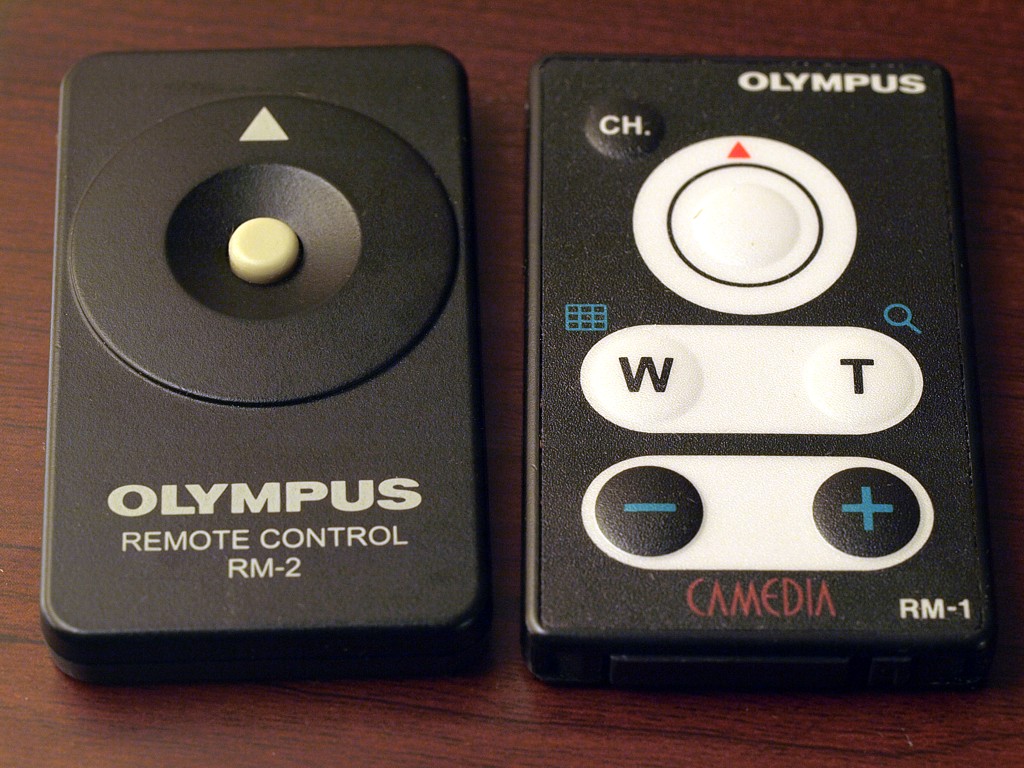
Remote release:
Two Olympus infrared remotes |
The wired remote is designated as RM-UC1, introduced for the E-410/E-510 series; it plugs into the USB socket on the back. This is different than the RM-CB1, used with the E-1 and E-3, and requiring its own, proprietary socket. The wired remote solution on the E-30 has three problems:
A wireless, infrared remote can also be used. I've used two models by Olympus:
Of these, the RM-1 is still listed by Olympus as current. One or the other used to be included in the box with older cameras. Not any longer: the RM-1 now a $30 option, seriously overpriced. There are less expensive third party alternatives, but I have no experience with those. Last but not least, the Olympus Studio software ($100) uses the USB connection to access all settings (except for zoom and focus), trigger the camera, and save images to the computer. I found this useful in studio work. The camera controller by Pine Tree Computing, offering remote control for Olympus cameras, lists some E-System members among supported models, but only up to the E-500. As the Web site never mentions any later models, I am assuming the program does not support them. Another option: a radio remote. For some applications, like photographing birds at a feeder, this is the best solution. For the E-30 I bought an unmarked, Chinese model, sold on the eBay as FoToCoLa V2in1 (that's "two-in-one"). It works just fine from a 15-meter distance (including some interior walls); the receiver is mechanically mounted in the hot shoe and plugged, via a short cable, to the Video/USB socket on camera's back; the transmitter is just a small, elongated box with a button (in addition to the on/off switch). As a bonus, you can remove the receiver from the hot shoe and use it as a wired remote. Nicely made and functional at $30 or so.
In Europe, Hähnel offers the
|
|
Time-lapse sequences:
No | This feature, missing in the E-520 and E-3, it is still missing in the E-30. I do not understand this omission, as time-lapse should be quite easy to include; it can be found on many less-advanced cameras. |
|
Mirror lock:
Yes |
This introduces a delay between the moment the mirror goes up and the actual firing of the shutter. Mirror lock is used in sharpness-critical applications to reduce the effect of camera vibrations due to the mirror going up and then coming to rest in the top position.
For reasons unknown, Olympus refers to mirror lock as "Anti-shock". This is wrong: introducing a proprietary term for a generic feature, with an English name established for the last forty years. The mirror lock delay can be adjusted via the menu system from 1 to 30 seconds, or totally disabled (the default). Enabling it will create "locked" versions of all drive modes; all of them will now show in the sequence which has to be scrolled through when the drive mode is being changed. Not too smart. How often will I use the 5 FPS sequential rate in conjunction with a 10-second mirror lock? And, for crying out loud, why? And why do I have to scroll through all these options even if all I ever need is a single-frame mirror lock? An ugly design. Still, being able to activate mirror lock through a direct button (or Control Panel), without going through the menu system, is better than in the E-510, where only the last option was available. Better, but still not as good as it could be. Enabling mirror lock for individual drive modes would be a better solution; a simpler (but equally practical) one would be to get rid of the explicit mirror lock at all, and send the mirror up as soon as the release (remote or not) is pressed in the self-timer mode, which has an adjustable delay anyway. |
Dual viewing:
|
Live View allows to preview the scene on the LCD monitor, very much like in a point-and-shoot camera. While for most uses this is inferior to the "classic", optical viewing, in some situations and under some circumstances it has advantages: macro and infrared are two obvious examples. The remainder of this section deals only with optical viewing; Live View has its own chapter below. |
SLR viewing system:
Apparent finder size in Olympus SLRs, compared |
Weight and size concerns limit the size (and apparent size) of the viewfinder used in compact SLRs; on the other hand, a larger (and brighter) finder is a nice thing to have. This is why the designers have to reconcile these conflicting requirements; in the E-30 they ended up with (I believe) a reasonable compromise, see the apparent finder size comparison at the left. (The E-510, E-410, and E-420 have the same finder as the E-520.) According to Olympus, this design saves about 40% of the volume, 10 mm of the height, and 50% of the weight of the viewing system, compared to the E-3 (100% coverage, 1.15× magnification). In the E-1 the apparent finder size was exactly like in the E-30 (a bit more coverage, but a bit less magnification: 100%, 1.0×). To compare finder sizes across various DSLR lines, refer to a small separate article on that subject. My simple framing test shows a coverage of 98.2% in the horizontal dimension (with an estimated measurement error up to 0.5%); this agrees with the specs. There are no visible alignment problems. The focusing screen has eleven AF point marks and a circle showing the spot metering area (see below). A bit busy for my liking, like in the E-3. While the manual specifies the screen as fixed, Olympus offers an alternative FS-3 version (with grid lines), which can be installed by the factory service. |
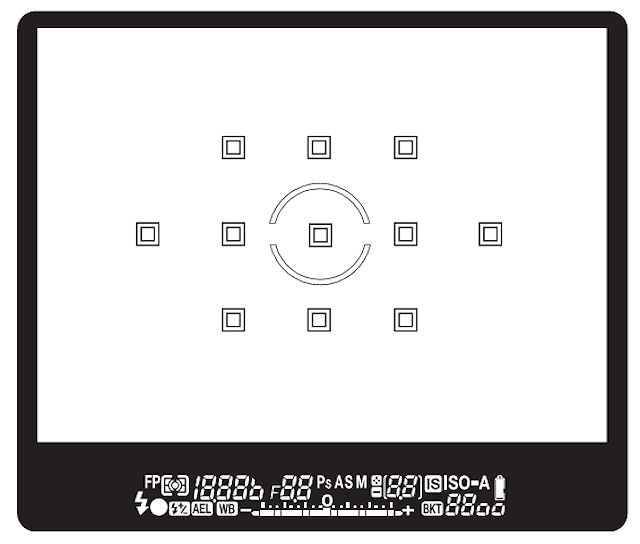
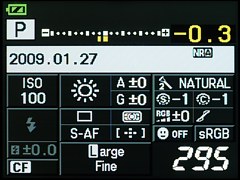
Information shown:
(From the Olympus E-30 manual) |
I didn't like the vertical data layout in the E-510/E-520 finder; using glasses, I had to move my eye sideways quite a bit to see it. I'm glad that in this camera the layout is horizontal, below the viewing area, like in the E-3. Believe me, this is better, even if I still have to move my eye up slightly to see the whole data display.
The information shown is quite comprehensive and sometimes it may become a bit overwhelming; luckily, only part of it is shown at any given time. The blue items on the list contain the full information (a value or a multi-state indicator); the others are just flags, indicating that a setting is off the default value, or that a feature is active. (Upon request from the Readers who may want to print this article in black-and-white, I'm adding asterisks to those.)
Picture from the E-3 [sic!] manual. Overall, the display is legible and well-arranged, no complaints here. One functional difference from the E-3 is that the exposure compensation scale doubles up as a level indicator, showing the left-to-right tilt of the camera. This display is activated when the shutter release is half-pressed (or the [Fn] button, if so assigned, used). |
|
Diopter adjustment:
From -3 to +1 diopters |
This is a typical range; should be OK for most users. The adjustment knob, to the left of the eyepiece, is adequate for the purpose, a bit easier to operate than in the E-510.
There are two eyecups offering more correction, see below. |
Other features:
|
The eyecup mount used in the E-30 is the same as in all Olympus SLRs except for the E-1.
The eyecup included with the camera is EP-5, the same as in the E-510/E-520, smaller than the EP-7 (standard with the E-3) or the slightly deeper EP-6. I like the latter two more; this may justify spending an extra $15 or so for a replacement. The ME-1 1.2× magnifying eyecup will fit the E-30, but it makes seeing the full display difficult without moving your eye around; that's why I wouldn't recommend it (still, try for yourself). It also offers less protection from stray light. I've never used (or seen) the two smaller eyecups offering +2 and -3 diopter correction, and listed on the Olympus site.
Some other E-System finder accessories are described in a separate story. To cut the cost (and size), the E-30 does not have an eyepiece shutter, like the one in the E-3 or E-1. There is a plastic, slide-on eyepiece cover (EPC-1) provided instead — but, at long last, this one can be attached to the camera strap. Mirror lockup is discussed in the section on drive modes. Depth-of-field preview has its own button near the bottom of the lens mount. In the E-510 you had to assign the [Fn] button to that; otherwise the feature would remain inaccessible. While I use the DoF preview very rarely, this is a better solution. |
|
Type:
Mirror-up, main imager used
|
Live View allows to view the scene before the picture is taken, using for that the same monitor which serves the purpose of displaying existing pictures. The image is generated by the same sensor which is used for actual picture-taking.
The camera which pioneered the Live View in SLRs, the E-330, had two such modes; in one of them the preview signal was generated by a separate sensor, dedicated solely to this function. While Olympus later abandoned this approach, it has been recently revisited by Sony in their A350. The single-sensor approach, introduced in the E-510, is conceptually simpler, but puts additional requirements on the imager (which has to be capable of continuous operation); this might have been one of the reasons that Olympus abandoned the proven and well-performing Kodak CCDs in favor of MOS chips. One way or another, the concept originally dismissed by other manufacturers as a non-essential novelty, soon became a standard feature on SLRs, even the top-tier, full-frame models. The tilting monitor is of a significant advantage here, see my remarks on that. The major Live View improvement from the E-3 is that in the new camera both autofocus and autoexposure can be performed by the imager (as opposed to the sensors which do that in the "regular" viewing mode), which should simplify the sequence of operations camera performs in Live View shooting. Here is how things work now in the default setting:
The Live View imager AF and AE were introduced in the E-520/E-420; as compared to the E-3 and E-510/E-410, there is less thumping and clapping now (although that could be reduced even more, see the remark to [3] above). Actually, there should be no mirror activity at all while the camera is in the Live View mode, as long as only imager AF and AE are used. To quote myself from the E-3 review: Another speed-up could be achieved by using the imager for autofocus and exposure metering; this could eliminate another two mirror travels. Consider it (almost) done. Actually, the E-30 offers two additional ways in which AE and AF are performed in Live View, see the next section. |
|
Imager-based AF and AE:
Yes |
As mentioned above, this is, inherited from the E-420/E-520, the main change in the Live View as compared to the E-3 (or E-510/E-410). This basically makes your SLR forget that it is an SLR; now it behaves almost exactly like any of the hundreds non-SLR models on the market.
The progress in sensor development over the last year or two brought us to the point where contrast-detection AF by the imager is good enough for many purposes, even if not as fast and accurate as phase-detection AF using dedicated sensors. Still, the E-30 provides three AF/AE options in Live View:
The contrast-detection AF using the imager is possible only with some, most recent, lenses from Olympus. These include the 14-42 mm and 40-150 mm "kit" lenses sold with the E-510/E-410 (or '20), the new 14-54 mm ZD II, and the 25 mm pancake; see my updated Four Thirds lens list. Obviously, the Sensor AF mode was provided for use with lenses not offering CD AF capability. The fact that the 14-54 mm ZD II was rushed to the market (identical to the previous version, except for CD AF) makes me believe that providing that in a firmware upgrade is not an option. Users who prefer the accuracy of the dedicated AF circuitry even with the "new" lenses, will, obviously, switch to the Hybrid AF, where CD AF is used just for viewing, not for picture-taking. I wouldn't make much of an issue of all that: after all, the Live View is just a secondary way of using your SLR. In eighteen months with the E-510, I've used it maybe six times: for infrared and tabletop photography. In addition, manual focusing becomes quite effective in the Live View mode thanks to the option of magnifying the display (see below). |
Live View data display and options:
|
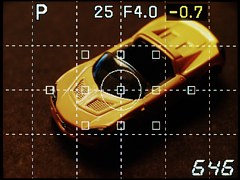
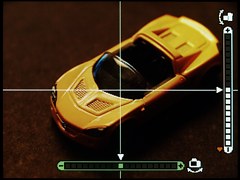
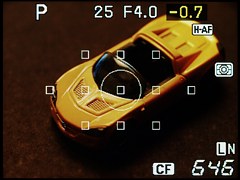
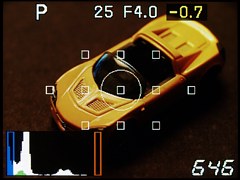
Mercifully, not all this is shown at once, as that would make the Live View display largely unreadable.
Pressing the [INFO] button switches the data overlayed on the previewed image between nine (!) display configurations. Most of us will not want to scroll through all nine configurations, content with three of four. This is why all of them except the basic information (number six in the table below) can be disabled. Actually, the level gauge display cannot, but the level gauge functionality itself can. The effect is not exactly the same, because then the feature becomes unavailable also outside the Live View. Instead of describing these displays, let me just show you the pictures: |
|
|

| |

|
|
| |
|
|
|
|
Autofocus:
Passive TTL
|
The autofocus system in the E-30 is exactly the same as in the E-3, which means state-of-the-art. Instead of copying this section from the E-3 review, I'm providing here a more concise description; for the full version see what I wrote on the E-3 focusing. Just remember to hit the Backspace key in your browser after you are done reading that section.
Obviously, this section covers only the "regular" AF, as opposed to the contrast-detection AF used in the Live View mode and described elsewhere. |
|
Number and type of sensors:
Eleven, twin cross> |
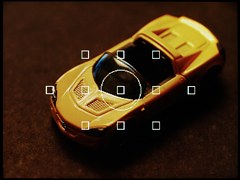
Eleven sensors in a wide pattern can be useful in casual shooting; for more critical applications I prefer using just the central spot or a 5-point cross pattern. Still, in some situations, like when using a tripod, being able to switch to another focus point is very useful.
All these sensors are sensitive to both horizontal and vertical detail; in many cameras only the central one is (or just a few are). All eleven are of the "twin" type, each with a double sensing array; this should increase focusing accuracy. |
|
Autofocus EV range:
From EV -2 to 19 (with an F/2 lens) |
Same as in the E-3, four times (2 EV) more sensitive than in the E-510.
The low end of -2 EV means exposures of up to 16 seconds at ISO 100, full lens aperture, regardless of that aperture. While I haven't tested this on the E-30, with the E-3 I was able to autofocus down to 30 seconds at full aperture, which is 1 EV lower than claimed. I do not have any means to test the AF speed of a camera, but it looks fast and responsive in the E-30, at par with the E-3, which claimed to be a record-holder in this area. According to David Rasnake (see Other E-30 resources), the E-30 focuses faster than Canon 50D or Nikon D90 (0.14 s versus 0.17 or 0.19 s, respectively; not that this is a really significant difference), and about twice as fast as competing models from Sony and Pentax. This is under sufficient light levels; at ISO 100, full-aperture exposures longer than 1/4 s, I've checked the D-300 to be faster than E-3; the same probably holds true for the D90 and 50D. |
Focusing modes:
|
The single AF mode finds the focus and freezes it when the shutter release is half-pressed (this can be reassigned. In the continuous AF mode the camera will keep adjusting the focus until the mirror goes up just before opening the shutter. The latter is predictive, following and out-guessing the subject position for the moment the picture is taken.
I'm not enough of an action photographer to tell you how well that works. Maybe one day; for the time being I'm staying in the S-AF camp. The "+MF" modes allow you to adjust the focus manually after the camera found it. For some newer lenses (the 12-60 mm ZD is the only one I'm sure of) the manual adjustment can be made regardless of the focus mode setting. In the manual focus mode, the AF system provides a focus confirmation blink in the viewfinder, but only with Four Thirds lenses. AF "on demand" can be set up by switching to the MF mode, if the [AEL/AFL] button is set appropriately for that mode. I found this feature quite useful; sometimes a life-saver. For reasons which escape me, Olympus decided not to restore the focus bracketing feature, which was very nicely implemented in the E-500 and then removed from later models. For a discerning user, this is worth more than face detection (but, again, which market is the E-30 aimed at?). I'm even afraid to mention the hyperfocal switch, lest some may accuse me of bickering. |
|
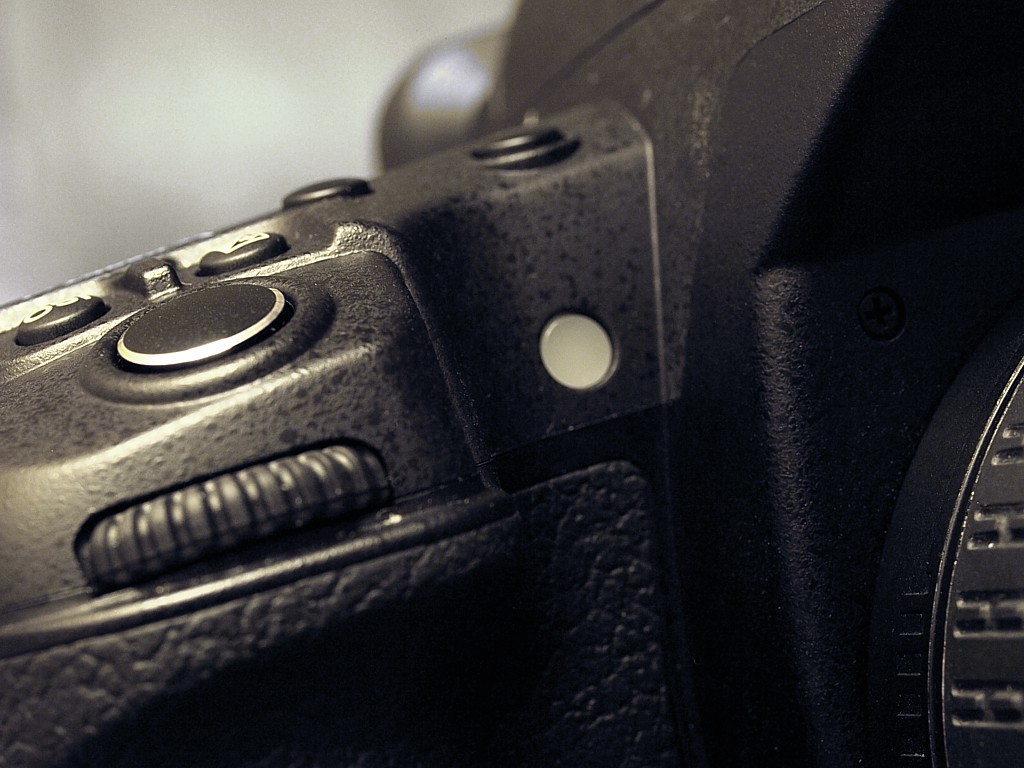
Autofocus lock:
Yes | The autofocus is locked (together with autoexposure) at a half-press of the shutter release. This can be customized, as described under AE lock. |
AF release lock:
|
By default, in the Single AF mode the shutter will not fire if the focus was not achieved. In Continuous AF it will fire in either case. While this arrangement makes sense, it can be customized.
The same setting decides if the shutter will fire before the flash is recharged. (This, obviously, works only with Olympus units, including the built-in one.) |
|
AF assist beam:
No; internal flash used instead | The stroboscopic AF-assist flash burst is quite obtrusive and annoying; a dedicated light would be much nicer. Such light is provided on Olympus flashes (FL-36, FL-50, "R" or not). |
|
AF calibration:
Yes, manual |
This feature is new in the E-30; it allows the user to adjust the autofocus if front- or back-focus is suspected.
The adjustment can be done globally (to remove any inconsistency between the location of the AF sensor and the imager), or it can be assigned to a particular lens (the camera will remember up to 20 lenses by name and serial number). In either case, individual corrections can be also applied to each of the eleven AF points. The procedure is manual (trial and error, really) and I've never performed it. Actually, I forgot to mention this feature in the original version of this article, and spotted the omission only when working on the E-620 review, where the implementation is identical. In that review I'm providing a more detailed description, fully applicable to the E-30. Instead of doing a copy-and-paste job, let me refer to it: here is a direct link to that section (just hit the Backspace key when done). |
|
Operating principle:
Body-based, moving sensor |
Olympus (like Pentax or Sony) chose the in-body image stabilization, as opposed to the in-lens solution used by Canon and Nikon. While I consider IS a transitional technology (raising sensor gain, or ISO values, will make it irrelevant in a few years, regardless of how it is done), I prefer this approach.
In this system, a gyroscopic device detects the camera/lens shake and drives a micromotor moving the sensor to compensate for the shaky image. Makers of lens-based IS systems claim that these can work better, because each implementation can be tweaked to the particular lens. I suspect this may be a sour apples attitude (remember dust shake-off and Live View, which nobody would ever need?), and the real rationale behind is the investment in legacy lenses and technology itself, originally developed for film cameras. There is certainly an advantage in being able to use image stabilization with any lens, not just with those which have it built-in. Frankly, I am disappointed that Panasonic went the other way in their Four Thirds (and Micro Four Thirds) cameras. The Panasonic/Leica IS lenses can be used on Olympus cameras, with either the in-lens or in-body stabilization enabled, but not both at the same time. The E-30 image stabilization can be used even with legacy lenses, i.e., ones providing no information exchange with the camera's body. In such cases, the lens focal length has to be entered into the camera by hand; this information is necessary to adjust the magnitude (possibly other parameters) of the correction. |
Operating modes:
|
In the two-dimensional mode (referred to as Mode 1 by Olympus) the camera movement compensation occurs both in the horizontal and vertical dimension. This is the mode suitable for most applications.
Mode 2 should be used when the camera is panning horizontally, and Mode 3 — vertically (or, more exactly, along the longer or shorter side of the frame, respectively), following a moving subject. Obviously, what we need then is image stabilization only in one (perpendicular) dimension. Mode 3 is being introduced as new in the E-30. Now I can stabilize my images when panning horizontally with the camera in a portrait orientation. (Really, I never had a need for that, but some users may.) When using a tripod, it is recommended to turn IS off. I am not sure why: maybe just in case (one less thing may go wrong), or maybe the camera may try to do something stupid (the nature of handheld shake is different than that of tripod shake, if any). |
|
Stabilization effectiveness:
2 to 5 EV (claimed by Olympus)
|
These values are supposed to reflect the average differences between longest handholdable shutter speeds with and without IS enabled. 2 to 5 EV means exposures from 4 to 32 times longer, not too shabby, but, remember, as a physicist I've been trained to be a skeptic.
Obviously, Olympus does not want to bother us with any information how (and with what lenses) these numbers were generated (sadly, I'm getting used to that). Anyway, this looks way too optimistic. Besides, the actual average gain must depend on the focal length of the lens used, its weight and shape, your shooting technique, plus, possibly, other factors — but, a factor of thirty?? I find such claims suspect, especially when not supported with any hard data, and without even a hint on how they were arrived to.
To see what improvement IS brings to the E-510 and E-3 I have developed I have no reason to expect that the results will be significantly different for the E-30, but I'm going to test that one day, including the focal length of 300 mm (where the benefits may be more visible). If and when I do that, the results will be posted as a separate article. Even if these values fall short of Olympus claims, I do not find them disappointing. I am sure that other manufacturers stretch the truth in a similar way; this is the way the industry works. |
|
Internal:
GN 13 m at ISO 100 |
This is the same as in the E-30, a tad more than in the E-510 (GN 12).
In the default setting, the flash will pop out automatically when the camera decides to use it. This is one of the first features I disable on a new camera (luckily, it can be disabled!) — those who do not know whether to use flash or not, should buy just an all-auto camera for better results and worry-free operation. An extra penalty is that after popping up the flash needs a few seconds to charge, so that the moment you wanted to capture may pass. When you pop the flash manually (by pressing the flash button), the unit becomes charging right away, so it will be usually ready when you need it. The unit is situated a bit lower than in the E-3: obvious, due to the reduction in body height. Larger lenses (like the 12-60 mm ZD) may therefore cast shadow into the image; removing the lens hood may help. The recharge time is usually less than three seconds. This may vary, depending how did the preceding flash use deplete the capacitor charge (aperture, ISO, subject distance). |
|
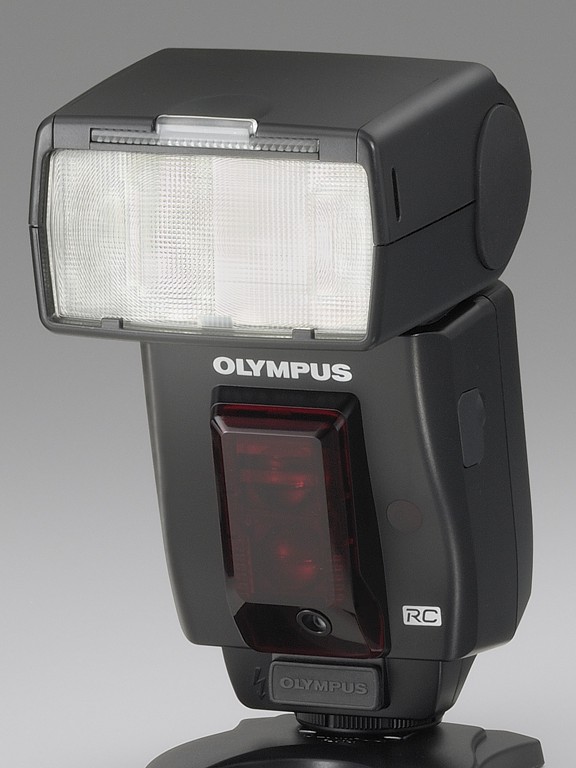
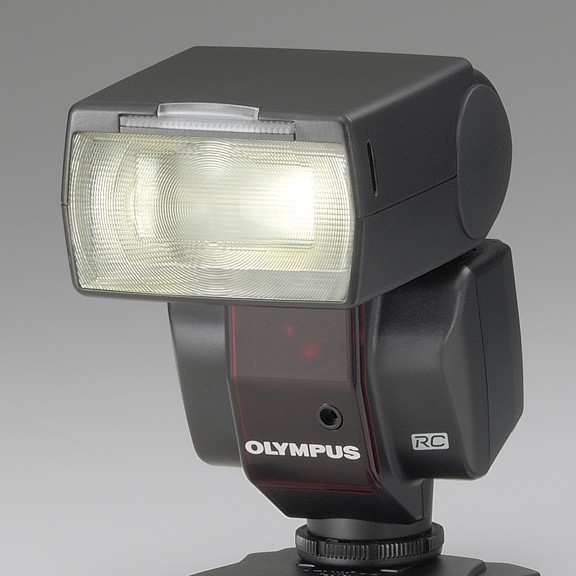
External:
Olympus dedicated flash system
Both units (FL-50 and FL-36) shown in the same scale |
The Olympus flash system includes three hot-shoe models: FL-50R, FL-36R, and FL-20, plus a ring flash and a dual on-lens flash. The older FL-36 and FL-50 provide the same capabilities as their "R" counterparts, except for the ability to be remotely controlled from the built-in unit. Unless you are planning a remote-controlled, multi-flash studio setup, the older version are a better buy, while they last.
The Olympus flash system is described in another article (which needs to be updated regarding the "R" series); the FL-36 has its own page. Refer to these articles for details. While the FL-20 is too weak for any "serious" use, it is extremely pocketable, and can be handy just to provide a light source removed further up from the optical axis (no lens shadows). The FL-36 ("R" or not), still quite portable, is OK for direct use, but barely adequate for bounced light, even if it provides tilt and swivel; that's the flash I'm using now. The FL-50 is a very good unit: it has adequate power and all control options, and its main disadvantage is the price tag ($430 or so). Unfortunately, both of the Olympus tilt/swivel flashes are missing a second burner to provide a fill when the main light is bounced. Believe me, this improves the results from a single unit a lot! Metz from Germany makes at least two flashes working with the E-System cameras: the Mecablitz 48 AF-1 and Mecablitz 58 AF-1. I had very positive reports on the latter, which offers not only full Olympus compatibility (including the "R" thing and fast-time synchronization, or the Super FP mode, see below), but also the second burner. It is slightly less expensive than the FL-50R; regardless of that, this will be the next flash I'm getting when I need one. |
|
Remotely controlled flash:
Yes, up to 12 units in 3 groups
The RC Flash Control Panel |
The remote units get information from the built-in unit via a burst of light (visible or infrared, unclear). Without any experience with the "R" flashes, I can just repeat what I've read.
If the RC Flash feature is enabled in the Settings, the Control Panel will have another page (accessible with the [Info] button), setting up the remote flash system. Up to three groups of remote flashes can be controlled, and for each group independently you can set a number of parameters, most importantly, the exposure mode: TTL, Auto, on Manual. TTL is the pre-flash based metering, Auto uses the flash's own sensor system to measure the light, and Manual is preset to a fixed output. I have no idea why would I want one group to use TTL metering, and another one — its own light sensors, but maybe there is a reason. As I said, I've never used the Olympus multiple flash setup. |
|
Slave flash option:
Yes. |
Slave units can be triggered by the built-in flash, which must be set to manual. This is to avoid the pre-flash triggering the slave, and also because neither flash knows the other unit's output. The intensity of the internal unit can be adjusted to provide the trigger as well as the proper amount of fill light. |
External connections:
|
In addition to Olympus dedicated units, the hot shoe will accept any generic flash with a single contact pin. (Some systems, like Sony, do not allow for that.)
Olympus offers a number of cables used to connect these two to off-camera flashes or flash brackets. I haven't used any of them. The flash socket on the camera front will work with most flash units ever made, as long as the voltage is not too high (see below). Its tiny screw-on cap is the first thing you will lose as soon as you take it off. |
|
Non-dedicated flash units:
Yes, up to 12V (?) trigger voltage |
It is unclear what is the highest safe voltage on the E-30's hot shoe, but I am sure 12 V is OK. You may be fine with more, although I wouldn't recommend that.
Some of the older flashes may have up to 300 V on the contact pin, and this would certainly fry the camera's circuitry. Non-dedicated units (including the older FL-40 by Olympus) can provide exposure automation with use of the unit's own metering circuitry, with the camera's shutter speed and aperture set manually. There is no information exchange between these flashes and the camera; the latter just has to be set to the aperture required by the flash, and then it closes the circuit. The flash itself measures the light scattered off the subject and throttles the output when it has enough. Actually, this is not more complicated than using a "full auto", dedicated unit, at a fraction of the price, and the results are good and predictable. The rest of this section will deal with Olympus units only (or the internal one). |
Flash modes:
|
Some of these are available only in particular autoexposure modes, as shown in brackets []. This is not a limitation; some exposure and flash mode combinations simply do not make sense. To change the flash mode, press the flash button (to the left of the prism hood) and turn the rear control wheel.
Manual setting of the flash power via the camera is an option only for the built-in flash; this allows for a variable amount of fill-in and/or triggering slave units. The internal unit can be set to full, 1/4, 1/16, or 1/64 light output. Most of the external flashes have their own controls to allow this. In both Auto modes the camera decides whether to use the flash. Like the auto pop-up feature, this is an evil thing, as the decision should be left to the photographer. In the red eye modes the flash emits a preliminary burst of light, intended to have the subject's pupils contract. This may (or may not) reduce the risk of getting the "red eye effect". Moving the flash unit further away from the lens axis works better in this aspect. The Slow modes are used to provide a mix of ambient and flash light. As I've checked on the E-3, this is implemented in a strange way: the camera sets the exposure for the ambient light, and then adds flash on top of it, without modifying the first component. Until I find some time to check this feature on the E-30, I'm assuming it works the same way, which does not make much sense. Some camera systems have a very useful option: choosing the flash fill ratio. This is missing in Olympus models. To make things worse, the information on slow synch mode in the manual (one paragraph total) is just useless. The first-curtain (default) and second-curtain synchronization in slow modes differ in when exactly the flash fires: just after the shutter is fully open, or just before it starts closing again. Depending on that, any motion streaks due to the subject exposure by the ambient light will precede the flash-generated image or follow it, respectively. Off disables the built-in or external flash (even if it is raised or turned on). The internal unit, if raised, will still be used for focus assist. |
|
Flash compensation:
From -3 to +3 EV. |
This compensation can be applied on top of or instead of the regular exposure compensation, depending on your preference settings. To adjust it, press the flash button and turn the front control wheel.
In addition, an extra correction can be dialed in on Olympus flashes (FL-36, FL-50). This will be applied on top of any exposure compensation set on the camera. |
|
Flash metering:
Through-the-lens pre-flash. | The flash sends a single pre-flash just before the actual exposure. This, reflected from the subject and metered by the camera, is used to set the aperture and/or the duration of the flash output. |
Max. flash synch speed:
|
With non-dedicated, third-party flashes, 1/320 s seems like a safe high synchronization speed, a tad above the official specs. At shorter exposures (up to 1/400 s or so) you can get a full synchronization when the flash is used well below the full power, which depends on many factors, including the particular flash model. This means that the shortest exposure at which the shutter is fully open is 1/320 s or a bit less (shorter). With a dedicated flash the camera will override any shutter speed setting shorter than 1/250 s so that it will stay at or below that value. (See the exception below.) The Super FP mode (available with the FL-36 and FL-50, "R" or not) allows for flash synchronization at any shutter speed, at the expense of lower effective flash intensity (guide number) and higher power usage. In this mode the flash sends a few hundred of small light bursts, jointly covering the whole time it takes the shutter to travel the whole frame height. This assures uniform exposure of the whole frame at shutter speeds all the way to 1/8000 s. The Super FP is useful when the flash is used as a fill, and the ambient light calls for exposures shorter than 1/250 s. It is not available with the built-in unit, which is just not powerful enough. |
White Balance:
|
A wide choice of white balance options, but not unlike what other cameras offer.
First to all, you have to remember that the WB setting is applied not during actual picture-taking, but only at the stage of raw-to-RGB conversion (whether in-camera or in postprocessing). This means that there is no white balance applied to the raw (ORF) image, if you use that format. Raw files store only the information on what WB was set on the camera when the picture was taken, but this is only used at the postprocessing stage — if the WB option there is set to "as shot". A WB postprocessing correction can be also applied to saved JPEG images. While in most cases this works just fine, the magnitude of that adjustment is more limited. This is the reason why some prefer to use the raw format when faced with tricky color situations. The Auto WB setting is what most people use most of the time. The camera comes up with what it thinks will be the best white balance for a given scene. This is not so simple, and sometimes just impossible, regardless of technology used, especially if the scene does not contain significant white (or gray) areas. (Is this a white shirt in a yellowish light, or a yellow shirt in white light?) In the E-30 we have an external WB sensor (see below), which may help here. A more experienced photographer (or even I) would prefer to set the WB to one of the predefined settings, corresponding to various light sources:
You can also use the Custom WB and set the color temperature directly. Raise that value to get warmer (more reddish) images, lower it to get them colder (more bluish). The adjustment range in the E-30 is quite wide, especially at the low end, where it goes down to 2000K: low enough for low-wattage bulbs. Adjusting the color temperature can be done with use of the [+/-] button (plus the dial) during the WB mode selection, a feature easy to miss. The Reference WB allows the white balance to be set by reading the light of a white (or gray) surface. It works very well; in some situations this may be the only reliable way of WB setting. The E-30 provides slots to store four such readings. To access Reference WB, it has to be previously assigned to the [Fn] (user-defined) button. Pressing that button and the shutter release will cause a test picture to be taken and analyzed, and the setting stored for a later recall. The process may fail under some circumstances: non-uniform reference surface, or mixed light sources. Unfortunately, if you assign the Reference WB to the [Fn] button, it can't be used for anything else. There should be a way around it, similar to setting the value in Custom WB, mentioned above. All WB settings can share a common correction (in ±7 steps each in amber-blue and green-magenta planes), or each can be individually modified. If you complain your camera renders colors too cool, just adjust this. For some reasons, Olympus no longer refers to the Red-Blue direction, but to Amber-Blue instead. I'm not sure if this is just a change in terminology, or if there are some subtle changes in the adjustment itself. (The new naming is more accurate anyway, as it is cyan, not blue, which is complementary to red.) |
WB Sensors:
|
The E-30 (like E-3) has an external WB sensor, aiming to improve the auto white balance setting, as it works not unlike an incident light meter, measuring (to a large extent, at least) the color temperature of the light illuminating the subject rather than reflected from it.
While this will not replace a stand-alone incident light meter, it should help. This sensor can be turned off from one of the setup menus, but it you are using Auto WB, I would recommend keeping it on. For other WB modes it is irrelevant. |
|
WB bracketing:
Three steps each in one or two color planes; three or nine frames total. |
White balance bracketing is a bit different than other kinds, as only one frame is really shot. Only during the raw-to-RGB conversion the camera generates three or nine JPEG files, each with a different WB adjustment.
This is why I consider this feature rather useless. Instead of waiting for nine JPEGs to be written out to the card, just save one raw file and adjust the WB in postprocessing. |
|
Noise suppression:
Yes, both static and random |
The two components of noise, static (fixed) and random, are caused by different reasons and prevail at different exposure times (long and short, respectively). They are handled differently in the E-30 (or other recent Olympus SLRs).
|
|
Color space:
sRGB or Adobe RGB | This defines how the colors are represented by a mixture of three basic components. It should be left at the (default) sRGB, unless you are really knowledgeable about color profiles and calibration, color spaces and related issues. Trial and error is not the right approach here. Your pictures (or mine) will nor suddenly become better if you switch to the Adobe RGB. |
Picture Modes:
|
This is like being able to switch between six different kinds of film, with different color and tonality characteristics. I like this option since the E-500; other camera brands now also offer similar features.
Each of these presets can be assigned values for image conversion parameters (see the next section). These values are persistent: the camera remembers them for each Picture Mode even when you switch between those. The Portrait and Custom Picture Modes, introduced originally in the E-3, have been retained in the E-30. The Portrait mode should provide better rendition of skin tones, and the Custom one is a slot for user-defined preferences. The latter is set up starting from one of the other modes used as a template; it also remembers the Gradation setting (the others do not), see below. Because Picture Modes are applied only in the raw-to-RGB conversion process, they do not affect raw image files. The settings are, however, stored inside those files, so that they can be used (or not) when such conversion is done in off-camera development, using the "as shot" selection. Obviously, this note also applies to the Image Adjustment section below. |
Image adjustment:
|
Sharpness, contrast, and saturation are remembered as set for each Picture Mode. They can be adjusted directly from the Control Panel, thus affecting the mode currently used. The available adjustments range from -2 to +2, in some arbitrary units. They are, however, not absolute values, being added on top of the "hidden" presets for each Picture Mode. In other words, the Vivid mode with contrast set to zero is not the same as Muted using the same (visible) setting.
While Olympus is busy hiding information from the users, a good EXIF reader (like Phil Harvey's ExifTool) will extract the information on absolute settings; for more detail, see the E-3 information on the subject, fully applicable to the E-30. Now, a brief description of parameters on this list.
I believe Gradation should also become a part of Picture Modes, individually adjustable for each (now it is remembered only for the Custom mode). This would offer the user more flexibility, in addition to being more consistent. In the Monotone [sic!] Picture Mode you cannot adjust saturation (understandably) or gradation (for unclear reasons), but you can apply a color "filter" to the raw-to-mono conversion. For example, an orange or red filter will deepen the sky. You can also add a color tint to the resulting monochrome image. Last time I took English classes was forty years ago; at that time a word used for a black-and-white (even tinted) picture was monochrome, while monotone meant "repetitive" or " of constant pitch" (about sound). Looks like the English language is really progressing in the last years, especially in Tokyo. |
Lens correction:
|
Four Thirds lenses transfer to the camera the information on the geometric distortion they introduce (especially at wide angles) and on the light fall-off away from the lens axis (vignetting).
The light fall-off can be handled in- or off-camera (the latter only if Olympus software is used). Interestingly, the correction seems to be applied during analog-to-digital conversion (not at raw-to-RGB stage, as I thought before), so that the raw files are affected. This is indicated by the fact that the Auto Shading Compensation option in Olympus Studio is disabled if that option in the camera was selected when a raw file was recorded. The feature works, sort of, nothing to write home about. For the 14-42 mm ZD at the widest setting, it removes a part (perhaps half, maybe less) of the effect. For the 12-60 mm ZD, where the fall-off is less visible, it does practically nothing. Geometric distortion can be corrected in images saved as JPEG or ORF files, in postprocessing only. This works OK for simple distortion patterns (barrel or pincushion). For the 12-60 mm ZD lens, where at the wide end the distortion has a prominent higher-order component (in plain English: a wavy shape), the correction is significantly less effective. |
In-camera image editing
|
The raw-to-JPEG conversion uses the same software as in the conversion automatically applied when a picture is taken. The image adjustment parameters (for example: white balance, sharpening, noise filter) are not applied as set when the picture was taken, but as set at the moment of performing the conversion. Except for image overlay (see below), the other editing functions are applied to RGB images — whether saved to a file or resulting from a just-done conversion, before saving:
There is also a separate function, Image Overlay, applicable only to images saved as raw files. You can select from two to four such images and overlay them into one, adjusting individual input of each into the final effect. Once again, with the LCD monitor being the only way to judge the effect, this does not seem to be very useful. Generally, I consider all functions in this group (except, maybe, the raw development) rather useless and of no value in a camera aimed at a serious (or semi-serious) photographer. I wish these resources were redirected to something genuinely useful (at least for some users), like time-lapse sequences, hyperfocal distance setting, or manual focus confirmation for legacy lenses. |
Art Modes:
|
These pre-packaged setups, accessible by setting the mode dial to the [Art/Scn] position, affect multiple parameters, both ones usually associated with picture taking (like exposure settings) and those related to image postprocessing (like color saturation).
They are (mostly, at least) applied when the captured image is converted into RGB. Including this feature into the E-30 seems to be a misunderstanding — but, still I gave it a try. The bottom line: pretty useless; a trinket you will try once or twice only to forget about it. Special effects like these should be applied to appropriate scenes only, and then adjusted as needed; an effect may work nicely with one scene, but not with another. Any image editor has dozens of them, to be tried out for a selected frame, adjusted, and then discarded or accepted. Doing the same in the camera is just a "keep it or trash it" alternative; usually the latter. Besides, evaluating the results on the camera's LCD monitor is usually inadequate for judgement. This way or another, Olympus gets my vote for the most useless feature introduced in a digital SLR; this will be hard to match. For the record: while switched to an Art Mode the camera activates program exposure, but most of the other parameters (exposure compensation, ISO, white balance, and some others) can still be adjusted, if via direct buttons only; the Control Panel can be used to display these variables but not to change them. This design is somewhat inconsistent, but it will affect only those using this feature. |
Scene modes:
|
A feature similar to the above, and also accessible by setting the mode dial to [Art/Scene]. As before, I'm at a loss why this feature was included into this camera.
The names are self-explanatory, except for DIS: Digital Image Stabilization, which is a fancy name for increasing the ISO to achieve faster shutter speeds, which helps to capture a moving subject (or reduce the effect of camera shake). Most of camera's parameter adjustments (even exposure compensation) are disabled in these modes; the one exception I could find was AF point selection. Maybe there are others — but this is a tertiary (not even a secondary) issue. There is nothing wrong with a camera, even an advanced one, being user-friendly. When this becomes a straightjacket, though, it becomes objectionable for even a moderately literate user. While the dedicated programs discussed above can be used as starting points for your own adjustments, the Scene Modes cannot. They also remain largely undocumented in the manual (except for totally trivial information). For the users who choose not to use them, they have just one impact: taking away (together with Art Modes) one valuable slot on the mode dial, which could have been better used for a custom exposure mode and setup. The panorama mode provides a display aid (in Live View only) to help in overlaying the frames in sequence as needed. For no technical reasons, it can be activated only when an Olympus-branded xD-Picture card is used, which I find unforgivable (as that could be the sole useful feature in this list). |
Aspect ratio:
|
I can bet this feature was designed by the same guy who was behind the Art Modes described above. It is equally useless, and has just one advantage: it is hidden deep down in one of the Settings sub-menus, so it does not stand in your way if you don't use it.
All it does is cropping the image (JPEG only) to a selected aspect ratio. In the Live View mode the preview shows the cropping rectangle; in the optical viewfinder you have to use your imagination: there is no framing aid of any kind (like in some APS film cameras). The aspect ratio selection was a close second in my most useless feature contest. It lost only because it does not occupy any room on the mode dial. |
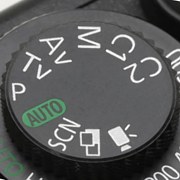
|
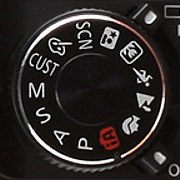
|
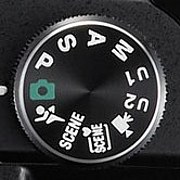
|
| |
| Canon G10 | Panasonic DMC-G1 | Nikon P90 | Olympus SP-590UZ |
|
This, I hope, can be fixed in a firmware update, by an optional assignment of a My Mode setting to the [Art/Scn] position on the mode dial. It is very unlikely that a person using the Art and Scene Modes will want to use a custom preset, and vice versa. Such a solution may satisfy the likely buyers of the E-30, at the same time allowing the marketing people to remain in their delusion that Art Modes will open to this camera a whole new market of photographers who cannot find this feature on any other semi-pro SLR. Close spacing between the exposure compensation and ISO buttons next to the shutter release requires applying some tactile memory when operating the compensation at eye level. Personally, I'm not worried much about it, having re-assigned this function to the front dial alone, and never experienced operating problems with this arrangement on the E-3 or E-30. (That button is placed better on the E-510/E-520, but it is the sole control in that area.) On the other hand, this leaves the compensation button not utilized. I would like to have an option to assign it to some other adjustment, so that there is less competition for the user-defined [Fn] function. This could allow, for example, for direct access to Picture Modes, or to image file format setting. Surprisingly, operating the front dial is easier than in the E-3, at least for me. No longer have I to reposition my hand to access it. This in spite of the E-30 body being less tall: perhaps something changed in camera contouring, or in the weight balance. Anyway, it feels better now. In the E-3 I had a problem with the four identically shaped buttons in a recess below the monitor. This remains in the E-30, and adding raised spacers between some of them did not help much. In particular, the Live View button could be moved elsewhere (I prefer its location on the E-510), or, at least, it could get another (pointed) shape to make it different from the others. Generally, the external controls in the E-30, except for the mode dial, remain very similar to those in its predecessor; any E-3 user will feel instantly at home. There are some small but well-thought improvements which, when added together, make the camera more of a pleasure to operate. The complaints I've read about too many buttons on this camera are unjustified. You cannot provide external access to many settings without complicating the interface. While some adjustments could be made with dedicated dials, those take more room than buttons, and the interface would become less consistent. I may have some quibbles about the ergonomics, or about the choice of functions accessible this way, but I would not complain about the E-30 controls being too complex. The Control Panel is shown on the color monitor and invoked with [INFO] button below. It displays most of the picture-taking settings of the camera, and allows to change the essential ones with a simple and consistent "select and scroll" approach, using the cursor keys to select a parameter and a control dial to change it. Similar solutions started recently showing up in competing models from other manufacturers, but (for me, at least) the one by Olympus seems most refined, usable, and complete. Olympus refers to it as Super Control Panel, but I will be skipping super in my write-up. Here is the full listing of what is shown and/or adjustable in the Control Panel:
Most of the these are also accessible via direct controls, and all (these which can be changed, that is) — from the menu system; the latter is a redundancy which I do not like. Like in the E-3, there is no longer a simplified version of the Control Panel display; one fewer button press when switching between various display modes. Aperture and shutter speed are shown in large digits on the top, and the exposure compensation is shown both numerically and graphically. If flash compensation is used, it will be added above the compensation scale; exposure bracketing is indicated (in addition to the bracketing symbol) by a modified display of exposure compensation below that scale in a mildly confusing (for me, at least) way. If the Remote Flash CP and/or Level Gauge options are enabled, then pressing the [INFO] button will switch between those displays and the regular Control Panel, or turn the screen off. As much as I like the Control Panel in the E-30, I have a list of issues which, as minor as most of them are, should be addressed. Unfortunately, the list is not shrinking since it was originally set up for the E-510:
My gripes and improvement suggestions aside, the Control Panel in the E-30 is really good-looking and functional, a pleasure to use. Sometimes (especially when switching between cameras) I use it more than direct controls.
There are five menus here, almost exactly inherited from the E-3:
The menu system in the E-3 was strongly rehauled from the E-510, and the improvements found their way down to the E-520/E-420. Still, I have some reservations about the (often) arbitrary and illogical assignment of particular functions to menus or sub-menus, which makes them difficult to find. As the menu tree in the E-30 is almost identical (just a few additions), the section on menu system in the E-3 is fully applicable here; With all that said, the current improvement is visible, and I'm already more at home with the menu system in the E-3 than I ever was with the E-510 or E-500, in spite of being more familiar with those cameras. The best thing about the menu system remains unchanged: you don't have to access it often. All (or almost all) settings which are likely to change, as they say, in the field, are accessible directly and/or via the Control Panel, and the menu should be used, as much as that is possible, only to customize your camera: set it and forget it. Don't get me wrong: some complexity, and the following confusion, is unavoidable because of the number of settings and options available, very generous in this camera. This, however, makes the logical arrangement of the menus even more important. The E-30 offers the same customization options as its predecessor, with a few minor additions. The intent behind that is to allow you to have the camera work your way, and then to enjoy it, being able to forget about the whole process — unless you change your preferences or working habits (or unless you upgrade your firmware; that usually obliterates all adjustments). Many of these options may look confusing because of insufficient documentation in the manual. To fill that gap, at least partially, I wrote a guide: Customizing the E-30 (largely based on, but significantly changed from a similar one for the E-3). I am not disappointed. For basic picture-taking, at normal outdoors light conditions (with ISO 100 to 400 used), this is a typical Olympus eye candy, reminding us the times when CCD sensors were used in E-System cameras. While some of the image-processing settings are set too high for my liking (contrast, sharpening), they can be easily tuned down. In any case, the amount of detail the camera captures (with a good lens, that is) is impressive, color and tonality most pleasing. Images have some "photographic" quality, unlike those from some cameras which may show better results on a test bench. You just have to compare images, not test results. |

|
Refer to my Image Samples, Part 1 for more commentary on that. Don't trust my opinion, see for yourself: some full-size (8 MB) images are included there for your scrutiny. Check also the set of comparative samples in the full ISO range, to see how the E-3 performs at higher gains and lower light levels. |
|
The 12-megapixel sensor combined with good lenses is capable of showing some quite amazing detail level. This is especially visible with noise filtering tuned all the way down. I'm still working on figuring out what settings to use for best overall results. At high ISO settings the camera shows a good performance as well. Let us face it: image quality above the base sensitivity of the sensor will always suffer from some contrast, dynamic range, and noise issues, but the question is how much. The news are quite good here: ISO up to 400 can be used for daily shooting without almost any visible effect. ISO 800 is almost as good: a progress since the E-510/E-520, maybe even from the E-3 (I will have to compare some samples to make sure this is not a wishful thinking). I will try to use ISO 800 in my wildlife photography with long lenses, but ISO 400 is really solid. ISO 1600 is OK or close for many uses (remember, I do not suffer from noise allergy). Some clustering can already be seen in the noise pattern (which is more objectionable than noise amplitude, commonly and wrongly used in most comparisons), but I have yet to see any banding effects. Actually, the increase in image contrast worries me more than noise itself. Then, the quality suffers a hit when you move to ISO 3200; quite visible when frames at various ISOs are compared by flipping through them in an image viewer. Still, even at this speed my images look no worse than scans from ISO 400 film from the Nineties. The color shift, visible at this setting in the E-3 is gone. Since the original posting of this article, I managed to do a full-fledged comparison of the E-30 against the E-3 regarding noise levels. The results confirm the more casual observations above: while there is slightly more noise in the E-30 at all ISOs, it is not a significant difference (although it is above what one would expect just from increasing the pixel density by 10% linear). Besides, comparing just the noise is not all; it can be always reduced at the expense of other image quality aspects. Importantly, however, the E-30 images at highest ISOs (1600 and up) do not seem to suffer from the occasional banding visible in the E-3, or from the color shift at ISO 3200. Generally, I like how the new camera performs in this department. To add things up, I am very pleased with the images from the E-30. The results are as good as from the E-3, and, at the highest ISOs, even a tad better (in spite of a mild noise increase). Now I have to choose the sharpness, contrast, and noise filtering settings I will like best. At this moment I'm leaning towards the same choice as I made for the E-3: sharpening and contrast at -1 (from Natural), noise filter at Low (although I'm tempted to set it to Off). A 150-page printed Instruction Manual comes with the camera. You can download a PDF file from the Olympus Web site. There are quite a few things I like about this manual. Unfortunately, there are also things I dislike about it, and very much so. What I like:
What I dislike:
As this manual is quite similar to the one included with the E-3, I will refer you to my comments on the latter, instead of largely repeating them here. A disappointing effort, accompanying a well-designed and executed camera — an offense not just to the readers, but also to the work of the engineering team. This is an updated version of the Olympus all-in-one software. While looking better than older versions, it is equally disappointing, mostly because lack of focus about the purpose of the program. Spending $100 or so on the Olympus Studio is not a bad idea. I did that, and I am not unhappy (if not thrilled, either). While I do have my complaints about it (how else?), it does a number of things right and it does not attempt to offend the user's intelligence. Note: Like it or not, you have to install the Olympus Master on a computer in order to perform firmware upgrades for the camera and/or lenses (unless you have the Olympus Studio installed). If you plan to use the raw image format, you may want to try the program, too, or the new version of Olympus Studio, included on the CD. (It will work with the registration key from previous versions.) Third-party raw-processing software was quite slow to catch up with the new camera; as of May, 2009, most of those programs still did not handle E-30 ORF files. The EXIF information format (including proprietary Olympus data) remains unchanged; my customized setup of ExifTool retrieves it just fine.
I bought just the camera body, with no lens included. The box contained also the following:
There was one item missing: the tiny, plastic screw-on cap to protect the flash PC socket. This proves my point, raised on many occasions: they get lost too easily; it may happen even before the camera leaves the factory. This was not enough of a reason to send the camera back to the dealer; at the moment I'm using such a cap taken off my old E-20; later I will probably splurge $5 or so to get a replacement. It took me just a week with the E-30 to like it enough to consider it not only the most attractive digital SLR in Olympus line-up to date, but also being capable to hold its own against the competition from other manufacturers. In the following ten months (this update: November, 2009) this opinion did not change; if anything, I like the camera even more. From a few thousand frames I shot with it, I can say that the image quality is first class. It is inherited from the E-3, without any ifs and buts, but seemingly with some small tweaks and improvements. Of those, the increase in pixel count is least important, but with a good lens (like the 12-60 mm and 50 mm Macro ZD I've been mostly using in my tests), the extra pixels are filled with detail, which allows for a higher degree of frame cropping, if necessary. (For uncropped images, 8 MP is more than enough to get very nice 12×16", or 30×40 cm prints.) The camera specs and features are very attractive, too. Again, no downgrading from the E-3, no corner cutting here. The only concessions have been made in the areas of construction robustness and weatherproofing (in addition to a smaller viewfinder). This is what many users, including myself, were expecting (or demanding) from Olympus: "give us a smaller, lighter E-3!", and these trade-offs were made to accommodate us in our wish. Fair enough. The weight and size of the E-30 are near the top limit of what I'm willing to live with (but still within it). This may be a subjective concern, but it was shared by many others; it was the main reason I decided against buying the E-3 after having used it for six weeks, and after having learned to appreciate it not just for the results it delivers. The controls and user interface are the best Olympus' effort to date. Yes, I do have my list of complaints in this department; some things could have been designed differently (for me: better), but that list is shorter than for any other camera I know. I can not only put the E-30 to a good use (this can be said of almost any SLR I've tried, and I try them at any opportunity), but I can actually enjoy the process of using it, and that's a lot. The adjustable monitor angle is a significant advantage over competing models (besides Olympus, only Sony and Panasonic seem to offer that), not as much in regular shooting, as in applications using the Live View. Individual cameras from Nikon, Canon, Pentax, or Sony may have this or that feature I like more, but as a whole the E-30 is a better-rounded package, closer to my ideal (as personal as such opinions always are). It does not seem to have a single deal-breaking flaw, which so often is the case with models I would have liked otherwise. Last but not least, we come to the area often underestimated in reviews, but important to a photographer focused on actually using the gear: customization and tweakability. Here, again, the E-30 shines. On one hand, the choice of adjustments in the picture-taking process and image-processing pipeline is most impressive — as always with Olympus SLRs, which do not put the photographer into a "take it or leave it" position. On the other, the controls can be largely customized to the user's preferences, working habits, and taste. The only really questionable decision (I promised myself not to use term "moronic" any more) was to include the Art and Scene Modes into the camera's feature set (well, maybe also multiple exposures and aspect ratio should be counted here). Many potential buyers knowing nothing about the E-30 and looking for a capable photographic instrument will just see that and walk away from that camera. Worse, these modes take away the space on the mode dial. This space would be better used for a custom (user-defined) mode, to which the E-30 now lacks an easy access. There is still a chance for a firmware fix, but this would require some guts of Olympus: a preference setting, assigning the current Art/Scene dial slot to a custom setting. Just one small thing to make me happy, while not getting rid of a feature (most probably) imposed on the designers by the marketing department. In any case, the dubious features aside, the E-30 has my enthusiastic recommendation. It is a camera many of us were waiting for. The pieces were put together in just the right way. For more comments and opinions on the E-30, to remind you again, see my First Look article. The price issue. The E-30 (body only) was originally priced in the States at $1300, about the same as the E-3. For some, this was more than they would expect. Certainly, a price around $1000 would not only make it easier on our wallets, but it also could bring Olympus more first-time buyers, lured with the word of mouth and willing to buy their way into the already famous selection of Zuiko glass. It is not up to me, however (or anyone else) to make business decisions for Olympus. Anyway, they've got my money, and I never had any regrets about it. In a free market a manufacturer charges for the product as much as they think they can get away with. For a good part of my life I used to live in a controlled economy, with prices set "fair" by the state, and it turned out to be a disaster. As of this update (November, 2009) the E-30 body sells at $900, with a laughable $50 extra for the 14-42 mm ZD lens. The $400 price drop means slightly more than a dollar per day for the pleasure and fun of using the camera in the last 300 days. Was it worth it? It depends; it was for me. Certainly, at the current price the E-30 is a most attractive buy. Comparison with the E-620. A common question is how does the E-620 compare, regarding features, performance, and results. More on this can be found in my E-620 review and accompanying articles; I have both cameras, I like them both, and I'm using both extensively. In short: while the '620 probably, if not certainly, offers a better value for money (November, 2009: $620), and while the compact body may be attractive to many (myself in this number), the image quality tips my scales in favor of the E-30, if not by a significant margin; this is the camera I would keep if I had to decide on just one. A slightly better ergonomics and viewfinder are just secondary arguments in favor of the E-30. (Actually, I could live with any current Olympus SLR, as long as I can keep my ZD lenses.) Oh, one more thing: the level gauge! I find it so useful that not having it in the '620 is a real disadvantage! Interestingly, the quantitative tests I have seen or performed myself, do not show any meaningful differences in results. But still, when postprocessing images from both cameras I am sure I can see a difference: on average, the images from the E-30 are less "digital", a bit less harsh, less "tired". Sometimes I suspect the camera makers of tweaking their models to look best in the most common tests (this used to happen in some other areas of technology, vide graphics adapters), as this is what carries the market; perhaps, on purpose or not, the '620 is a step in this direction? Anyway, this is a grand camera, worth any endorsement I can make. I am sure it will be bested with some new model the next year, but it should last me for a while. |
|
Here is what already has been posted now (November, 2009):
This list is limited only to articles which, in my subjective opinion, deserve your attention for the depth of coverage, some interesting insights, or another reason. It does not include "reviews" limited to re-phrasing of manufacturer's specs and some images casually taken with camera set to factory defaults.
|
|
|
My other articles related to the |
|
Olympus® is a registered trademark of the Olympus Corporation.
This page is not sponsored or endorsed by Olympus (or anyone else) and presents solely the views of the author. |
| Home: wrotniak.net | Search this site | Change font size |
| Posted 2009/01/25; last updated 2009/12/13; touched up 2013/11/02 | Copyright © 2009 by J. Andrzej Wrotniak |
.x.jpg)
.x.jpg)