Features and specifications
Some of these are as given by the manufacturer; some are my measurements or deductions. In either case I'm not just providing the information, but also explanation of what it means and some discussion with my unavoidable comments.
Body
|
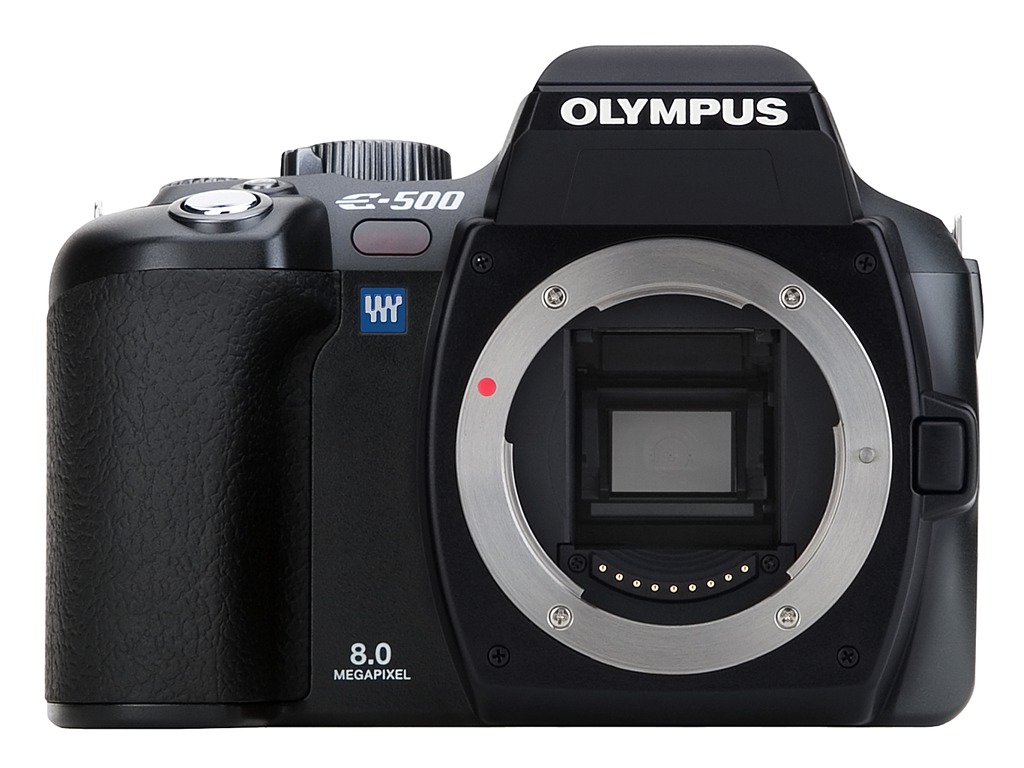
Construction:
Plastic (polycarbonate fiber?), metal inner frame.
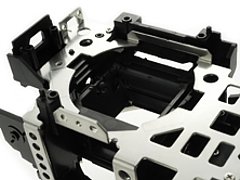
(Image by Olympus)
|
This was my major doubt before I was able to put my hands on this camera: will it feel right and solid enough? I'm quite unwilling to use a camera if it feels flimsy. The hands-on experience was reassuring: this is no Canon 350D (Digital Rebel XT). I am sure the new body is less expensive to make than the old one, but I can live with it more easily than with some cameras twice the price.
The picture at the left shows the inner frame construction: certainly, not a job like in heavy-duty, professional cameras, weighing twice as much, but better than nothing: it improves the dimensional rigidity of the body, without significantly adding to camera's weight.
|
|
Finish and feel:
Deep matte black; rubberized grip.
|
Too bad Olympus has given up on the black, crinkled finish of the E-300, which felt like metal, being also less prone to dirt and scratches than the smooth surface on the E-500. The new finish must be, again, less expensive, but it is not bad; again, no cheap feeling of most of the competition.
The rubberized grip surface does not extend on the flat part of the body front; there is also no rubberized thumb patch in the back; two niceties present on the older model. Another sign of economizing, but, again, still feels better than in other models in this price range, and not only.
The grip is good, and the camera is quite pleasant in touch. Even if an economy job, a good one.
|
|
Weatherproofing:
None
|
Don't expect it in this price range. OK with me, I would rather use this money elsewhere.
|
|
Size (WxHxD):
129.5×94.5×66 mm
|
This is a matter of taste, but with this model Olympus is right in the sweet spot, or very close. The E-1 (141×104×81 mm) it was just too large for me. The E-300 was better, but still too wide; in its review I wrote: "If the camera width could have been reduced by 15 mm or so, the proportions would be much better, and the size more enjoyable". Well, here you have it: 16 mm less. Visually, the size difference seems bigger than the numbers would indicate.
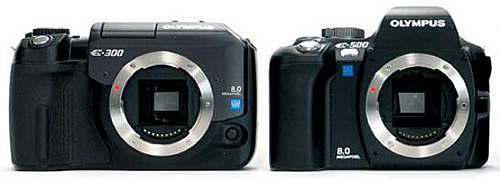
The E-500 is just 4.5 mm wider and 1.5 mm taller than the Pentax *ist DS2, or 1 mm narrower and 2 mm taller than the Minolta (excuse me, Konica Minolta) Maxxum 5D. Most importantly, shrinking the width and removing the left-hand body protrusion improved the camera balance; it feels better in hand. Together with the bundled 14-45 mm zoom the camera is a joy to handle; better than I expected.
|
|
Weight (body):
435 g
|
This is much less than the E-1 (665 g) or even E-300 (580 g). It is still enough for the camera to feel solid in hand, I'm relieved to report.
The Canon 350D and Nikon D50 tip the scales at 540 g, Minolta 5D at 590 g, and Pentax *ist DS — 505 g (no batteries or memory cards included in these numbers).
|
|
Index
Lenses
|
|
Interchangeable lenses:
Four Thirds standard
|
I do not understand all the whining about "limited lens availability" for Olympus SLRs. To the contrary, Olympus offers more lenses designed for digital cameras than any other brand (the full list can be found here). True, with other brand cameras you can use "legacy lenses" designed for the 35-mm film format, but their performance will in most cases be not as good, especially at full apertures and wider angles, where the light strikes the peripheral areas of the CCD surface too far from the perpendicular direction to be properly utilized. The film-camera lenses were also designed with 1.5 times less resolution in mind (although the more expensive ones may exceed this requirement).
The premium glass from Olympus is offered at premium prices (but try to find a 9.5 mm rectilinear wide angle zoom for any brand with an APS-sized sensor, at any price, to match the Olympus 7-14 mm zoom). Still, even budget and mid-line Olympus lenses offer very solid performance at prices within the means of an average amateur.
|
|
Mount size:
46 mm internal diameter
|
This is huge, compared to the sensor size. Most 35-mm SLR camera bayonets are smaller than that.
With the sensor being approximately half linear size of the 35-mm frame, one could expect the mount also to be half as large; that would offer a considerable size advantage to camera bodies and lenses. The "digital" lenses, however, cannot be designed just by reducing "film" ones proportionally to the sensor size: once again, the incident light angle requirement comes into play. It turns out that a 14-45 mm Four Thirds zoom, equivalent to a 28-90 mm zoom on a 35-mm film camera, will be similar in size in weight to the latter, not smaller at all. The "digital" lenses begin getting smaller than their "film" equivalents only at longer focal lengths.
|
|
Control coupling:
Electronic
|
There is no mechanical coupling between the camera body and lens; focusing is driven by a micromotor built into every lens, and aperture is also adjusted based on signals received from the body. Each lens even has its own microprocessor chip and the necessary firmware, which can be updated from the camera.
The zoom control is mechanical, and this is good: much more precise than any electronic adjustment by controls placed on camera's body or even by a "fly by wire" lens ring. The latter solution is, however, used for focusing (at least in the bundled zooms), and I'm not too happy with it, preferring manual focus to be mechanically driven.
|
Standard (bundled) lenses:
-
14-45 mm, F/3.5-5.6, and
-
40-150 mm, F/3.5-4.5
or
or
|
The camera I bought came in a kit with two zooms, the first option in the list shown. On most markets, including the United States, the E-500 will be also sold with the second option (14-45 mm only).
The third option (17.5-45 mm) seems less attractive, with the zoom starting only at 35 mm EFL (remember the factor of two!), but that lens weighs only 220 g and its length is 70 mm, which may make it a great hiking companion. Most probably this lens will not be sold separately, only as a part of a kit on some markets.
Both lenses of the two-lens kit have been available since the introduction of the E-300, and both turned out to be solid performers: obviously, Olympus chose to downgrade rather the specifications than the optical quality. While I consider the 14-54, F/2.8-3.5 zoom to be a more desirable choice, that lens alone costs $450 (in the U.S.).
I've used the 14-45 mm zoom for almost a year now and I like it. It shows some vignetting at wide angle when wide open, but at F/5.6 this goes away and the sharpness is also good corner-to-corner, see my E-300 samples. The 40-150 mm lens is even better.
Considering that the street price of the E-500 body is $700 and the kits are priced at $800 and $900, you can get each lens at just $100, far less than if bought separately. A very attractive pricing, indeed.
|
|
Index
Image sensor
|
|
Sensor type:
Full Frame Transfer CCD: KAF-8300CE by Kodak.
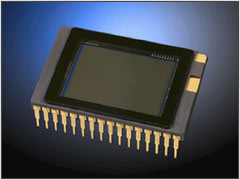
|
This is exactly the same sensor as the one used in the E-300. "Full Frame Transfer" means that the connecting circuitry runs beneath and not alongside the photosites, so that the latter are larger than in interline CCDs of comparable pixel density per area.
No amount of in-camera image processing will replace a better sensor, although some manufacturers seem to think differently. I'm glad Olympus decided to retain the premium Kodak chip in this camera; this means that the image quality should be at least as good as that from the E-300. If you are interested in details, refer to the specs sheet (with a link to a PDF document); an interesting and educational discussion of the KAF-8300CE has been also provided by Jason Busch at digitaldingus.com, especially if you have some background in sciences.
|
|
Effective sensor size:
17.3×13.0 mm
|
As per the Four Thirds standard. This is twice the linear size of the largest (2/3" nominal) sensors used in best non-SLR cameras, and half of the 35-mm film frame size.
Regarding the comparison with APS-sized sensors in most non-pro SLRs on the market, both are almost the same. Let me do the numbers: a typical APS-sized sensor (Canon 20D) is 22.2×14.8 mm. Because of the 3:2 proportions, a part of the longer dimension is wasted; the shorter one is what really counts if you print your images in any standard format besides the drugstore 4×6" (10×15 cm) size. This means that the effective linear sensor size in Four Thirds standard is 88% (divide 13 by 14.8) of that in the APS-sized breed.
|
|
Pixel count:
Nominal 8 megapixels, or 7.62 "binary" MP
|
To be exact, the number of photosites from which the image is recorded is 7,990,272, and this is 7.62 "binary" megapixels (where "mega" means 220, and not 106 like in sciences; one megabyte is about 1.049 million bytes).
Anyway, this is plenty. While I consider 5 MP sufficient for good 30×40 cm (12×16") prints, with the E-300 I've learned to appreciate the 60% larger pixel count which allows me for quite significant cropping, if needed, as long as the lens delivers enough detail (and usually it does).
|
|
Native image size:
3264×2448
|
Yes, of course, this is the blessed 4:3 aspect ratio. It allows me to compose my images directly (and tightly) in the viewfinder, without introducing a mental correction for the side areas which will usually have to be cropped out. I don't understand why other camera makers did not admit that most images are usually cropped to 4:3 (or close), and adjust the frame proportions accordingly.
Two interesting pieces of trivia:
-
In the Sixties, some Japanese camera makers, including Nikon, tried to introduce a 24×32 frame format, more pleasing to the eye, in 35-mm film cameras. This was never accepted, especially outside of Japan, perhaps due to unwillingness by photofinishers to process another format. These are the same guys who stubbornly refuse to offer 4:3 prints from the 95% of digital cameras being sold, using 4:3 image proportions.
-
Around the same time, an interesting gadget was sold in the U.S., allowing to mask out the outer edges of the 24×36 mm SLR viewing screen to the 4:3 or 5:4 aspect ratio, to help with more precise composing of pictures to be printed (Kenneth S. Tydings, Advanced Exakta-Exa Guide 1960). I wonder if someone will come up with the same ides for present-day digital SLRs stubbornly sticking to the 3:2 proportions.
Well, maybe this was not directly related to the E-500, but I thought you might find this entertaining.
|
|
Color depth:
12 bits per RGB component
|
This is like in the E-300 or E-1. The full information is retained only if your image is saved in the raw format; in JPEGs it will be converted to 8 BPC.
Still no JPEG 2000 support? Which of the camera makers will have the guts to bury the 20+ years old JPEG, or at least offer JPEG 2000 as an option? This format offers better compression at the same image quality, or better quality at the same compression, and is supported by all graphic applications of the last few years.
|
Capture sensitivity:
- ISO 100-400
- ISO 800-1600 (on demand)
|
ISO values above 400 are accessible only if activated by a separate option in the camera's settings. They are, I believe, achieved in the in-camera processing stage, and generate results not as good as those up to ISO 400. On the E-300, using the same sensor, ISO 800, while noisy, is quite usable, while the noise in ISO 1600 becomes prohibitive, useful only in emergencies.
As a new feature in the E-500, the ISO settings above 400 can be available with dynamic noise filtering turned on or off. The filtering (which is different than the low-signal, static noise reduction by dark frame subtraction) should help in reducing the visible noise at the expense of losing some detail — similar to the "Saran wrap" look in pictures from cameras applying the noise filter to work around noisier sensors.
There are two other new options related to the ISO settings:
-
The step in which ISO value is manually adjusted can be selected as 1 EV (100, 200, 400...) or 1/3 EV (100, 125, 160...). I don't think this is really important.
-
You can set the upper limit to which the autoexposure logic will raise ISO if needed (this happens with flash only). Nice.
|
Low-pass and anti-IR filter:
Separate, non-removable
(Picture by Olympus)
|
The low-pass filter is supposed to add some fuzziness to the image, to avoid Moirè patterns, which show up when the subject has periodic, fine detail of size comparable, in the image plane, to that of the pixel size. All cameras I've met have such a filter, although its details may vary.
October 2006: The new Leica M8 is the first model getting rid of the low-pass filter, so that resolution is not affected; the Moirè effect is addressed in the software which converts raw images into RGB.
The infrared-blocking filter protects the sensor from capturing the IR light which negatively affects the image, especially color balance. This feature is also common.
Both filters are placed just in front of the image sensor, and in some cameras they are combined into one. The Olympus drawing shown here suggests that in the E-500 they are implemented separately (my guess is that the anti-IR filter is shown in darker green), with the dust barrier (marked as SSWF, pink) being a separate layer.
|
|
Infrared sensitivity:
Exposure factor of 10.3 (or 7.3) EV, depending on batch.
|
According to Olympus, the IR-blocking filter has been improved in the E-500, which may suggest cutting the infrared off more effectively. While this may be a good news in general, for those few (including myself) who like to venture in IR photography it means less sensitivity (longer exposures) in IR shooting.
This is, however, not the whole truth. The first batches of E-500 still used the old anti-IR filter; the new one appeared only after a few weeks, maybe months. Details are discussed in a separate article on shooting IR with E-500; here are just the basic facts:
-
My first IR tests (October, 2005) have shown the E-500 to be as sensitive to infrared as the E-300; shooting with the R-72 IR filter required a 150× increase in exposure (7.3 EV steps).
-
In March of 2006 my camera was sent to Olympus for a shutter repair. When it came back, the IR sensitivity turned out to be much lower, with exposure ratio of 1300× (10.3 EV). The only possible explanation is that the whole assembly was replaced, including the filter.
Depending on when a particular camera was made, you may expect it to belong to the first or the second group.
|
|
Dust removal:
Yes, ultrasonic.
|
This may be the most underestimated feature of the E-System. The dust barrier (see the diagram above) seals the CCD in and vibrates for one second or so at a low-ultrasonic frequency of 25 kHz when the camera is turned on; the dust particles are shaken off and stick to an adhesive surface at the bottom of the mirror chamber. This surface has to be replaced by a service center every three years or so, according to Olympus, but this depends on how often and in what environment you change lenses.
This is how this works in theory, and when I started using E-System cameras, sharing this feature, I had some doubts how effective the system may be. After a year with the E-300 I can say that it really seems to work: my monthly check shows no traces of sensor dust, and I am changing lenses quite a lot.
Dust is a major issue in interchangeable-lens SLRs; every time you remove the lens, some particles may settle on the sensor (or rather the internal filter in front of it), resulting in dark specks in subsequently taken pictures. This is best visible in shots of smooth, uniform areas, like a blue, clear sky. The specks will be fuzzy, as the dust particles are not directly on top of the sensor but somewhat ahead of it; still, the effect is quite clear.
There is a booming, home-grown industry of tools for removing the dust from the front of the sensor: brushes, swabs, pads, tissues, liquids, and prayer beads; sometimes just repackaged or re-branded cosmetic accessories sold at ten times original price; there are also whole schools supporting one or another approach to performing this operation. I'm glad I don't have to do it.
October 2006: Looks like manufacturers who never bothered to mention the dust problem are now, after three years, jumping on the bandwagon. The new Canon 400D (a.k.a. XTi), Sony A100, and Pentax K10D are using a dust removal system similar to that in Olympus cameras.
|
|
Sensor cleaning option:
Yes, from the menu system
|
Accessible from one of the settings menus, this flips up the mirror, which will stay up until the camera is turned off, giving you access to the dust barrier in front of the CCD, if you feel an urgent need to clean it, see above.
|
|
Index
Image processing
|
White Balance:
- Auto
- Manual
- 7 presets
- User-defined
- Reference
|
Setting the white balance is like choosing the type of film and, optionally, corrective filter in color film photography. (Leaving it on Auto is like letting the salesman to make the decision.)
The Auto WB should work reasonably well if your picture contains a clear white area. Otherwise you're risking that the camera's decision will be less than optimal; you may also lose color consistency between consequent frames: a series of slightly different pictures differing just a little in what the frame contains may have quite different white balance settings, definitely not nice. This is not something particular to a given camera of maker, but a fact of life.
To give you some say in WB of your pictures, Olympus offers a number of presets, marking each with both a mnemonic icon and the color temperature value in degrees Kelvin:
-
Three daylight settings: sunny (5300K), cloudy (6000K), open shade (7500K);
-
One incandescent setting (3000K);
-
Three fluorescent settings (4000K, 4500K, 6600K);
In addition, there is one user-defined (custom) setting, to which you can assign any color temperature value to be later recalled quickly.
Usually the most precise way to set the white balance is to do it by reference: pointing the camera at a white or light-gray area, holding down the [Reference WB] button at top right, and pressing the shutter release. The camera takes a picture, and analyzes it without saving to memory card; the setting is then stored and can be recalled at will until it is changed.
This is one of the first features I checked on the E-500, and it seems to work very well, as good as on the E-300. The user interface has been, however, improved.
Note: The white balance settings are applied when the image is being converted from the raw data into an RGB (i.e., JPEG or TIFF) format; therefore any WB settings and adjustments do not affect images saved in the raw format (ORF). The settings, however, are stored in the ORF file header, and can be applied (or changed) when the image conversion is done on your computer.
|
WB adjustments:
- ±7 steps in red/cyan
- ±7 steps in green/magenta
|
The color balance can be adjusted in two planes: red/cyan and green/magenta. While the first one is, I believe, equivalent to an adjustment of color temperature, the other addresses possible problems, or our preferences, related to the overall green (or anti-green, which is magenta) cast.
A pair of adjustment values can be assigned independently to each of the presets, as well as to auto setting, and to the reference WB; in the last case the same correction will be retained even after you take another reading. This makes sense; for example, you may want to keep your open shade setting a little colder, and move any reference-metered ones towards red. The assigned custom setting, however, cannot be adjusted. You can also apply or cancel the WB adjustment to all settings in a single operation.
As much as I appreciate the creative freedom this feature offers, I haven't met anyone yet who would use it. I guess the most common use may be to tweak the adjustments to your liking in general, and leave them there.
|
|
WB bracketing:
Three frames each in red/cyan and green/magenta planes; up to nine frames total.
|
When this option is used, the camera takes just one picture, and saves a number of JPEG files, applying various color balancing when doing the raw-to-JPEG conversion. Three files are saved if the bracketing is applied to one dimension, nine — when to both. The magnitude of color shift between different files can be set to 2, 4, or 6 "steps", presumably the same ones as those used in WB adjustment described above.
Again, I do not see much use for this feature, being able to do the same in postprocessing, especially if the image is saved in the raw format.
|
|
Noise reduction:
Yes, both static and random
|
To reduce the static noise, visible at long exposures under low light, as soon as a picture is taken the camera records another frame at the same settings (in particular: ISO and exposure time), but this time without opening the shutter at all. That "dark" frame is then subtracted from the original one.
This works quite well, as the low-light noise is, indeed, mostly static, i.e., the sensor response at a given light level varies from one pixel (or rather photosite) to another, while remaining approximately the same for a given pixel from one frame to another. (You may want to see my noise article for an introduction to this subject.)
The random noise (unpredictable differences in light response of the same pixel) happens, with differing magnitude, at all light levels, and all camera makers apply some filtering to smooth it out. Smoothing means loss of image detail, but smart algorithms make the latter less painful, detecting the detail patterns and applying the smoothing so that these patterns are not affected (for example, along, not across a strand of hair). This is, however, quite tricky, and Olympus approaches the problem in a conservative manner, with as little noise filtering as they deem necessary — and I agree with that, preferring some graininess to a Saran Wrap look.
At ISO settings above 400, the E-500 gives you a choice between less and more aggressive dynamic noise reduction. These settings can be disabled at all, or enabled with or without the aggressive filtering on.
|
|
Color space:
sRGB or Adobe RGB
|
Actually, I never felt a need to use the Adobe RGB color space, and I doubt I'll use it on the E-500. It is there, however, for those who may need it (or who judge cameras by number of tick-marked features).
|
Picture Modes:
- Vivid
- Natural
- Muted
- Monotone
- Sepia
|
This is a setting new to the E-500. The manual does not say anything meaningful about differences between Vivid, Natural, and Muted; while the names suggest different color saturation settings, I suspect this is not all. (Actually, the color saturation can still be adjusted within each of these modes.)
This is quite annoying, unfortunately following a pattern: the engineers agonize about some solutions and decisions, and then the publication department decides we are not worthy to know anything about them. Let me quote the whole extent of the manual text regarding these settings:
[Vivid] Produces vivid tones.
[Natural] Produces neutral colors.
[Muted] Produces flat tone.
Thank you, Olympus, we wouldn't ever be able to figure this much out by ourselves, and we would be never capable of understanding any more meaningful explanations.
The two other Picture Modes are monochrome, or monotone (which means "having a single color" in my poor immigrant's English, therefore the naming is a bit misleading). The "Monotone" mode can be tinted blue, purple or green, and both can emulate filters used in B&W photography (yellow, orange, or red).
I consider the monochrome modes to be of marginal usability. Besides, applying a "filter" at the image conversion stage is not quite the same as putting a color filter in front of the lens, for a number of reasons.
The first three (color) modes can come quite handy, though — especially after some experimentation, as the sharpness, contrast, saturation, and gradation adjustments (see the next section) can be set and will be memorized independently for each of them (as well as for both mono modes). Once you do that, you will have a number of easily accessible presets, not unlike switching between different kinds of color slide film: think Velvia versus Ektachrome (see my E-500 customization article).
|
Image adjustment:
- Sharpness
- Contrast
- Saturation
- Gradation
|
Again, all these adjustments are applied during the conversion of the raw image into RGB, therefore if you store your pictures in the raw format, these decisions can be postponed until postprocessing.
For many users, however (including myself), JPEG files are good enough, therefore these settings are meaningful.
-
Sharpness can be adjusted within ±2 steps, whatever a "step" is. This is a contour enhancement process and, obviously, it will not restore any detail lost due to unsharp image or camera shake. In many cameras the default setting is too aggressive, being more pleasing at the first glance, but creating artifacts quite annoying at a closer look. I usually keep my sharpness at -2, applying the exact amount of sharpening (and the exact kind of it) in the postprocessing stage: once you butcher the image with excessive in-camera sharpening, the harm cannot be undone.
-
Contrast (±2 steps) is often confused with sharpness, and the mass market loves contrasty images with details lost in shadows and highlights. Most of the time I keep the contrast setting at -1, increasing it only as needed after stretching the tonal range in postprocessing.
-
Color saturation (shown as "RGB", ±2 steps) is also easy to overshoot. The default (zero) setting is close to my liking for most uses; on some Olympus cameras I've been using +1, but not on the E-300.
-
Gradation has three settings: Normal, High Key, and Low Key. This feature was also present on the E-300, and I never took it off Normal, preferring instead to raise or lower the middle part of the tonal curve as needed in postprocessing.
As I mentioned before, these adjustments are set and memorized independently for each of the Picture Modes discussed above.
|
Lens correction:
- Light fall-off
- Geometric distortion (in postprocessing)
|
The light fall-off (or vignetting) is sometimes seen with wider lenses, especially at full apertures, as darkening of image corners. Some of it is a flaw of the lens itself (smaller effective lens aperture for peripheries than for center), some may be due to the difference in incident angle of the light striking the sensor; therefore legacy lenses, developed for film SLRs usually show more of it.
The computer chip built into every Four Thirds lens transfers the information about the magnitude of the effect at the current focal length and aperture to the camera, which then may compensate for it during raw-to-RGB conversion. (This means that images stored as raw files will not be affected, although they carry the information to be used in postprocessing, if so chosen.)
The in-camera fall-off correction, activated as an option named "Shading Compensation" from the menu, works nicely and transparently in the E-500. The bundled 14-45 mm ZD lens, indeed, exhibits slight fall-off at the short end when fully open, so the correction comes in handy.
If you use the Olympus Master (or Olympus Studio) software in postprocessing, you may postpone this step; it can be applied to both raw and JPEG files.
Better image editing programs offer a similar feature, but it does not get the lens information; you have to adjust the correction by hand, or use a third-party plugin for a given lens profile; less convenient and more expensive.
The lens distortion, also usually most visible at wider angles, can be corrected in a similar way, but in postprocessing only. It also uses the data received from the lens, and can be applied to raw or JPEG files.
|
In-camera image editing
- Raw-to-JPEG conversion
- Conversion to monochrome
- Saturation adjustment
- Red eye fix
- Rotation
- Size reduction
|
These are editing functions applicable to the picture which is being viewed. The raw-to-JPEG conversion applies the current camera settings (not the ones used at shooting) and saves the result as a new JPEG file. The other operations are applied only to JPEG or TIFF images (in the latter case the result will be saved as JPEG).
I consider these not much more than trinkets; all can be performed more precisely in postprocessing, and it is quite difficult to judge the results on camera's monitor, even if it is as nice as that on the E-500.
While writing this review I wanted, with the help of my wife, to check how the red eye fix works. After half an hour of trying we had to give up: using the built-in flash we were not able to get a single case of red eye in the pictures we took of each other. Only after a few weeks I was lucky enough to see the effect in a family snapshot; as shown here, the red eye fix seems to really work.
Rotation (lossless, probably just by changing the orientation tag inside the file) and size reduction (rescaling to fewer pixels) are also available in case you are one of three people in your country who do not use a computer for postprocessing.
|
|
Index
File format and compression
|
Image file format:
- ORF (Olympus Raw Format)
- JPEG (four compressions)
- TIFF (uncompressed only)
|
The ORF files save the information as picked up from the CCD, without any processing. In particular, the individual signal values for red, green, and blue photosites are preserved, without being converted (interpolated in two out of three components) to RGB pixels. Yes, an 8 MP camera actually stores just 3 MP of information and gets the remaining amount by interpolation; this is the way in which camera makers present the numbers.
Anyway, many refer to raw files as "digital negatives", and this is right: any information lost in the conversion to RGB cannot be later restored, so if you are really picky about this, you want to store raw images. This however, adds an extra step of converting them to RGB in postprocessing. (See my Raw Image Format article if you need to know more on the subject.)
For most practical purposes (including all I do), JPEG files are just fine. They use compression in which some image detail is always lost, and some compression artifacts introduced. These effects can be minimized by using lower compression ratio (also referred to as higher quality).
I don't see a real need to use the TIFF format. It is uncompressed RGB, and the files are quite huge; usually I'm not able to distinguish images saved as TIFFs from 1:2.7 or 1:4 JPEGs, even at close scrutiny.
|
|
JPEG compression:
1:2.7, 1:4, 1:8, and 1:12
|
These are nominal values, as given by Olympus. The actual compression ratio will vary from image to image, depending on the amount of detail present.
Olympus uses lower compressions than most manufacturers, and this is a good thing. The choice on the E-500 includes 1:2.7, 1:4, 1:8, and 1:12 (the last one in new in this camera).
The 1:2.7 (best quality) compression is practically lossless, better than most of us actually need, but it produces largest files. With my other cameras I was usually switching between 1:4 and 1:8, finding the latter OK for most uses. The 1:12 setting can be resorted to when you want to save card space, but be prepared for your images to degrade in quality; check beforehand if this ratio meets your needs.
|
Average file size:
- Raw – 13.6 MB
- TIFF – 24.6 MB
- 1:2.7 JPEG – 6.4MB
- 1:4 JPEG – 4.5 MB
- 1:8 JPEG – 2.5 MB
- 1:12 JPEG – 1.8 MB
|
These sizes, as quoted by Olympus for 8MP images, are approximate (as are the nominal compression ratios). An uncompressed, 8 bits-per-color RGB image of 7.63 MP takes 22.9 MB (three bytes per pixel), plus the header information and housekeeping data; consistent with the TIFF file size shown here. An uncompressed but packed (i.e., not byte-aligned) raw file from that image uses 12 bits, or 1.5 bytes per pixel (really: photosite), which leads to 11.45 MB plus the overhead.
The JPEG file size (and actual compression ratio) will vary from image to image; still, the Olympus numbers seem to be rather inconsistent; for example, a 1:4 compression should result in 22.9/4 = 5.7 MB plus the overhead, not 4.5 MB. Yes, I know that a mean of reciprocals is not equal to a reciprocal of mean value, but the discrepancy seems to be too large anyway. This is, however, nitpicking, as the issue is of no practical importance.
|
Image size (pixels):
- 3264×2448 (8 MP, native)
- 3200×2400 (8 MP)
- 2560×1920 (5 MP)
- 1600×1200 (2 MP, UXGA)
- 1280×960 (1 MP)
- 1024×768 (XGA)
- 640×480 (VGA)
|
This is exactly like in the E-300. The non-native resolutions are available only for files saved in the JPEG image format.
I am somewhat puzzled with the 3200×2400 size. It is just 2% smaller than the native size, so why bother? If there is some reason behind this (which is possible), it remains well-hidden.
|
Size/compression combinations:
- SHQ (Super High Quality)
- HQ (High Quality)
- SQ (Standard Quality)
|
For the JPEG format, you cannot directly choose what combination of image size and compression the camera will use. You have to choose between SHQ, HQ, and SQ combo meals, and the actual parameters are assigned to these from a settings menu. The choices are as follows:
-
SHQ: native size, hardwired 1:2.7 compression;
-
HQ: native size, compression preset to 1:4, 1:8, or 1:12
-
SQ: any size listed above (except native), any compression.
I'm not very fond of this indirect setting system (actually, you may set the "Standard" quality to be better than "High"), and the large number of reduced sizes serves no real purpose. A simple, direct system would be better, I think.
|
|
Index
Storage
|
Storage medium:
- Compact Flash Type I or II
- xD-Picture
|
I am not sure why I like the double-slot feature, present in many previous Olympus cameras I've used. Maybe the warm feeling of extra security in case one card (or the socket) refuses to work, maybe the extra storage you can put on top of the largest CF card you can afford, or maybe just the "more is better" syndrome I'm usually so sarcastic about.
Anyway, Compact Flash is the most common standard for storage cards and will probably remain so for the predictable future; the CF cards also improve from year to year faster than any other medium. The xD-Picture is a proprietary format, supported only by Olympus and Fuji; physically much smaller than CF, and currently available up to 2 GB.
Unfortunately, xD cards are significantly slower than most present-day CF ones; the initial expectations raised by the new standard did not materialize. Even the new "H" ("high speed") type, does not stand up to a good, modern CF card, with about half the speed of a SanDisk Extreme III. Still, my recommendation would be to put both types of card into the available slots.
For more on this see my card-writing speed article.
|
|
Dual-format saving:
Yes, ORF+JPEG
|
Unless you are a press pro, who urgently needs to send JPEGs to his office while keeping raw files for further processing, you will never use this feature.
|
|
Uploading interfaces:
USB 1.1, storage-class device
|
The official name is "USB 2.0 Full Speed" which is not the full speed of the USB 2.0, just a misleading naming convention used in the industry. The "Full Speed" is actually the speed of USB 1.1; the real USB advantage is in "High Speed" devices.
Anyway, I'm slightly disappointed about this; some of the new, less expensive cameras from Olympus use the High Speed interface.
Copying 207 MB of files from the E-500 to my computer via the USB interface took 280 seconds; this gives the average transfer speed of 0.74 MB/s, or about 50% of the nominal USB 1.1 transfer rate of 1.5 MB/s. These numbers show that even the USB 1.1 speed is not fully used. Quite possibly, the camera itself, not the USB interface, is a bottleneck in the process.
|
|
Index
Viewing system
|
|
Optical viewing:
SLR, pentamirror and groundglass
|
The pentamirror is less expensive and weighs less, but provides a somewhat less bright image than a pentaprism, although I could not see a difference when comparing the E-1 (pentaprism) with E-300 (pentamirror), both using the same lens, side by side.
|
|
Focusing screens:
Non-interchangeable.
|
The focusing screen is plain, except for three AF markers (a central cross and two vertical rectangles), and a circle, which shows approximately where most of the center-weighted metering pattern is located.
The circle is not very useful, as it means nothing: the center-weighted pattern does not have a clear borderline, and Olympus provides no data about what percentage of sensitivity is concentrated within what radius. Actually, the circle is not even mentioned in the manual.
|
|
Depth-of-field preview:
Yes.
|
Some people still believe they can judge the depth of field on a tiny viewing screen, less than half the size (linear) of a good 35-mm film SLR finder. Good luck; I've given up on this long time ago. Still, if you want to try, you have this option, except that it is not directly accessible via a dedicated button. You have to go to the camera settings, and re-assign the [Reference WB] button to DOF preview. Of course, this way you sacrifice the easy access to the former function, and I would rather not do that, using reference WB quite often.
I don't consider this a real disadvantage; looks like Olympus recognized the marginal usefulness of DOF on small-finder cameras and made it accessible only for those who are desperate enough. On the other hand, all reviewers will check the DOF box on their specs sheets, and everybody is happy. Me too.
|
|
Coverage:
95% nominal
|
This means a 90% area coverage, as most makers prefer to give a linear value here: it simply looks better. My quick (and not very accurate) check gave a reading of 95.5%, close enough.
|
|
Image magnification:
90% at F=50 mm, infinity
|
This is 10% less than in the E-1 or E-300, and, in real terms, in most of competing models from other manufacturers. Olympus explains the smaller magnification with the need to make the finder brighter and smaller, but a 20% gain in brightness is hard to spot, unlike the 10% decrease in size. I was able to see this clearly comparing side-by-side the E-500 against the E-300, both using identical lenses.
I consider this one of the three major flaws of this camera (the other ones are the absence of a wired remote socket, and being unable to use the built-in flash together with a hot-shoe-mounted one).
Digital camera makers use a quite misleading way to show the finder magnification. Most film SLRs have values of 80-100% at F=50 mm; specifications for digital SLRs look quite close (like the 90% above), unless we take into account that the actual image angle differs: 50 mm on a Four Thirds camera is equivalent to 100 mm on a 35-mm model. Therefore digital camera makers should rather quote values at the same equivalent, not actual focal length. In case of the E-500, this would be F=25 mm, resulting in a magnification of 45%, and this is the smallest value I've seen to date in any SLR, digital or film.
For comparison, the Nikon D70 has a magnification of 75% at F=50 mm. To make this value comparable against a film SLR, we would have to divide it by 1.5 (the focal length equivalence ratio), resulting in a magnification of 50%, the same as in the E-300 and higher than in the E-500. Until the camera manufacturers start publishing numbers which can be directly compared against each other, you will have to divide each quoted magnification value by the lens equivalence ratio.
|
|
Diopter adjustment:
From -3 to +1 diopters
|
This is a normal range, provided in similar cameras. The adjustment knob, left of the viewfinder eyepiece, is not as nice or precise as in the E-300, but adequate for the purpose.
|
Finder information:
- Shutter and aperture
- Autoexposure mode
- AE lock
- Exposure compensation
- Metering mode
- Autoexposure lock
- White balance override
- Flash needed and OK
- Autofocus confirm/fail
- Battery status
|
Unchanged from the E-300, this information is provided in a column layout to the right of the viewing screen. If you are using eyeglasses, you will probably have to change your eye position in order to see it, as I do. Although the problem is a little bit less severe than on the E-300 (maybe because of the smaller finder size?), I would still prefer to have this display below the screen.
|
|
Eye relief:
10 mm
|
As far as I understand, this is defined as the distance between your eye and the eyepiece, from which you can still see the whole viewfinder. The 10 mm value looks worse than 20 mm for the E-300, but I couldn't really see a difference when comparing both cameras side-by-side.
|
|
Mirror lockup:
Yes, by adjustable shutter delay
|
This feature is implemented by introducing an extra delay between the mirror action and activating the shutter. It is accessible from one of the menus (on the E-300 I never could remember which one) and comes useful in shooting from a tripod with a long lens and slow shutter speeds: the vibrations caused by shutter action are given time to die out.
|
Other features:
- External eyepiece cover
- Interchangeable eyecups
|
The eyecup on the E-300 was a bad joke; the one included with the E-500 (designated as EP-5) is much better, costing maybe a nickel more to manufacture. Another one, EP-6, is available optionally.
The good news for E-300 users is that both EP-5 and EP-6 will also fit that camera.
Now the bad news: the eyepiece cover (a must when shooting from a tripod, without your eye at the finder) is the same flimsy and easy to lose piece of plastic as in the E-300. At least the new eyepiece is easier to remove and re-install when you are using the cover, some consolation.
Olympus also offers another eyecup, ME-1, with a built-in 1.2× magnifier. The piece uses two glass elements, which means it is achromatic, and it works as advertised, although eyeglass-wearers may have problems seeing the full finder area, including the data display.
|
|
Index
Shutter
|
|
Type:
Mechanical, focal-plane, electronic control
|
That's what everybody else uses in their digital SLRs.
|
|
Speeds: 60 s – 1/4000 s, bulb up to 8 minutes
|
A respectable range, sufficient for all uses I can think of. The top speed is quite good, faster than is some competing models.
The top shutter speed is limited by two factors: the speed with which shutter curtains move along their path (this speed does not depend on the setting), and the width of the slit, i.e., the distance at which the second, closing curtain follows the first, opening one. This width has to be precisely as needed, therefore narrow ones are more difficult to achieve.
My rough calculations show that the slit width in the E-500 is about 0.6 mm, the same as in the E-300.
The longest exposure times are available only in the manual exposure mode; in others, obviously, they are limited by the metering range, see below.
|
|
Max. flash synch speed:
1/180 or 1/320 s
|
See the flash section for more on this.
|
|
Release:
Soft-touch, electronic
|
It seems that this is the same release as in the E-300: OK, but not as precise as the one used in the E-10 and E-20 of some years ago.
|
|
Index
Drive modes
|
Modes available:
- Single-frame
- Sequential
- Self-timer
- IR remote
|
The E-500 assigns a separate button to access the choice between these options, and this is a nice improvement from the E-300; no more digging in the menu system.
|
|
Sequential rate:
2.5 fps up to 4 or more frames (single focusing); 64 MB buffer capacity
|
The sequential drive mode allows you to take a sequence of multiple pictures by holding down the shutter release button. The pictures will be shot at 2.5 fps (frames per second) rate and temporarily stored in a memory buffer; the buffer is being unloaded (images processed and saved to card) while the sequence is under way.
When saving images in full-size, 1:8 or 1:12 JPEG format, the image conversion and writing speed is high enough to keep up with the 2.5 fps rate, so that sequences are limited in length only by card capacity.
When saving images as ORF or TIFF files, or JPEGs at 1:2,7and 1:4, the buffer gets full after four frames, so this is the maximum sequence length, after which you must wait until the buffer empties, at least partially (yes, you can resume shooting while the buffer is still being cleared).
These numbers are applicable to the Single AF mode, where the focusing is done only at the first frame. In Continuous AF the rate drops down to 2 fps or below (I shot 20 frames of a static object, with the time stamp difference of just 10 seconds between the first and the last one), as the camera focuses (pretty fast!) before each frame. The exact rate may depend on the AF speed.
The sequence speeds are what I would expect from a camera in this class: faster rates do not come free in terms of production costs or oher caveats. I am also not disappointed with the limit continuous shooting imposes on compression: sequence shooting is used for moving objects, and then I have other worries (framing, focusing accuracy, camera shake) than compression quality; the latter is not apt to become the bottleneck.
If you really insist on lower compression rates and unlimited sequences, you may set the SQ to 5 MP (2560×1920) and 1:4; at these settings the camera will keep up with the 2.5 fps rate.
When comparing the sequence speed and length of the E-500 against other cameras, one should take into account that what may be designated as "Fine" setting on one camera may actually be closer to the E-500 1:8 setting than to 1:4; the image pixel dimensions should be also considered.
|
|
Self-timer:
Yes, 2 or 12 seconds
|
The self-timer can be also canceled if you change your mind quick enough. The 2-second delay may be of some use in tripod shooting.
I wish Olympus triggered the mirror action before, not after the self-timer delay. This would be functionally equivalent to the mirror lock feature, at the same time reducing the number of settings (one sub-menu less) and making the mirror lock directly accessible via the drive button.
|
Remote release:
- Infrared, optional
- Via USB cable, with optional Olympus Studio
|
My other major gripe about this camera: no wired remote socket. I know this makes things less expensive, but there are a number of other features I would gladly sacrifice to get this one.
Using a wireless IR remote instead is not quite the same; less convenient and less reliable, as the corresponding sensor is placed at the front of the camera. Another not-so-good news: Olympus does not include the infrared RM-1 with the E-500; now you have to spend $30 or so for a simple gadget like this.
On the bright side, you may have an IR remote from another Olympus camera; both the RM-1 and RM-2 (simpler, one button only) will work. In the former case, the remote zoom buttons, no longer working with the mechanical zoom on the E-500, have been assigned new functions: one opens and another closes the shutter in the bulb exposure mode.
Remote operation of the camera via USB using the Olympus Studio program allows you to access all settings (except for zoom), trigger the camera, and save images to the computer. This may be useful in stationary (mostly studio) setups, but I doubt if many users will the an advantage of this option.
|
|
Time-lapse sequences:
No
|
While this is not a really essential feature, it would be nice to have it on the E-500, and it is implementable entirely in the firmware, at little cost. I would gladly give up the illustrated "guide" to scene modes, an entirely useless feature, to free the necessary space in the firmware memory.
|
|
Index
Exposure control
|
|
Light metering:
Full-aperture TTL, an array of 49 sensors
|
Full-aperture TTL metering is typical for modern SLRs (last 25 years or so). The process, unlike in non-SLR digital cameras, does not use the imager, but a separate 7×7 grid of sensors. It remains unclear where these are located: behind the (partially semi-transparent) mirror or off the viewing screen; I suspect the latter.
The metering system has been completely re-designed in the E-500, a major change from the E-1 and E-300. While the former used two (maybe three?) sensors measuring light at various image areas, the new system uses 49 separate, tightly-defined, readings. This is a more modern system and, in theory at least, it should provide the logic circuitry with more information about brightness distribution over the frame, thus allowing for better protection against detail loss in overexposed areas.
In practical use, however, I found the older system to work well enough, and its simplicity also has some advantages. My experience with the E-500 shows that it still makes sense to use some exposure compensation, depending on the scene being photographed, I failed to see any significant advantages to the new metering matrix (although, based on general considerations, there must be some).
|
Metering modes:
- ESP (Pattern)
- Center-weighted
- Spot
|
Olympus uses the ESP moniker for all metering systems they put into cameras, therefore it means nothing. Obviously, the logic for the new matrix system had to me entirely changed from the previous models, but the name remains.
The pattern metering uses that logic, determining the exposure at which the brightness range of the captured scene will fit best into the sensor's dynamic range. The major idea behind this solution, and similar ones by other makers is "Trust us". Fine, usually it works OK, but for most brightly-lit, high contrast scenes I still like to apply an exposure compensation of -0.3 or -0.7 EV to protect the highlights, and this also seems to work fine with the E-300, too. A literate photographer will usually get better results than a few hundred bytes of code in the firmware.
The ESP metering mode has two flavors: in addition to the regular one, the "ESP+AF" regimen modifies the metering algorithm by putting emphasis on the area used to autofocus. The manual does not even mention this option, and you cannot set it directly (with a button) or via the Control Panel; it requires going into the menu. Once set, however, it will be used any time the ESP mode is used; fair enough.
The center-weighted mode averages the image area brightness with weights falling off from the center out. Many photographers are used to this system from their film SLRs, and they will find this option familiar.
Spot metering uses the information from the central 2% of the image area. An experienced user may get very good results from this approach, knowing where to point the spot (that area will be rendered at the standard 18% gray level).
In addition, the E-500 offers two variations on that theme: Highlight Spot and Shadow Spot. In principle, these render the metered area as highlight or shadow, but it is unclear (and undocumented) how high or deep, so the photographer has to learn using these options by experience. I prefer to use a regular spot mode and applying exposure compensation, thus being able to say, for example, "I want this point to be 2 EV above standard 18%". It is actually faster (especially with the convenient way in which AE compensation is used in this camera), more controllable. This is why I consider the Highlight and Shadow Spot nothing to write home about.
|
Metering range:
- ESP and CW: EV 1 to 20
- Spot: EV 3 to 17
(ISO 100, F/2.0 lens)
|
The low-end metering limit has been improved by 1 EV compared to the E-300 (which means exposures twice as long). This is good, and my first trials confirmed manufacturer's claims.
To make comparisons easier, manufacturers quote the metering range at ISO 100 for a lens with the maximum aperture of F/2.0. On one hand, this levels the playing ground, but on the other, an average user is not sure what actual exposures will the camera be able to measure properly with the lens actually used.
Some simple math brings a more practical way to present this data: EV 1 at F/2 (as quoted) means that with any lens the E-500 is capable to meter exposures equivalent to 2 seconds at the lens full aperture. (This is so simple; surprising that nobody seems to know how to translate one number into another; one day I may write a small article on this. For the time being, trust me.)
Anyway, this is a respectable number. With spot metering the manufacturer's data translates into metering up to 1/2 s exposures, with any lens, again.
|
Exposure control modes:
- Program (shiftable)
- Aperture priority
- Shutter priority
- Metered manual
- Time exposure (bulb)
- "Scene modes"
|
As expected in a camera aimed at advanced users.
The program uses full aperture for shutter speeds up to the one generally recognized as handholdable (one over the equivalent focal length), then increasing the shutter speed and F-number at the same EV rate. reasonable and simple, why not?
The program can be also shifted towards larger or smaller apertures by turning the control wheel, adjusting the shutter speed in the opposite direction as needed to keep the exposure at the same level. Actually, I would like to have an option to disable this feature, as it is too easy to turn the control wheel by accident. (Yes, the feature can be re-assigned to the exposure compensation button, but then you can accidentally apply the compensation instead.)
Aperture and shutter priority work as expected (and if I need to explain what these mean, then you should rather buy a more basic camera), so does metered manual. Time exposures work up to 8 minutes, far beyond the point where the imager noise becomes prohibitive; I don't see many users using eight-minute exposures.
An "Auto" setting is also available on the mode dial; this is essentially the same as Program, except it reverts most of the settings (at least all critical ones, listed in the Control Panel) to their defaults. (It also diables the program shift). The reverted settings can be still modified as you wish. (This note has been changed in August, 2007; it took me almost two years to realize that.)
|
|
Specialized programs:
15 "scene modes"
|
These are the pre-defined "bundles" of settings to be used by less-advanced (not to say: illiterate) photographers, and their presence is a sign that Olympus is trying to draw attention of that group to the E-500. I rather tend to disagree, as this class of users will be more attracted to non-SLR cameras with wider-ranged zoom lenses built-in at lower price.
In some places Olympus refers to these as "creative modes". We could agree with that, but only assuming that "creative" means "I have no clue what and why I'm doing".
For the record, the scene modes include the following: Portrait*, Landscape*, Landscape+Portrait, Night Scene, Night+Portrait*, Children, Sport*, High Key, Low Key, Macro*, Candle, Evening Sun,Fireworks, Documents, and Beach & Snow. The five I've marked with asterisks (*) are available from the mode dial; setting that dial to [Scene] makes all fifteen available from a menu. The latter shows briefly an example picture, reducing it then to a smaller one with a short text which is supposed to serve as an explanation, like "suitable for shooting fireworks at night", in case you cannot figure this out from the mode name.
The scene modes would be more usable if Olympus provided some meaningful explanations in the manual about the settings these modes use, but this is not the case (although you can figure out some of those from the status panel).
As mentioned above, five of the scene modes are also directly accessible from the mode dial. This is almost the same as selecting them from the Scene menu, but not quite: you can modify some settings for modes accessed via the dial, but not when they are accessed from the menu. A subtle difference, not described in the manual.
|
|
Exposure compensation:
From -5 to +5 EV.
|
This can be done in steps of 1/3, 1/2, or 1 EV, as set from the menu. The adjustment range is wider than usual (you will rarely, if ever, resort to -5 EV), but this may come handy under some circumstances. (For example, I'm using a +5 EV compensation when metering a scene through an infrared filter.)
The compensation is applied in a convenient way: by pressing a button on camera's top with your index finger, and turning the dial with your thumb. As the compensation value is shown inside the finder (assuming you can see it), the adjustment can be done while composing the picture, nice. A minor gripe is that the LCD screen light up during the process, which is generally good, but quite annoying with your eye next to the eyepiece. A sensor, disabling the monitor activation while you are using the viewfinder would be a welcome improvement.
You may also configure the camera so that the compensation is done by turning the dial alone, and pressing the [+/-] button activates program shift. This, however, applies only to the program mode, in shutter and aperture priority you do not have this option, therefore using it would make the interface inconsistent; I wouldn't recommend it.
|
|
Exposure bracketing:
Three frames, adjustable step.
|
The bracketing step can be chosen as 1/3, 1/2, or 1 EV, and the frames are shot within 0.4 s or so from each other, starting from the non-modified one. Makes sense.
The bracketed images are not shot as a sequence like in all previous Olympus cameras. You either have to release the shutter three times, or switch to the sequential drive mode. In the first case, the bracketing indicator in the Control Panel, [BKT], turns blue to remind you that you are in a middle of a bracketing series; in the second, the sequence will be automatically terminated when the last bracketed frame has been taken.
Unfortunately, to activate autobracketing you have to dig into the menu system, and I can almost guarantee that this will not be the menu you will start from. Olympus could do better even without assigning a dedicated button to this function — via the Control Panel, where bracketing, if activated, is shown, but from where it cannot be changed in a somewhat inconsistent design.
|
|
Autoexposure lock:
Yes, customizable.
|
By default, the autoexposure locks when you half-press the shutter release, and so does autofocus. If you want to separate these two functions, pressing and holding the AEL button to the right of the viewfinder will lock the exposure separately.
This is how things work normally, but you may change this order if your working habits differ. For example, in the Single AF mode you have three setups: (1) standard, as above; (2) exposure is determined just before the shutter fires, not at half-press, unless the AEL lock button is used; (3) the AEL button freezes focus, half-press — the exposure. Similar re-assignments are available independently for the Continuous AF and manual focus modes.
There are two more ways to modify these functions. First, you may ask the camera to use a selected metering pattern (matrix, center-weighted, or spot) to be used when the exposure is being locked with the AEL button, regardless of what pattern is used without that button. Some users will want to use spot metering here. Second, the AEL button can be used as a toggle: when it is pressed and released, the autoexposure will be locked until it is pressed again, even for multiple exposures. This is often useful; for example, when shooting composites (panoramas) we do not want to exposure to change from one tile to another.
All this gives you lots of choices in customizing the camera to your liking. It may look convoluted, but has to be done just once; these are not settings you want to change every day. (For details, see my E-500 customization article.)
|
|
Index
Focusing
|
|
Autofocus:
Passive TTL, phase-detection
|
Passive TTL AF uses a sensor placed on the bottom of the mirror chamber: some light goes through semi-transparent slits in the mirror and reaches that sensor via another mirror, riding piggyback on the first one. This looks like a mechanically complex solution (and it is), but it is used by most SLR makers.
Phase detection is usually better than contrast detection, as the camera's logic knows not only how much off-focus the lens is, but also in which direction, and this speeds the process up.
Generally, I was pleased with AF performance of the E-300; the E-500 is claimed to be improved in this aspect. I wasn't able to see any changes at high light levels (where the E-300 was already very good), but at low light, requiring 1-second and longer exposures, the E-500 is, indeed, better: faster and more reliable, according to my informal tests, performed with both cameras using the same lens.
|
|
Number of sensors:
Three
|
The sensors are aligned in a horizontal line; the central one is sensitive to both vertical and horizontal patterns; two others, placed about a third of the finder half-width away, to horizontal ones only. By default, the camera tries to use all three sensors, and then decides which one, if any, to trust.
If the operation is successful, you will know: a small red light briefly blinks at the selected sensor's outline on the focusing screen, a green AF indicator lights up in the information panel inside the finer, and a small beep sounds (this can be disabled). A failed AF operation is signaled only by blinking AF indicator in the information panel.
I'm not thrilled with AF systems sporting seven, nine, or even more sensors. Actually, one is OK with me, as long as it is reliable; I prefer to point the central spot at the part I want in focus, lock, and recompose — this gives the photographer full control. Therefore three sensors in the E-500 is enough, although if I have to use them all, I would prefer the side ones to be sensitive to lines in both directions.
|
|
Autofocus EV range:
From EV 0 to EV 19
|
My trials indicate that the camera's autofocus system works fast and reliable down to the light levels requiring 4-second exposures at F/4, ISO 100, as long as the system has some detail to focus on. This is good enough: below the autoexposure metering range. At lower light levels you can use focus-assist bursts from the built-in flash.
|
Focusing modes:
- Single AF
- Continuous AF
- S-AF with manual override
- C-AF with manual override
- Manual
- Manual with bracketing
|
The continuous AF mode tries to follow the object distance changes when the shutter release is half-pressed instead of locking the focus. It is also predictive, trying to extrapolate the subject movement. The system seems to work very well, although on the E-300 I didn't use it much.
The manual override allows you to adjust focus manually after the AF system did its job. It works as expected with single AF, but I don't have a clue what it does with Continuous AF, and the manual is not helpful at all in explaining the difference. After all, the continuous AF keeps readjusting until the shutter fires. I have tried the C-AF+MF combination, and, to my surprise, it looks like turning the MF ring has no effect whatsoever. Until I know more, I must consider this feature nonexistent.
The manual focus mode is, well, manual. I use it very rarely (mostly with legacy, MF lenses), and the tiny viewfinder image is not really helpful in determining how good the focus is. The only circumstances under which I ever resort to MF with AF lenses is when the camera has no detail to focus on (for example, astrophotography). Under some circumstances you may want to use the AF to set the lens position, and then switch to MF to retain it; this is useful, for example, in pictures of fireworks.
In the manual focus mode you can activate focus bracketing; I believe it can be used only with lenses offering micromotor focusing (like all Olympus ZD ones). You can then take five or seven pictures, with camera shifting the focus after each one: first at the focus as set, then two or three shifted in each direction, with adjustable step.
Note: The manual is wrong stating that the camera will take the sequence by itself: you have to release the shutter five or seven times as needed; only the [BKT] indicator in the control panel shows that you are in a middle of a series. There is also no clean way of breaking out if you change your mind.
|
|
Autofocus lock:
Yes
|
By default, the AF is locked together with autoexposure by half-pressing the shutter release. The camera has, however, a separate autoexposure lock (AEL) button; if that one is used, the shutter release will lock just the AF. This is a reasonable solution sufficient for most uses, and if you want to separate both AE metering and AF from framing, you can do it quite easily: point the camera to meter exposure, press the AEL button, point it to focus, half-press the release, recompose, shoot. Faster done than described.
The AEL button can be also reassigned to AF lock.
|
AF release lock:
- Single AF: Focus priority
- Continuous AF: Release priority
(Customizable)
|
In the default setup, in the single AF mode the shutter will not fire if the focus has not been achieved; this is referred to as focus priority. In the continuous AF, the shutter will fire regardless (release priority). This arrangement makes perfect sense, but each assignment can be changed at will.
|
|
AF assist beam:
No; flash can be used
|
The camera has no autofocus-assist light. It can, however, use the built-in flash in this capacity; it will emit a series of brief bursts to help the AF system in doing its job. This feature is available regardless of whether the flash is actually used to take the picture.
The Olympus dedicated flashes (FL-36, FL-50) provide a built-in, deep-red AF-assist light which also can be used.
For shooting without flash, the assist light is not really necessary, as the AF sensitivity extends below the autoexposure range.
|
|
Index
Flash
|
|
Internal:
GN 13 m at ISO 100
|
This is good for a built-in flash, especially one providing a 28 mm EFL coverage. (The flash in E-300 had GN of 11; this is about 40% increase in the light output.)
The flash will pop up by itself in the Auto mode, unless you modify one of the preference settings. Interesting: I thought Minolta had a patent for this; possibly Olympus licensed it. Still, I prefer to keep the auto-popup function disabled. The flash button at the top-left of the camera back can be used to raise the flash when you need it; once that is done, the button is used, together with the control dial, to switch between various flash modes.
The flash raises quite high above the camera body; higher than the one on E-300, but it does not slide forward. I was unable to get a red-eye with it in half hour of trying.
|
|
External:
Olympus dedicated flash system
|
At present this system, very well integrated with the camera, up to smallest details, includes three units: FL-50, FL-36, and FL-20, as well as a ring flash and a macro setup. All work with the E-500, although for general use I would think FL-36 is the best choice.
A not-so-nice surprise: the built-in flash cannot be used simultaneously with any of the Olympus units mounted on the hot shoe; its upward movement is obstructed by the locking ring.
This is more painful than it may seem: the internal flash would be very useful as a fill light when an external one is bounced off the ceiling. Neither FL-50 nor FL-36 have a second, fill-in head, and using a flash bracket in this application is just cumbersome. A point in favor of the E-300.
|
|
External connections:
Olympus dedicated hot shoe
|
The camera does not have a flash socket, but there are accessory cables available to facilitate hooking up a flash on a bracket.
Third party non-dedicated flashes (as well as the older Olympus FL-40 unit) will work with the E-500, but the camera has to be set to manual, with the flash using its own thyristor circuitry. (The results from the FL-40 were very good in this mode.)
Dedicated flashes from other makers, working OK with older Olympus cameras (like the C-5050Z or E-20), may be only partially compatible or non-compatible with the E-500, as the flash communication with the camera was slightly changed when the E-300 was introduced. Do not ask me about particular models, as I have no data on any.
|
Flash modes:
- Auto (as needed)
- Auto + red-eye burst
- Slow + red-eye burst
- Slow (first curtain)
- Slow (second curtain)
- Fill (always on)
- Off
|
All possible options have been provided. The slow modes allow to mix flash light with ambient, although some experimentation with flash compensation, see below, will be needed to get desired results.
First- and second curtain synchronization determines whether the motion streaks (image created by the ambient light) precede or follow the frozen part of the image (created by flash burst).
"Off" disables the built-in flash even if it is raised (it still may be used for AF assist, though).
|
|
Flash compensation:
From -2 to +2 EV.
|
The flash compensation as set by the camera is applied on top of or instead of the regular exposure compensation, with the choice being set from the preferences menu. It can be used to adjust the flash-to-ambient light ratio.
The adjustment can be done in steps of 0.3, 0.5, or 1.0 EV, as set in the preferences. It is accessible by holding the exposure compensation button and pressing the flash one; this calls up the compensation scale, so that you can dial in the needed value. You can also adjust flash compensation from the Control Panel (only in full mode.)
Using outdoors fill flash quite often, I consider this a significant improvement over the E-300, where the feature was less useful, accessible only via the menu system.
The FL-50 and FL-36 dedicated flash units allow for flash exposure compensation to be set with use of a dial on the flash itself. This correction is always applied on top of whatever is set on the camera.
|
|
Flash metering:
Through the lens.
|
The camera makes its exposure decision based on a single pre-flash, emitted when the shutter is released, just before the mirror goes up. This happens quite fast, so that you will not even notice that two light bursts are emitted, not one. (This is not the same as the red-eye or focus-assist burst; those happen earlier, if activated.)
This can be verified by taking a picture of (not with!) a slave flash in front of the lens. The slave burst, although visible by the human eye, is not caught in the picture; this means that it is triggered before the shutter opens. Changing the camera's flash operation to manual gets rid of the pre-flash, and the slave's burst is then visible in the picture.
|
|
Slave flash option:
Yes.
|
The metering pre-flash described above has one consequence: in order to use a slave unit, TTL metering should not be used (even if the slave does not affect the basic exposure, like when pointed at the background only). The flash connected to the camera should be either in manual or (non-TTL) auto mode.
The internal flash has manual settings (1, 1/4, 1/16, and 1/64 of full power) accessible — only if enabled from the Settings menu. These can be used to trigger slave units, also providing some fill. (For the sake of adjustable fill, I would prefer to have 1 EV, not 2 EV steps in power settings.) On the FL-50 and FL-36, the light output can be manually adjusted with the dial on the flash unit itself (the in-camera settings are disabled then).
Note that slave units are the only way to use multiple flashes with the E-500 (or any other E-System SLR).
|
|
Max. flash synch speed:
1/180 or 1/320 s
 1/320 s, non-dedicated flash
 1/400 s, non-dedicated flash
|
1/180 s is applicable to the regular, single-burst flash with dedicated units (including the built-in flash); with non-dedicated flashes, full frame coverage is achieved up to speeds of 1/320 s (the camera has to be, obviously, in the manual mode). This is, however, possible only if the external flash has a very short burst (which usually means direct, as opposed to bounced, light, and a small flash-to-subject distance).
With a dedicated flash only shutter speeds up to 1/160 s can be set by hand; this limit can be lowered in 1/3 EV steps down to 1/60 s. (The manual is wrong, stating the 1/320 s maximum speed with the built-in flash.)
The dedicated Olympus units (FL-36, FL-50) also offer a special mode, called "Super FP" by Olympus, in which not a single, short light burst is emitted, but a series of smaller bursts, together covering a time span longer than it takes the shutter to travel the whole frame height. This is close enough to a uniform burst of that length, and it allows for flash synchronization at any shutter speed. A downside is that the guide number in this mode is significantly lower, and the flash uses more energy.
While this is not a critical feature, some photographers find it useful when using fill flash in bright daylight.
My rough estimate is that the Super FP mode uses 200 or more light pulses to achieve approximately uniform lighting over the frame area, but I wasn't able to verify this number. I was, however, able to confirm that the frame is, indeed, exposed uniformly.
|
|
Index
Power
|
|
Power source:
One BLM-1 Li-Ion battery
|
This battery provides, according to Olympus, enough energy for over 400 pictures with partial use of flash, following the CIPA standard (with which I'm not familiar).
The performance of the E-300 with BLM-1 was very satisfactory, and on the C-5060WZ — nothing short of outstanding. The E-500 uses more power than E-300 (backlighting the bigger LCD screen!).
The officially claimed number of picture with the BLM-1 is only 20% lower for the E-500 than it was for the E-300, but my experience seems to be worse than that; I'm changing the battery about twice as often. I have not conducted any comparative tests, so this is an unscientific statement, but still. It may have something to do with the fact that I tend to use the LCD display more heavily (it is so darn nice!); I'm not ready to draw any strong conclusions, but the impression remains.
I suspect that the shorter battery life may be, in a large part at least, related to significant power usage in the sleep mode. Forgetting to turn the camera off resulted a number of times in the battery being almost empty the next morning.
(Version 1.1 of the firmware, released in December of 2005, seems to have fixed this problem.)
While I would feel more secure with rechargeable NiMH AA's, which can be replaced with alkalines in an emergency, the BLM-1 is a high-capacity power source, and it has a low self-discharge rate, i.e., it loses less charge when the camera is stored for extended periods of time.
A spare BLM-1 should be your first extra accessory for the E-500. I am serious here.
Warning: On some (mostly European?) markets the E-500 is packaged without the BLM-1 battery, and without the charger; just with the LBH-1 holder for CR123 batteries (see below). This is perhaps to keep the cost down, but the savings is problematic, as you will have to get a BLM-1 and charger anyway for any serious use.
|
|
Energy stored:
10.8 Wh (1500 mAh at 7.2V)
|
A set of four 2500 mAh rechargeable NiMH AA's stores 12 Wh, but the provided external voltage drops significantly while the batteries discharge, so that most cameras will stop working before the batteries are emptied. The Li-Ion chemistry used in the BLM-1 holds the voltage better, so the stored energy is more fully utilized.
|
|
Charger:
BCM-2, included
|
I have used this charger with the C-5060WZ and E-300, and it is OK. Some people complain that it recharges batteries slowly (five hours when quite empty, two-three hours otherwise), but I prefer it this way. A faster charger (optionally available from Olympus) must use higher current, and this is less gentle on batteries.
|
|
Additional power sources:
- LBH-1 battery holder for CR123 lithium batteries
- No external power supply
- No power grip option
|
The optional LBH-1 battery holder is a surprise. It takes three CR123 or CR123A single-use lithium batteries. The good news is that these are quite widely available (most drugstores) and can be easily procured in an emergency. The bad news is that they provide only about half of the capacity of the BLM-1. There is also a rechargeable version, called R-CR123 available from some less-known manufacturers, but I would advise to exercise caution here.
Still, dropping the LBH-1 holder into your bag may give you some extra sense of security against your batteries or charger dying in the most unexpected moment.
LBH-1 will also work with the E-1, E-300, and, I believe, C-5060/7070WZ.
I do not mind at all the lack of external power option, or the power grip. The grip would increase the camera's size and weight considerably, while external, tethered power does not provide a real advantage against freshly-charged BCM-1 with its high capacity.
|
|
Index
LCD monitor
|
Type and size:
- Liquid crystal, color TFT
- 2.5" (63 mm) diagonal
- 210,000 pixels

(Picture taken with Olympus C-5060WZ, Super Macro mode.)
|
This is a major improvement from previous Olympus cameras, and perhaps the best monitor on any current SLR. After a few days with the E-500 I find it quite hard to go back to the 1.8" (45 mm) monitor on the E-300.
It is not just the matter of physical size. Many cameras (including some of the newer Olympus models) sport 2.5" monitors. This one, however, also offers significantly improved resolution, increased from 135,000 to 215,000 pixels (or rather RGB sub-pixels, as per the industry's misleading way of quoting this specification).
A small fragment of the display is shown at the left; you can see that each honeycomb-cell pixel consists of three vertical RGB stripes. A quick count of the pixels (stripe triplets) shows a resolution slightly below 320×240, or close to 70,000 pixels, consistent with my remark above.
Let us check the numbers: the 94% increase in the monitor area is accompanied by 59% more pixels. This makes the data display and image review about 30% more detailed, a visible improvement, while pixels themselves are also be slightly bigger; the display can be viewed from a larger distance, a welcome news for people with middle-aged vision.
Unfortunately, doubling the monitor area has an impact on battery life, as screen backlighting is the major component of camera's power usage. Nothing comes free, although the battery life is still very good.
Anyway, the monitor is bright and contrasty, a pleasure to use. I'm not surprised, as it is made by Sharp, and those people know their job better than anyone else.
|
|
Display modes:
- Off
- Control Panel
- Menu system
- Image review
|
Switching between these modes is done with use of the [Play] (green arrow), [Menu], and [Info] buttons to the left of the monitor.
|
Control Panel data:
- Battery status
- AE mode
- Shutter and aperture
- Exposure compensation
- Current date
- Noise reduction
- ISO setting
- White balance
- WB adjustments (*)
- Picture mode
- Flash mode
- Flash compensation
- Metering pattern
- AF sensor selection (*)
- AF mode
- Drive mode (*)
- Color space (*)
- Bracketing indicator (*)
- Sharpness, contrast, saturation, and gradation (*)
- Image quality
- Image size (*)
- Card used (CF/xD)
- Frames left on card
(*) Only in full info mode.
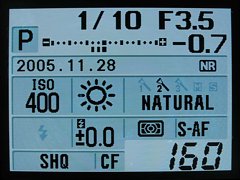
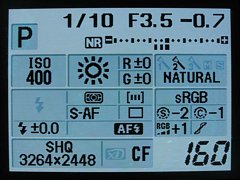
|
Wow. This is a truckload of information, and the designers took pains to present it in a readable and logical mode. They succeeded, and not only because of more display space available. I have very few complaints or improvement suggestions, and this is something. Now, down to the nitty-gritty.
The first press on the [Info] button or on [OK] brings in the simplified Control Panel; the second one — the full version (items marked with asterisks are available only in the latter; the date only in the former). The panel is very easy to get used to, and you can set it to one of two different color schemes, a nice touch.
Most importantly, the panel can be used to change most of the settings it displays: press the [OK] button, then use the cursor keys to highlight the desired settings, and turn the wheel to change it. Very convenient; to do it via the regular menu system you would have to be a masochist.
In an unwelcome exception from this rule, two displayed fields are passive only: the bracketing indicator, and the AF-assist flash setting. These are, actually, the only two things which I would like to be changed. The bracketing indicator does not show what bracketing is in use, nor does it allow for changes, and the AF-assist status also just sits there.
As I mentioned above, the Control Panel can be invoked with the [Info] or [OK] buttons. There is a small difference between these two ways: in the latter case the panel will go away as soon as the adjustment is done (another [OK] or wheel inactivity timeout). A nice touch.
The exposure information is shown in larger characters on the top, and the exposure compensation is shown both as a numeric and an adjustment scale, with the latter showing both the "regular" and flash adjustment.
In general, an excellent job, making the camera much faster, more pleasant, and less error-prone in use. The only disadvantage is that the Control Panel uses battery power (for economy, the camera enters the sleep mode after one minute or more of inactivity, adjustable from the settings).
It would be also nice to have an auto switch, turning the panel off when the camera is brought up to the eye — but maybe I'm just getting spoiled.
It took me just a few weeks with the camera to grow addicted to this monitor. This may be the most significant improvement from the E-300, and for some it may be enough of a reason to upgrade.
|
Image review:
- Image only
- Image plus basic information
- Luminance histogram
- Detailed information
- Clipped highlights
- Clipped shadows
- Magnified (up to 14×)
- Thumbnails
- Calendar

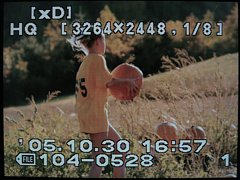
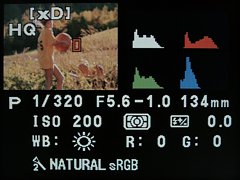
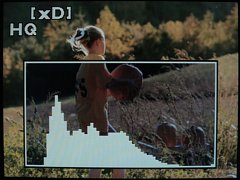
|
Pressing the [Play] (green arrow) key brings up the last taken image to the screen; the arrow keys can be then used to scroll through images.
The [Info] key is used to switch between various display modes, differing in the amount and kind of information shown.
The "basic information" display comes in two flavors: more and less basic. The first one shows the card used, quality setting, file name, and frame number; the second adds image size and compression, date, and time.
Real fun starts in the detailed display mode. The image is reduced to 1/4 of the screen (it now includes the indicator of the AF sensor used), and adds all, or almost all, relevant exposure information. Most importantly, it also shows four, tiny but still useful, histograms: luminance and individual RGB components.
The RGB histograms can be quite useful in analyzing pictures of brightly-colored objects, where the general luminance may stay within limits, but an individual RGB channel may be overloaded: for example, a deep red without all detail lost. I'm having this problem sometimes in pictures of flowers.
The clipped highlight and shadow displays are also useful. The affected areas are shown blinking; you may spot burned-out areas which are too small to be noticeable in a histogram. I wonder why these two were implemented separately; I would imagine having them in the same display would not be difficult, simplifying the view mode sequence.
Turning the control wheel allows you to adjust the viewed image magnification (up to 14×) or to enter the thumbnail viewing mode (plus the calendar for easy jump to pictures from a given day). While the image is magnified, you can scroll over it with the arrow keys.
The 14× magnification sounds better than it really is; actually only magnifications up to 8× or so are really useful; at higher ones the image display gets quite fuzzy. I suspect Olympus is using the internally stored thumbnail for this display, with much less detail than in the actual picture; some JPEG artifacts showing in the enlarged view (but not in the final image) seem to confirm this theory.
The reference WB key, when pressed in the image display mode, will toggle between three states:
-
Full frame with a 10%×10% fragment marked at the center; the arrow keys will move that fragment around, and the control wheel will change the its size;
-
The fragment magnified to the full screen size; arrow keys move between images while the magnification stays the same; the control wheel changes the magnification.
-
The fragment magnified as above; arrow keys move it within the image; wheel changes the magnification.
Unfortunately, there is no quick way to leave any of these three, jumping back to the normal, full-frame display; you have to use the dial to get back to it. To make things more confusing, once you enter any of these three states, the same toggle functionality is duplicated by the [Info] key, which no longer works as described above. This almost-but-not-quite duplication is quite annoying, an obvious design error. It would be much better to keep the [Info] button at its original task, regardless of magnification. Modal user interfaces are always undesirable, and this one is just evil.
Last but not least, you can compare the same fragments of magnified images side-by-side in two halves of the display (press the AF point selection button to do this). I used this feature just once: with the low quality of the magnified display, it is better to postpone any selections to the postprocessing stage. I'm very tempted to call this feature a useless trinket.
|
|
Video output:
PAL and NTSC
|
The contents of the monitor can be sent to a TV set.
Interestingly, there is no separate video output socket like in all previous Olympus cameras; this has been integrated with the USB connection.
To accommodate the dual functionality, that connection had to be changed to a non-standard one, different than in all Olympus cameras from 2001 on (and most cameras by other makers). I am not happy about this: another cable to keep track of and to carry when traveling with two cameras. I understand that the design might have saved Olympus a dollar or so in manufacturing costs, but I doubt the savings were worth the hassle (mine and yours).
|
|
|
| | | | | |
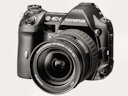
.x.jpg)