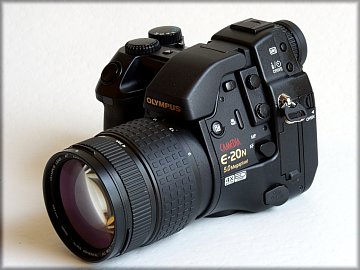
Olympus Camedia E-10 and E-20 — a Technical Review

My other articles related to the Olympus E-10 and E-20 cameras

How is this review different than others?
There are a number of other reviews of the E-10 and E-20 on the Web, offering detailed description of the camera's specs and controls. If you haven't seen them, I would recommend using them as a starting point. The links are given here.

What you will find in this review is the camera's specs, annotated with the discussion of their significance and real meaning, plus my own, often subjective and opinionated, impressions.

The article is addressed to the advanced amateur who would like to gain some knowledge of the camera beyond the bare specs or the description of control placement.

The review, originally posted in December, 2000, is based on production-run cameras I bought through regular retail channels. At the time of this update (June, 2004) I have used the E-10 for more than two years before selling it to a friend; E-20 — for almost three years, and the text is still being updated from time to time.

(If you have to know: the pictures at the right were also taken with the reviewed cameras, about 1s exposure at F/8, diffused daylight.)

Introduction
E-10 vs. E-20
Body
Lens
Viewfinder
Monitor
Shutter
Drive modes
Light metering
Exposure control
Focusing
Image sensor
Resolution & storage
Power source
Controls
Other features
Image quality
The competition
The bottom line
Web resources
A significant development

With the Camedia E-10, Olympus successfully bridged the gap between the best sub-$1000 advanced amateur ("prosumer") cameras and the "professional" ones, costing $5000 and more. Its follow-up, the E-20 is basically the same camera, increasing resolution from four to five megapixels, and adding some minor improvements.

If these efforts succeed on the market, we may expect other camera makers to follow shortly, possibly bringing prices of digital SLRs down to $1000 within two years or sooner. This would be comparable to the price of a good, film-based SLR with a decent lens or two.

With the SLR convenience and precision of controls, and with image quality comparable to that of film (let's face it: for me a break-even point was at three megapixels), only the price advantage may prolong the period of phasing out the 35-mm film.

Judged by my own experience with the E-10, the Olympus engineers and designers really succeeded. The camera competes well against models selling at 2-4 times the price, and it should appeal to advanced amateurs and professionals on one hand, and wealthier tyros on the other, providing high-quality images and being surprisingly easy and pleasant to use. The E-20 (with which I have equally positive experience), being an incremental, if not revolutionary, improvement, continues the trend.

E-10 vs. E-20 — similarities and differences

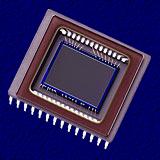
Actually, both cameras are almost identical. The main difference is the new CCD sensor in the E-20, with five megapixels, as opposed to E-10's four (see below for more on the CCD resolution).

The other differences, in addition to being pointed out in the Annotated Review which follows, are listed below.

  • Lower CCD noise levels in the E-20;
  • Noise reduction feature (useful for longer exposures but available at any shutter speeds, see below);
  • Shutter times down to 30s (as opposed to 8s in the E-10);
  • A non-interlaced Progressive Scan mode, allowing for exposures as short as 1/18,000 second at the expense of reduced vertical resolution;
  • Mapping of bad CCD pixels (also available as a $20 firmware upgrade for the E-10);
  • Reduced power consumption;
  • Bad news: the LCD viewfinder no longer offers 100% coverage;
  • The IBM Microdrive is now officially supported.

In my opinion, most of these differences are nothing to write home about. Except for the CCD, I suspect that all changes are entirely in software. Don't take this as a criticism: E-10 (still in production) is an excellent piece of gear, and giving it more pixels is a good thing to do. On the other hand, keeping the mechanical design the same means no messing with something that works, but also keeping the cost down.

The E-20 is offered in three flavors: E-20N (North American market, NTSC video output), E-20P (Europe and most of the world, PAL video output), and just an E-20 (Japan?). I'm referring here to all three as just "E-20".

To make differences between E-10 and E-20 easier to spot, references specific to the latter are shown in color.

Top

Annotated walkthrough
Body
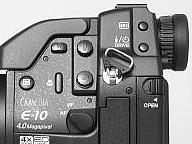
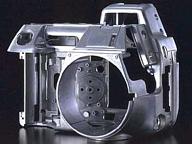
Construction:
Die-cast aluminum, some external hardened plastic.

The black aluminum body assures not only dimensional rigidity (improving the optical quality of the image), but also acts as a heat sink, reducing image noise.

The finish is first-class. Handling this camera is a pleasure.

The few plastic parts do not feel cheap, and the grip is additionally covered with a soft, textured layer. Very nice.

The tripod socket is well-positioned and solid.

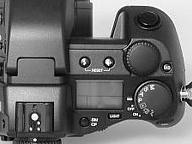
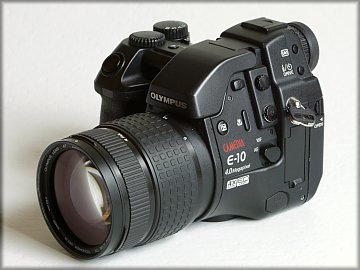
Look and feel:
Big, soft handgrip, thumb recess.
Although quite big and heavy (bigger than my spare SLR body), the camera has a good balance and feel to it. My first impression was that of a Nikon N-100 SLR with the part of the body to the left of the lens chopped off.
Size (WxHxD):
129x104x161 mm, including lens.
The substantial body depth is increased by the length of the lens (see below). I think I would prefer something just a little, maybe 15%, smaller, very much like a compact SLR (remember Olympus OM-1?).
Weight:
1.05 kg (37 oz), w/o batteries.
Cutting this down by 30% would be nice, still providing enough heft to avoid camera shake. On the other hand, Olympus must have had good reasons. Oh well, I still keep my Oly C-3000Z for traveling light and for long hiking trips.

Top

Lens
Interchangeable: No. In a camera costing $2000, this is a subject of much discussion going around. Olympus gives three main reasons for their decision:
  • Dust and humidity protection: a fixed-lens design allows for sealing the optical sensor from elements.

    This argument does not convince me in 100%. E-10/E-20 uses a non-movable, double-prism beam splitter instead of the mirror. The CCD array is safely located behind it, while the front face of the splitter is less sensitive to cleaning damage than the CCD surface itself.

  • Dimensional rigidity: with the sensor being 1/4 of the (linear) size of a film frame, this is more critical than in 35-mm cameras. Fixed-lens design alleviates any problems related to interchangeable lens mount precision and wear.
  • Sensor requirements: the CCD light sensitivity varies greatly with the angle of incoming light (one more reason for the inverted telephoto design, and the hefty lens size). Therefore using lenses not specifically designed for this camera might result in inferior results.

    Again, this is not the best argument. Agreed, using lenses designed for a film-based SLR is out of the question. Most importantly, they are designed for a different frame size, with different sharpness requirements (that's why I'm not so hot Canon EOS D30/D60). Still, I would like to see a camera body with its own system of 3-4 interchangeable lenses designed specifically for it.

Focal length:
9-36 mm (4x zoom range), equivalent to a 35-140 mm lens mounted on a 35 mm camera.
This covers 90% of my (and most other users') needs. I still think that a 28-105 mm range would be more useful (if we want to stay within the 4x ratio); 35 mm is not really wide angle. On my SLR I'm using mostly a 28-105 mm zoom, switching to 20-35 mm and 70-300 mm as needed.

Especially for a non-interchangeable lens, the 35 mm short end is painfully limiting.

Aperture range:
  • F/2.0-11 (at 35 mm)
  • F/2.4-11 (at 140mm)
with adjustments in 1/3 EV increments.
The F/11 minimum aperture is more than sufficient. According to the M×A Rule, it provides the same depth of field as F/44 on a 35-mm camera (far beyond closing-down capabilities of any lens there). On the other hand, because of smaller physical size of the aperture, at greater F-numbers light diffraction effects would cause image quality degradation.

For the same reason I would avoid using apertures smaller (F-numbers greater) than F/5.6, especially at the short end of the zoom range, except for close-up work.

Optical construction:
All-glass, multicoated, 14 elements in 11 groups, two aspherical and one low-dispersion element.

Wow. Wow. Wow.

The lens uses the inverted telephoto (retrofocus) design, with its entrance pupil much closer to the image sensor than the physical location of lens elements. In 35-mm SLRs this design is used for wide-angle lenses only, to make room for the swinging mirror. Here, I believe, it serves two additional purposes: making the light strike the CCD at smaller angle (as measured from perpendicular), and allowing the lens construction to be physically larger, to make the mechanical tolerances more acceptable.

While the lens is very nicely made and appears really sharp, it displays some barrel distortion at the wide end (not noticeable at 70 mm and above), as shown in this picture, taken at EFL=35 mm ("EFL' stands for "Equivalent FOcal Length".

Ergonomics:
Manual zoom ring, varifocal design.
The zooming ring is wide, well-damped and smooth, allowing for precise adjustments — much better than a separate lever (just a sad necessity on most other digital cameras), and smoother than on most of the 35 mm lenses I have tried. Same about the focus ring, which is not mechanically coupled with lens elements, but rather activates the (mercifully quiet) focusing motor in the lens.

The lens is bigger than an average 35-140 mm zoom on a 35-mm camera. This is partly due to the inverted telephoto design (see above), but clearly the lens was also designed with the optical front-end attachments in mind (mind it: the 3x, 420 mm-equivalent telephoto attachment causes only 1/2 F-stop aperture loss; now, try to buy an F/2.8, 400 mm lens for an SLR at less than $2000!).

Both zooming and focusing are internal; i.e., do not cause front element rotation or any changes in the overall lens length. A great plus, allowing for use of sculpted hoods, polarizers and graduated filters.

This is not a parfocal design, where the focus setting stays put while you zoom, but rather a varifocal one, like in almost all digital camera lenses. When you change the focal length, the focus setting changes as well.

Or, rather tries to change, as the camera logic immediately activates the focusing micromotor and adjusts the focus setting to the new focal length. This works in both auto and manual focus modes. In other words, although the lens is of a varifocal design (optically), it pretends to be of a parfocal one (operationally). Smart.

Aperture:
Iris type, 7 blades.
But of course, at this price you would expect a precisely made, multi-blade aperture diaphragm.
Filter thread: 62 mm. Awfully nice; you can use lots of filters you already have. There is no noticeable vignetting with a filter attached.
Lens hood: Included. Maybe it's just a piece of plastic, but a very well made one. It bayonets onto the lens independently of the filter thread. The bayonet action is precise and positive (a rarity among hoods I've tried!). The hood can be stored on the lens in inverted position, fitting the barrel snugly and still allowing access to the zoom ring in case of a sudden grab shot.

Top

Optical TTL viewfinder
Type:
Through-the-lens viewing.

This addresses my main problem with non-SLR (read: sub-$1000) digital cameras, where you have to use either a real-image, optical viewfinder (small and imprecise) or the LCD screen, hardly viewable outdoors, useless in bright sun (the internal electronic viewfinders are not much better). The viewfinder was one of the main original reasons I bought the E-10.

To avoid mechanical complexity (and to facilitate LCD monitor use), Olympus uses a beam-splitting prism in the optical path. Some of the image-forming light passes through it to the CCD (this is what creates the recorded image, also used for the LCD viewing), and some is reflected under right angle to the horizontal groundglass above the prism. An image is formed on that groundglass, and it is viewed through the eyepiece, like in a "regular" SLR.

To allow for eye-level viewing of the groundglass image, there is a "mirror prism" above it (as opposed to a solid-glass pentaprism used in "classic" SLRs).

These two design decisions (splitter and mirror "prism") are quite meaningful. First, the splitter causes a loss in the amount of light reaching the image sensor. This results in lowering the effective ISO-equivalent sensitivity. It may be the reason why the E-10's CCD is rated at 80 ISO, and not 100, like in most other cameras.

Second, the mirror "prism" (I'm stubbornly using quotes, as it is not a prism at all) usually results in darker viewed image than a pentaprism — in addition to the fact that we are already using only the part of the light diverted from the sensor.

This is why I expected the viewfinder to be rather dark. Surprise: the viewed image is quite bright and useful in both composing the picture and focusing. The finder is comparable in brightness to that of two Minolta AF SLR bodies with similar focal-length (although, obviously, darker) lenses I'm using; one has a pentaprism, and another — a mirror "prism". It is no match, however, for my old XD-5 which uses a pentaprism and an Acute-Matte screen, but this is true of almost all present-day AF SLRs.

There are two obvious reasons for the viewfinder brightness being greater than expected:

  • Brighter lens: almost two stops brighter (that's a factor of 4!) than an equivalent 35-140 zoom on a 35-mm SLR — F/2 as opposed to F/3.5 or F/4 (unless you buy something really expensive)
  • Smaller finder magnification (see below).
Still, the Olympus designers were so confident that what they offer is enough, that they decided not to opt for a Fresnel glass instead of a regular groundglass. I'm happy they didn't: a groundglass is more useful in focusing (or verifying the autofocus correctness) — the viewed image just snaps into place.

Note on terminology: some reviewers refer to the E-xx cameras as not "true SLRs", some because of non-interchangeable lens, some because of the beam-splitting prism as opposed to mirror. Wrong on both counts: an SLR (single lens reflex) is a camera with optical viewing through the lens, and it does not matter whether the mirror plane is semi-transparent or not. As a matter of fact, a number of 35-mm cameras used the same approach (with the venerable Canon Pellix being perhaps the first). The acronym "ZLR" (zoom-lens reflex) is just a marketing trick, as "ZLR" sound better than "non-interchangeable lens SLR".

Field coverage:
95% horizontally and vertically; area coverage: 90% (manufacturer's data).
This is as good as in a decent 35-mm SLR, although a precise, 100% coverage would be better. My own measurements (140 mm, subject at 1 m distance) also show 95% coverage in both dimensions.

(Some reviewers report a 95% viewfinder area coverage, not understanding the difference between linear size and area. If I cut an image in half vertically and horizontally, I end up with 25%, and not 50% of the image. Something is wrong with our school system.)

With an almost full coverage, and a bright image, I found myself using the optical viewfinder almost all time, with the LCD monitor useful mostly for reviewing pictures already taken (plus some close-up work).

Magnification:
  • at 35 mm: 0.42x
  • at 50 mm: 0.6x
  • at 140 mm: 1.6x
Smaller than in 35 mm SLRs, where at F=50 mm 0.86 is a good value, with 0.7 prevailing in less expensive, auto-focus cameras. Sill, I think a smaller but brighter finder is better than a large and dim one.
Parallax correction:
not applicable.
Applicable only to non-SLR cameras. Here there is no parallax to correct.
Information in finder:
  • Autofocus status
  • Flash status
  • Macro focus mode
  • Shutter speed
  • Aperture
  • Metering mode
  • Exposure override
  • Exposure lock
  • White balance
These items show as a single row of green LCDs just below the viewed image; in addition, the autofocus and spot metering areas are etched in the center of the groundglass.

The information is complete and not distracting; this is clearly a photographer's (as opposed to gadget lover's) camera.

Diopter correction: Yes. Adjustment is done with a nice, easily accessible, ribbed ring around the eyepiece. The operation is precise and (what a relief!) can be performed while viewing the finder image.
Eyepiece shutter: Yes. This is used when taking pictures without your eye at the viewfinder, so that any stray light entering through the eyepiece does not affect the process (it could not only affect exposure measurement, like in film cameras, but also, as far as I understand, lower the general contrast of the picture).

Top

Color LCD monitor
Type: TFT liquid crystal. The LCD monitor is a disappointment. It is less contrasty and less readable in daylight than the one on the C-3000/3030Z, has a visible time lag (smearing in motion or zooming), sometimes visible noise, also has a very narrow viewing angle and significant glare.

We have to keep in mind, however, that no other digital SLR, regardless of price, offers live preview of the image before the picture is taken.

Physical size:
27x37 mm; 46 mm (1.8 in.) diagonal.
The monitor can be also tilted between 90 degrees up and 20 degrees down. Not as good as in some other cameras (Canon G-2), where you can swing and tilt the display in almost any way you like. Even with one-dimensional tilt, the 20 degrees down is not good enough for over-the-heads shooting in a crowd.
Pixel size:
118k pixels (approx. 400x300).
This is a standard on current non-SLR digital cameras and enough for any purposes. Still, because of the factors mentioned above, the image looks less sharp than on the C-3000Z.
Area coverage:
  • E-10: 100%
  • E-20: 90%
(manufacturer's data).
E-10: Very good, but who cares, if the monitor stinks anyway, and the TTL viewfinder is so good?
E-20: Some of us may consider the limited coverage a disadvantage for critical framing; indeed, I don't understand why doesn't Olympus provide a 100% here.
Brightness adjustment:
Yes, via menu.
Ditto.

The E-20 also allows to choose between two display modes: "raw" or corrected with brightness and color balance as applied to the image.

Top

Shutter
Type:
Mechanical, electronically timed; exact construction and location unknown.
This is a mechanical shutter (as opposed to an "electronic" one, which is not a shutter at all, but rather a process of averaging the CCD response over a measured period of time). I don't know why, but all higher-end digital cameras use mechanical shutters, at least up to some speed.

Originally I suspected that this shutter is a leaf, in-lens type, like it used to be in most SLR with non-interchangeable lenses. This was consistent with two blackouts in my E-10's viewfinder: at the beginning and at the end of the exposure (after all, in order to open the shutter for exposure you have to close it first, as it usually stays open for viewing).

As it turned out, when the E-10 firmware was upgraded, the first blackout disappeared; it also is not present in the E-20! Both cameras show a blackout only at the end of the exposure (although, of course, the viewfinder darkens at the start, as the aperture is closed down to the working value).

The only way to explain the absence of the first blackout is to assume that the shutter is not only behind the lens, but also behind the beam splitter — unless I'm missing something here. In this case, the remaining blackout could be explained only as a visual effect — although how it is achieved (certainly not by closing the aperture fully), remains a mystery. If anyone knows more on the subject, please let me know: I hate not being able to explain how things work...

Speed range:
  • E-10: From 8s (manual) or 1s (all auto modes) to 1/640s
  • E-20: From 60s (manual) or 2s (auto modes) to 1/640s (full-resolution, interlaced scan mode)
  • Adjustable in 1/3 EV increments
  • E-20: shorter times available in the progressive scan (reduced resolution) mode, see below.
Come on, Olympus, why not 1/1000s? — was my question in the original version of this review.

There may be two reasons behind this limitation. Leaf shutters (as opposed to focal-plane ones) rarely reach speeds higher than 1/500s, and at higher speeds they suffer significant light losses (as for a fraction of the nominal exposure time the shutter is only partially open). Using a focal-plane shutter in the four-step mode mentioned above would be messy. I suspect that some digital cameras claiming higher "shutter speeds" do not have a shutter at all, using the "electronic shutter" process mentioned above.

The second reason is related to interlaced scan regime of the CCD, discussed below. Faster shutter speeds would be too short to accommodate the time shift between odd and even lines of pixels.

This may exclude the E-10 from, or limit its usefulness in, some areas of photography (like sports). More importantly, the F/11 and 1/640s combination is quite close to the "sunny 16" exposure: in full sun, medium latitudes, expected exposure at F/11 and ISO 80 would be 1/160s. This means the fastest shutter speed is only 2 EV above the average exposure under such conditions. What if it happens to be brighter, or if we want to underexpose? A 4x, neutral-density (or polarizing) filter may have to be used. (Why at least doesn't Olympus drop the gain to get down to lower ISO speeds?)

"Electronic shutter":
Available (E-20 only) in the progressive scan mode (reduced resolution); up to 1/4000s in a normal sequence (every 1/3 EV), and then a single speed of 1/18,000s.
With all said above, Olympus still was desperate to improve the specs in terms of high shutter speeds. The solution is, however, disappointing. The E-20 allows to use the "electronic shutter", i.e., cutting off the time over which the CCD is response is being averaged.

This camera uses a CCD with interlaced scan, where odd and even lines of pixels are out-of-phase by 1/1000 s or so (remember the Sony Mavica's infamous "field" and "frame" modes?). This means that an "electronic shutter" would collect the image information from every other pixel row only.

Let's eat this frog and call it a feature, said Olympus. And, indeed, in the progressive scan mode the shutter speed range extends all the way up to 1/4000s; additionally, in manual and shutter priority modes you can set the super-high speed of 1/18,000s. This looks good in specs.

The price paid is lower image quality (although the picture is still saved in the nominal, selected resolution). The "jaggies" are quite prominent, especially on contrasty, slanted, lines. Contrary to some reports (and to hints by Olympus), this is not the same as halving the megapixel count; a cursory examination of my samples shows images clearly less acceptable than those from a two-megapixel camera. (Actually, 1.25 MPix would be, I believe, a better estimate.)

Still, this is better than nothing. In some applications (sports, birds in flight) the quality loss caused by interpolation may be more acceptable than that due to fast-moving subject or to camera shake. Consider the progressive scan a thrown-in freebie (it is done entirely in the software, anyway), and don't use it if you find it unsatisfactory. Myself, I'll have to be badly pressed to resort to it.

Bulb (manual timing):
Yes, up to 30 seconds (E-10) or 8 minutes (E-20).
Some users have reported amazingly good (low noise) results from long-time, night exposures. My experience with low-light scenes is also very positive.

Top

Drive modes
Autobracketing:
Three exposures, 1/3, 2/3 or 1 EV apart from each other.
For tricky shooting situations: the camera takes three shots at various settings so that you can choose the best one.

Some cameras (including less expensive models by Olympus) have up to five-frame bracketing, but this is an overkill. With the accurate exposure metering in the E-10/E-20, three frames is just fine, and having the offsets in 1/3 EV (rather than 1/2 EV) is of some advantage.

In most cases when I have to resort to autobracketing, I set the exposure compensation at -1/3 EV, and the bracketing amount to 1/3 EV, thus getting three frames, exposed at -2/3, -1/3, and 0 EV compensation.

Sequence shooting:
Up to three (E-10) or four (E-20) exposures at 2 frames per second.
The images are stored in a buffer memory, and then offloaded to the memory card. When the buffer is full, another picture cannot be taken until at least one image is removed from it, and this takes its sweet time. The LCD screen is also inaccessible while pictures are being stored.

The buffer capacity does not depend on your image storage size and quality settings (full raw images are buffered in any case), except for the progressive scan mode in the E-20 when the number of buffered frames increases to seven (and the sequence speed increases as well).

These numbers seem to indicate that the buffer capacity is 32 MB (E-10) or 64 MB (E-20). Doubling this number would be awfully nice.

Time-lapse:
Yes, in intervals from 1 min to 24 hrs.
After the feature is activated, the camera takes the first shot, and then it keeps going as instructed, entering sleep mode between shots. Every picture taken is briefly displayed on the LCD screen (this preview cannot be disabled to save battery power).
Self-timer:
Electronic, 12-sec delay.
OK.
Remote control:
  • Wireless: included infrared;
  • Wired: optional, electronic.
The infrared remote is the same as the one included with other Olympus cameras. Its 2-second delay is just enough to get the remote control out of sight, if you are in the picture.

The remote is also useful for long exposures with use of a tripod, to avoid camera shake.

Top

Light metering
Type: TTL Through-the-lens. Nothing else expected from an SLR camera.
Sensor: The imaging CCD. The same CCD which records image information, is also used to measure the image brightness. Makes sense.
Metering patterns:
  • ESP matrix
  • Center-weighted
  • Spot
Matrix metering (ESP stands for "Electro Sensitive Pattern") divides the image into a number of square cells and uses some logic to fit the cell readings into the available tonal range. This is the safest bet.

Center-weighted mode just averages the light over the whole image area, with greater weights attached to the center. This used to be the standard on most SLRs until about ten years ago (when matrix systems emerged).

The spot metering is for critical work, when we exactly know which fragment of the image do we want to be shown at the standard (18% reflectance) brightness. In such cases we just measure the exposure at that fragment, lock it, reframe, and shoot.

Overall between these three modes we find everything we need. One possible extra feature would be to allow to lock the exposure and then point the spot at various fragments, reading out the difference between that fragment and the locked exposure. Some film-based Nikons and Minoltas I've used have this feature, and is some cases it comes handy.

Anyway, I'm very pleased with the exposure system. Even difficult scenes (snow, light sources in the frame) are usually exposed well, nicely fitting into the CCD's tonal range. Inspecting the brightness histogram (whether in the camera or during postprocessing) shows that the cameras are great performers here. My digital pictures, taken with the E-10 and E-20, are in most cases exposed better than those taken on slide film with respectable, modern SLRs.

A side-by-side comparison of the E-10 and E-20 has shown that both always come up with exactly the same exposure reading (I've tried this on 20 frames or so), quite impressive calibration.

Top

Exposure control
Modes:
  • Program (full auto)
  • Aperture priority
  • Shutter priority
  • Metered manual
As you would expect.

The program understandably, tends towards wide apertures. As the light increases, it first keeps the lens wide open until the shutter speed reaches a "handholdable" speed (1/30s to 1/125s, wide to tele). At this moment it starts changing both shutter speed and aperture at the same rate, until the latter reaches F/4. This value is then kept constant while the shutter speed increases to 1/640s, from which moment any further adjustment is done by closing down the lens.

(In the progressive mode, the E-20 stays at F/4 up to 1/4000s, only then closing the aperture down as needed.)

Compensation:
±3 EV in 1/3 EV increments.
Useful for objects significantly darker or brighter from the standard 18% "gray" and filling large part of the frame. For example: sunny snow is white, not gray, therefore for pictures with lots of it, use a +1 or +2 compensation.

This usually cannot be done with an image-editing program: once some of the scene brightness range gets cut off from the recorded image and nothing will restore it.

ISO settings:
Auto, 80, 160, 320.
These correspond to film speed in "normal" cameras. Higher values allow for faster shutter speeds and/or smaller apertures (greater F-numbers).

Enhanced sensitivity is useful in low-light situations but comes at a price: greater image noise, quite visible at ISO 320.

I am disappointed, however, that Olympus did not include an option to reduce the exposure index to ISO 40 (or even ISO 20!). This would be useful in full daylight situations, when we still want to reduce the depth of field by using wider apertures. With the top shutter speed of 1/640s, most daylight shots use the aperture of F/5.6 or F/8; being able to open the lens a stop or two wider would be awfully nice. As opposed to some of my other gripes, there seem to be no technical reasons behind this one — just an oversight.

White balance:
  • Auto
  • Seven presets
  • Quick reference
This feature replaces correction filters which sometimes have to be used when shooting on film. It is not as important as it may seem, as color balancing is something which also can be done in postprocessing. I usually set the balance manually to 5500K when shooting outdoors and keep it there.

For perfectionists, the "quick reference" setting allows you to put a sheet of white paper in front of the camera, and say "this is what I mean to be white". The camera will then compute and store the while balance, which now can be recalled as a preset. Very nice.

The preset values are: 3000K (incandescent light), 3700K (same, warm tint desired), 4000K and 4500K (roughly: fluorescent light), 5500K (sunlight), 6500K (overcast), 7500K (open shade). This should be enough for any use.

Top

Focusing
Autofocus:
Passive TTL (through-the-lens), contrast-detection type, with active, infra-red initial setting; single spot only.
With this hybrid system the designers are trying to combine the speed of active systems with the accuracy of the passive ones. Olympus has a long experience with such hybrids, having used them in their non-interchangeable, zoom-lens SLRs.

Obviously, an active system (casting a beam of infrared light on the subject) will perform well in low-light situations and with subjects lacking vertical detail, necessary for passive systems to work well. (Actually, in such cases the camera will use only the active system.)

This should, in principle work very well, and usually it does. The E-10/E-20 has, however, some problems focusing in low-light situations (at EV4 or below). Worse, it will often confirm the image as in-focus while it is hopelessly off the mark. After some time you develop the habit of verifying the focus in the viewfinder and giving the autofocus another chance if you find it confused; this will save you some wasted frames.

A major complaint: the camera uses a single, centrally located, AF sensor, responding mostly to vertical lines. This is at least two generations behind the modern SLR AF technology. You have to remember about it when taking pictures of off-center subjects, and you may have to tilt the camera if the subject displays predominantly horizontal patterns. At least a set of three AF sensors with at least the center one being "crossed" would be a reasonable expectation in a camera of this class and price. Just so-so.

On the positive side, the focusing is done with a motor built into the lens (like in Canon AF SLRs). It is very fast, and the motor is barely audible, much quieter than in most 35 mm cameras.

Manual:
Yes, with use of manual focusing ring.
For manual focusing you may use the TTL viewfinder (real groundglass, and quite snappy, too) or the distance scale displayed on the LCD monitor. Because of the great depth of field, for many occasions even approximate manual focus is more than enough. Obviously, you have to resort to it when shooting through glass, when passive IR systems tend to fail.
Focus range:
  • 0.6 m (24 in.) to infinity in "regular" mode;
  • 0.2 m (8 in.) to 0.6 m in "close" mode.
The 20 cm minimum distance is not as close as we might have wished, although OK for most users.

At the minimum focusing distance (which, as it turns out, is measured by Olympus from the front of the extended lens), the field of view is about 80x60 mm for the longest lens setting, and 232x174 mm for the shortest (my measurements, estimated ±2% accuracy).

What I find quite irritating though, is the necessity to switch between "regular" and "close" focusing modes at about 60 cm distance (mercifully, there is a slight margin, maybe 10 cm, around that value). This stems, I suspect, from the inability of the infrared active system to work at close distances (when set to the "close" range, the camera uses only the passive TTL system).

There is a way around this: set the focus mode to the non-blinking attachment symbol. This disables the IR pre-focus; focusing will be a slower, but without a need to switch back and forth.

Mercifully, switching between focusing modes does not require the use of the LCD monitor, and can be done quickly, without even looking at the top control panel.

Autofocus steps:
From 70 (wide) to 550 (tele).
This is a surprise: the general understanding was that autofocusing in the E-10 and E-20 is continuous. Olympus decided against clarifying the subject at all, except for the Q&A section of their official Japanese Web site, where I found the information (without a clarification whether the numbers refer to the "normal" focusing range or to both ranges combined).

Anyway, the number of steps (depending on the focal length in use) is large enough to make the question rather irrelevant.

Top

Flash
Built-in flash range:
  • 0.6-6.3 m at 35 mm
  • 0.5-5.2 m at 140 mm
The flash covers the lens angle at the 35 mm (really 9 mm) focal length setting. At short focal lengths you should remember to take off the lens hood, otherwise its shadow will be visible at the bottom of the picture.

The red eye does not seem to be a problem, because the flash pops out away from the optical axis. The popping is triggered by pressing a button.

The difference in range is explained by difference in the maximum aperture at both ends of the focal range. Despite the manufacturer's claim that the flash exposure would not work properly below 0.6 m, I was getting well-exposed pictures at less than half of that distance, as long as I was avoiding the shortest focal lengths (lens shadow).

Guide No.: 12.6 m (42 ft). Calculated from the previous data: 6.3*2.0=12.6.
Recharging time:
Below 7 seconds.
As in most of current units, if the flash is fired at less than full power (i.e., at less than maximum subject distance), the recharge time will be shorter. Most of the time, shooting from 1.5-3 m, I was getting 2-3 seconds on NiMH batteries.
Metering:
TTL (through-the-lens).
Flash metering works well, resulting in properly exposed images in the whole distance range from 20 cm (8 in.) up.
External:
Optional, either dedicated FL-40 by Olympus, or third-party.
The dedicated FL-40 unit from Olympus is very nice (tilt, bounce, TTL metering) but expensive. The camera has both a hot shoe and a PC cord terminal, so you may use almost any external flash (although losing the TTL metering in the process). Some experimentation may be necessary to get things right.
Flash exposure compensation: ±2 EV. Very useful. When using the internal flash as a fill-in (to soften shadows in bright sun) I like to set the compensation to -1 or -2 EV.
Usage modes:
Auto, auto red-eye, always off, always on, slow synch (front and rear).
In addition to the expected modes, slow synch (available with or without red-eye reduction preflash) allows you to use flash with long exposures in order to get some detail in the dark background of night or dimly-lit scenes.

In such cases you can have the flash go off at the beginning, or at the end of the exposure. For stationary objects this does not make any difference, but for moving ones it does, as the "streaks" will precede or follow the sharper, flash-generated image, respectively.

For unknown reasons, a forced (always on) flash is available with red eye reduction only in shutter priority and manual modes, but not in others.

Top

Image sensor
Type:
CCD (charge-coupled device), interlaced.
This means, for all practical purposes, that Olympus uses what almost everyone else does. In case of the E-20, the popular belief is that is uses the same CCD (made by Sony) as the Nikon CoolPix 5000 and Sony Cyber-Shot DXC-F707 cameras.
Pixel count:
  • E-10: 4.1 million (as given by Olympus), really 3.76 million or 3.59 megapixels;
  • E-20: 5.0 million (as given by Olympus), really 4.92 million or 4.69 megapixels.
The values given by most manufacturers are usually misleading: some of these pixels are outside of the image area, and I don't care if there are twenty million of them, because they just sit there, doing nothing. In the E-10, the image is build out of exactly 3,763,200 pixels, or, in "binary mega" terms, 3.59 megapixels. For the E-20 the pixel count is 4,915,200, or 4.69 MPix.

(In computer terminology, "mega" means 2^20, i.e., 1048576, not one million; camera manufacturers ignore this distinction, as it makes the specs look less impressive.)

The good news for E-20 owners is that the pixel count gain (as compared to the E-10) is not the 25% expected from the 5-to-4 ratio, but rather 31%. This, in addition to bragging rights, translates into a 14% increase in the print size.

For example, if you were happy with your 9x12-inch prints from the E-10, you will be equally happy with 10.3x13.7-inch ones from the E-20. The difference, if not dramatic, is noticeable.

(This comparison assumes that the bottleneck in picture quality is the pixel resolution, not the lens itself. This seems to be the case here, as the E-xx lens seems to be nothing short of outstanding.)

Importantly, most pictures would benefit from some slight cropping: you are not always able to compose your picture critically in field conditions. The extra 14% gives you some freedom in improving the composition or straightening not-too-vertical lines.

Size: 2/3 inch. The image sensor sizing convention is a holdout from the I Love Lucy years. Actually, this data item does not mean much.
Image size: 6.67x8.90 mm.

(The E-10's CCD, shown above, is made by Sony; so is probably the one used in the E-20.)

These are my calculations, based on the assumption that Olympus defines focal length equivalence in terms of the diagonal of the frame; if not, I may be 2% or so off the mark.

In at least one Web article I found the E-10's image size given as 10.2x13.5 mm. This is obviously wrong, based on an assumption that the image frame diagonal is equal to the diameter of the CCD sensor (2/3 of an inch, or 16.9 mm); it is also inconsistent with the equivalent focal length data given by Olympus. Trust me.

According to the Electronic Imaging Primer by Edmund Industrial Optics (no longer posted on their site), a 2/3-inch sensor has the active area of 6.6x8.8 mm — these numbers are within about 1% from mine.

Image noise: Some. There was a heated discussion on message boards about the noise visible in E-10 images, especially in clear sky areas. Some people find it objectionable; I don't — see a separate semi-technical article on the subject.

Top

Resolution and storage
File formats:
ORF (Olympus Raw Format), TIFF, JPEG.
The ORF format stores the unprocessed information from the sensor (3x10 bits per pixel). It uses lossless compression, and takes somewhat less that 8MB per image. Files can be read with the included Olympus software.

Uncompressed TIFF files are huge: above 11 MB in the E-10, 15 MB in E-20, full size. JPEGs are much smaller but lose some information in the compression process, depending on the degree. TIFF and JPEG files can be read with any image-processing software.

JPEG compression:
Three levels: 1:2.7, 1:4, 1:8.
This is exactly what I was asking for in the C-3000Z review. Not only is the 1:2.7 compression almost impossible to tell from a TIFF, the other ones also became, I believe, more useful.

Now I'm shooting most images at 1:8 (good enough for nice 8x10 prints), only for some applications switching to 1:4, and there is still the lowest, 1:2.7, compression left in case I really need it.

Image sizes (pixels):

  E-10 E-20
Full 2240x1680 2560x1920
Half 1600x1200 1792x1344
SXGA 1280x960
XGA 1024x768
VGA 640x480
A good choice, although it would be nice to have the 3-megapixel, 2048x1536 format, especially in the E-20. Note that the "Half" sizes (close to those of 2-megapixel cameras) are, indeed, almost exactly half size of the "Full" ones (0.52x for E-10, 0.48x for E-20).

We have to realize that all files at less than maximum resolution are created by some way of averaging a number of neighboring pixels of the sensor. This, most probably, includes some interpolation. (Having a closer look at how a CCD sensor works, however, we have to realize that this interpolation is done even in the "native" resolution: each photosite responds to only one of the RGB image components, ant the two others have to be computed by interpolation from the neighbors anyway.)

Therefore I had to change my initial guess (originally published here) that an image in, say, 1600x1200 pixel mode has to be of slightly lower quality than such an image taken with a camera with a "native" 1600x1200 resolution. This depends on the particular algorithm doing the interpolation: if the rescaling is done from original RGB photosite readings, the result should be better; if it is done from the full-color RGB image (i.e., one first interpolated to the native resolution), the result will be slightly worse. I suspect Olympus uses the first solution; my experimenting with the C-5050Z seems to support that.

E-20: Contrary to what at least two "big" review sites say, the pictures taken in the progressive scan mode are not limited to the "Half" size. The image (consisting of every other scan line of the CCD, thus losing half of vertical resolution) is interpolated to (and saved in) the current resolution, as defined by the SHQ, HQ, or SQ setting.

Recording modes:
Full TIFF or RAW and three user-defined JPEG modes.
Once again, someone from Olympus must have read my C-3000 review. The system was changed just enough to become more logical and less confusing.

Switching between modes (referred to as TIFF, SHQ, HQ, and SQ) is done without use of the LCD monitor, using the "press and turn" approach standard on the E-10/E-20. Recording in the RAW format needs a separate setting from the menu.

The three JPEG modes can be defined by the user, each as any combination of pixel size and compression. This is done via the menu system on the LCD monitor.

Usually I have SHQ set to Full/1:4, HQ to Full/1:8, and SQ — to Half/1:8, the last one is still more than good enough for decent 4x6 or 5x7 snapshot prints.

Storage media:
  • SmartMedia (up to 128 MB at present);
  • Compact Flash type I or II (any size); the MicroDrive is officially supported only by the E-20.
Once the Olympus designers decided that weight and size are no longer an issue, they've put both types of slots into the camera, like in the C-2500. Both kinds of cards can be used at the same time, with switching possible on the run (even allowing to copy files between cards).

One SmartMedia card (32 MB) is included with the camera; most users will want to buy a 128-megabyte one right away, and also a large Compact Flash card. Trust me.

After more than a year of using the E-10, I'm still not sure whether two card slots is a good idea. Maybe shaving 6-7 mm off the camera depth instead would be better? Anyway, I've got used to this, and have two cards, 128MB each, inserted all the time. With the 1:4 compression ratio, this gives me about 150 exposures, not too bad, especially that 1:8 seems to be fine for most purposes, and this doubles the capacity. For the E-20 I've got a 128 MB SmartMedia, and a 256 MB Compact Flash, having decided against the MicroDrive (higher power consumption, moving parts).

With SM cards, the controlling circuitry is a part of the device which uses the card, as opposed to CompactFlash, where it is a part of the card itself. This, intended to make the SM cards smaller and less expensive, may have a limiting side-effect: when SM cards with higher capacity show up on the market, an older camera may not be able to handle them.

Top

Power source
Batteries:
  • Four AA cells: NiMH rechargeables recommended, or
  • Two CR-V3 lithium battery packs, or
  • Two RCR-V3 rechargeable Li-Ion battery packs, or
  • Rechargeable lithium polymer battery pack in a handgrip
Here NiMH (rechargeable) are the most often recommended solution, as they keep the voltage flat with time (unlike alkalines), have decent charge (unlike nicads) and no noticeable memory effect (ditto).

Olympus recommends AA alkalines for emergency use only. Still, being able to use AA alkalines (although they go very fast!) can be a lifesaver. Try to get a Sony InfoLithium replacement in a general store in Hell Hole, Arizona!

My initial investment in sixteen NiMH batteries and three excellent MaHa chargers from Thomas Distributing paid itself back in three months. (I keep two chargers at home in the States, and one in Poland, where I visit often.)

The lithium CR-V3s (a pair is included with the camera) have a 10-year shelf life), so you may put them into a drawer for some emergency. Note that Olympus warns against using lithium AA batteries in the E10, as they may overheat and damage the camera. (They are OK for many other cameras, including the Oly C-x0x0 series.)

The rechargeable lithium polymer pack, available from Olympus as B-10LPB, requires a special battery holder (B-HLD10, optional) and charger (B-20LPC). In exchange for the money spent ($400 or so), you get a longer-lasting battery which also is smart, reporting its status to the camera computer.

New in 2004: In a recent development, a Taiwanese manufacturer came up with a rechargeable Li-Ion RCR-V3 battery, with the form factor similar to that of the CR-V3: two AA's side by side. While the claims of CRC-V3's delivering more energy per charge than NiMH are grossly inflated, their self-discharge rate is much lower.

In spite of high prices (a pair of RCR-V3's will cost you $50 or more), this may be an attractive option if you keep your camera inactive for longer periods of time.

My C-5050/5060 section contains an article on the RCR-V3, including some test results.

Battery life:
  • 200 shots with NiMH
  • 500 shots with CR-V3
On the E-20 these numbers should be 50% or so larger.
These data, given by Olympus, may be slightly optimistic, but still, as the LCD is almost not needed, I'm getting 130 frames or more from a set of NiMH batteries on the E-10, or more then 200 on the E-20. These are quite respectable numbers
External power supply:
Optional.
The power supply by Olympus is quite small, but it's single-voltage only, and more expensive than some of the third-party replacements. Don't waste your money. I bought one for the C-3000Z (it seems to fit the E-10, both physically and voltage-wise), and never used it.

Top

Controls
External:
Most settings accessible by pressing a button and turning a dial, with the visual feedback on the top-deck LCD.

Top:

  • Command dial
  • Rotary mode knob
  • On/Off switch
  • Flash mode
  • Size/compression
  • Memory card selection
  • Control panel with...
  • Backlight switch

Front:

  • Shutter release
  • Quick reference white balance button

Back:

  • Command dial
  • Exposure lock
  • Monitor on/off
  • Menu on/off
  • Four-way cursor
  • OK button for menu (also ISO)
  • Protect, erase image and info buttons

Left-hand side:

  • Auto/manual focus switch
  • Normal/close focus
  • Expo. compensation
  • Metering mode
  • Drive mode
  • Flash pop-up button

This side also hosts power, TV, USB, remote and flash terminals, and the LCD monitor release lever.

Complete and intuitive; almost perfect. The Olympus designers listened to the users of their previous models. Ergonomically, the E-10 (or E-20) is, at long last, an example how things should be done. I was able to access most of the camera's functions without looking into the manual.

Don't be intimidated with large number of buttons listed below. It is better to have three buttons than just one, performing three different functions depending on the context. As compared to the Camedia 20x0/30x0 series, the number of buttons has been almost tripled, yet the operation is greatly simplified.

The design follows one principle: to change any setting, press the corresponding button and then turn the command dial until the desired setting is shown in the LCD panel at the top.

Thus, for example, to change the storage mode to SHQ, press the storage button (you have to remember its icon, though), and turn the wheel until "SHQ" shows up in the panel. To switch to the close focusing mode, again, press the focusing mode button and turn the wheel: a small flower symbol will show up in the panel. You can do it even while looking into the viewfinder. The manual sometimes becomes boring, trying to describe these operations step-by-step.

Both command dials can be used interchangeably with any button. Additionally (without any button being pressed) they control the shutter or aperture in the respective automation modes. In the manual mode, though, one controls the shutter speed, and the other — aperture. This is like in most modern SLR cameras.

The mode knob switches between various operation modes, including four exposure metering ones. The On/Off switch is placed on a rotating collar around it.

The release button is very soft, without the clear "half-press" resistance. This led me more than once to an accidental release. On the other hand, once you get used to it, you can trip the shutter really softly, thus minimizing camera shake.

The cursor cluster and OK button are used with menus or while previewing previously taken pictures; in either case when the monitor is on.

Additionally, if the OK button is pressed and held down when the menu is not active, it allows you to change the ISO setting by turning one of the control wheels.

The [Info] button at bottom left has a dual functionality:

  • In the shooting it mode toggles the shutter/aperture and distance information shown at the bottom of the screen, duplicating the top LCD display.
  • In the playback mode it allows to show picture data (exposure, compression, size, etc.) and the brightness histogram. Pressing it toggles the histogram on/off (only if histogram display is enabled from the Settings menu), while holding down and turning the wheel changes the amount of image data overlaid on the display (none, basic, full). A somewhat inconsistent implementation, I would say, but this is a minor complaint.

Note: contrary to some early reports, the histogram display (which I find extremely useful) can be activated only in the playback mode, after a picture has been taken.

The most frequently accessed buttons nicely fit under the left or right thumb (at least when the camera is held horizontally); it is obvious that much thought went into the right placement.

The only setting for which I sometimes have to access the back LCD display is the flash intensity adjustment. I like using the built-in flash as a fill-in in the daylight, and being able to adjust it externally would be very nice.

On-screen menu system: Rarely needed, logical and easy. The top-level menu count is
  • Record mode: 12
  • Playback mode: 4
  • Setup mode: 6 (E-20: 7)
Much simpler and less used than in most cameras (certainly, than in any camera below $2000). It is used mostly for general settings (user's preferences).

The menus are usually just one level deep. In the record (shooting) mode, there are only three camera functions which you activate from a menu: time-lapse (interval) sequences, and autobracketing. (As a matter of fact, I would be even happier if they were moved out of the menu system.)

Top

Other features
Settings at power-up:
Last used.
Strangely, this is a step back from the 30x0 choice of last used, factory defaults or user presets. I've got used to the last one. In the E-10 you can only reset the camera to factory defaults.
External interfaces:
  • USB
  • TV video
Serial (RS-232) interface is not supported; I'm not missing it at all. The TV output is hardwired in either NTSC or PAL (U.S. or European) standard, depending on the market. (In case of the E-20, the TV output standard is reflected in model designation: E-20N or E-20P, respectively.)

The USB interface is of the newer, "storage class device", variety. This means that when the camera is connected to the USB port of your computer with a proper cable (supplied), its memory will be visible as an external disk drive. Moving files is fast and simple, and does not require installing any drivers or other software. (I'm assuming that you're running the Mac OS, Win98SE, ME, 2000, or XP).

In-camera image processing:
  • Sharpening: Soft, Normal or Hard
  • Contrast: Low, Normal or High
  • Saturation: no adjustment
The raw image from the sensor is processed, before being stored, with use of a contrast- or contour-enhancing algorithms. Most cameras do it, but only a few give you a choice.

"Soft" and "Low" correspond to no sharpening and no contrast enhancement, respectively. This is what the advanced user would use, doing all postprocessing on a computer (with PhotoShop or Photo-Paint). Initially I left the settings at "Normal" and forgot about them; now I'm using "Soft/Low" or "Soft/Normal" settings all the time.

Additionally, having a color saturation adjustment would be nice, although not essential.

The Olympus default setting (including saturation) are on the conservative, "less-is-more" side. At the first glance, more strongly manipulated images look more pleasing, and that's why most of the consumer-level cameras apply it more aggressively. On some occasions, however, this leads to undesired effects: highlights are getting blown out (contrast), white artifact outlines appear at edges (sharpness), or detail is lost in strong colors (saturation).

These losses in image quality cannot be corrected in postprocessing; therefore it is safer rather to under-apply the image manipulation, adding only as much as needed when the image is postprocessed. I'm glad Olympus chose its approach as it did, aiming the E-10/E-20 at the more advanced market.

Exposure confirmation:
  • Audible (imitation SLR sound)
  • Visual (viewfinder blackout)
As an old SLR hand, I find the audible feedback very reassuring. It has two presets and two volume levels; can be also switched off. One preset imitates the venerable OM-2 SLR, and another — the L1 (with which I'm not familiar).

See Shutter above for some discussion of the finder blackout.

Noise reduction:
Yes (E-20 only).
After exposing the picture, the camera takes another one, with the light cut off from the CCD, and with shutter speed and ISO setting being the same. Then the second frame is subtracted from the first one; this results in removal of much of the dark CCD noise (at least the most annoying part of it), see my dark noise article.

This takes a while (up to one minute); during that time the image buffer is not accessible, i.e., you have to wait in order to take the next picture. Obviously, the sequential shooting and autobracketing modes are disabled when the noise reduction option is activated (which is done from the LCD menu).

The noise reduction can be enabled (add will go through the whole long and painful process) at any shutter speed, except that the results seem to be discarded if the camera decides that the exposure is not long enough (1/2s or so). This is not very smart.

More, it looks like the threshold depends also on aperture used. For example, at ISO 320 and 1s, the NR kicks in at F/2.4, but it does not at F/11. This means that the photographer in some cases may not really know if the noise reduction was actually applied to the picture just taken. (If you think that any of this is described in the user manual, you are wrong: these guys were too busy trying to teach you how to insert the batteries.)

Digital Print Order Format (DPOF) Image files may include information for DPOF-compatible photofinishers — number of prints and cropping area. This is an entry-level option, used by those who print pictures directly as taken, without any postprocessing.

I found this feature quite cumbersome and confusing to use. I'm just ignoring it in the E-xx cameras. It just sits there, taking one position on the mode dial.

Features not included:
  • Sound annotation
  • Digital "zoom"
  • "Movie" mode
It's good to see these three go. Once again, Olympus listened to the serious users (myself included). If I need a video camera, I'll buy one.
Included software:
  • Camedia Master 2.5
  • PhotoShop 5.5LE (E-10)
  • PhotoShop Elements (E-20)
Although PhotoShop Elements is a better program than PhotoShop 5.5LE, I find both equally irritating, being used to the Photo-Paint by Corel. Camedia Master has such bad press than I haven't even tried it. The only compelling reason to open the software package may be the RAW image-importing plug-in, usable from any program accepting Adobe-standard filters — you will need it if you prefer to import raw images into your postprocessing program.

Top

Image quality
The proof is in the pictures. And indeed, here my impressions are very, very favorable. Here is a small page of E-10 sample images, showing reduced full-frame images next to the original-size, not manipulated fragments.
And here is a set of samples from the E-20. The loss of image quality in the progressive scan mode is also shown here.

The lens is sharp (hardly any difference between center and corners, quite amazing), and has the flare well under control — with the help of good internal finish and the deeply sculpted hood. The distortion at the wide end will be visible in some applications, however.

Based on my preliminary observations, the amount of in-camera postprocessing applied in the E-10 and E-20 (even at "normal" settings) is less than that in most other digital cameras (including Oly's 3000 series), leaving more room for image manipulation with external software. This is what I would expect from the professional-class camera, although at the first glance it may seem less pleasing than images from many lower-end cameras.

After some experimentation I decided to avoid any in-camera postprocessing in most of the situations, setting sharpness to "Soft" and contrast to "Low". The default "Normal" settings may result in more pleasing snapshots straight from the camera, but the images at "Low/Soft" give better results when submitted to postprocessing on your computer.

A note on comparing images between various cameras: some Web sites have a nice collection of comparison images. The caveat is that often these are not images of real objects "at large", but shots of 2-dimensional, previously taken pictures of such objects. While some aspects of the image quality can be judged from such images, many (like handling of glare, high-contrast transitions, white balance, and more) cannot.

Top

The competition

At this moment (mid-2002), the E-10/E-20 line still faces no competition in its class; well, it is a class of its own in the two-dimensional plot of performance and price.

Olympus seems to have caught other camera makers with their pants down, and they were not able to catch up in the following year.

Some offerings from Canon, Nikon, Fuji, and Sigma, come close, but on one hand, they cost significantly more (if you include a comparable lens), on the other — they use standard, 35-mm format lenses.

Some people may consider the latter an advantage. It would have been one, possibly, if these cameras had the image sensor of the size of a 35 mm film frame. Their sensors, however, are about 1.5 times smaller (linear size), and this means that using a 24 mm wide-angle lens gives us the equivalent focal length of 36 mm, hardly an impressive wide-angle performance.

Moreover, every lens involves some compromises. Among others, the sharpness at frame edges can be improved at the expense of that in the center, and both are judged in terms of the confusion circle, usually expressed in terms of the linear frame size. Now, for the 35-mm cameras adapted to digital this value should be 1.5 times less than for film cameras, but I don't think it is. Need I say more?

Of course, I expect these makers to come up with some lenses specifically designed for that breed of cameras. They will be, however, still facing a number of "legacy problems".

As one of my friends used to say: "If you add a big engine to a scooter, it won't become a racing car. It will still remain a scooter, with a big motor attached."

In the price range just below the E-xx there are some nice models out there made by Minolta, Sony, Olympus, and Fuji, but all of them are crippled by one main shortfall: lack of the true, optical TTL viewing. An electronic TTL viewfinder will not replace a true optical one; try them side by side and you'll know what I mean. Please don't send me emails to the contrary.

Top

The bottom line

With the E-10/E-20 Olympus brings a professional-level camera within reach of an advanced amateur — the one who has to have the best (and who can afford it). This is a strong attempt at excellence. The cameras are capable, highly flexible, easier to use than most, and, most importantly, produce high-quality images.

Choosing a tool to be used in your favorite pastime is a highly personal thing. Almost every camera has some good points, and all have some shortcomings. The trick is choosing a model with pluses making your photography better and more enjoyable, and minuses you can either work around or get used to. While I'm highly satisfied with the E-xx cameras, and the results they provide, your mileage may vary.

Keeping the above in mind, here is my personal and, possibly, opinionated recommendation: if you can afford the E-20, go for it. If not — there is no excuse for not at least having a serious look at the E-10, with the image quality high enough to guarantee that the camera will not become obsolete in the next few years.

I have been using an E-10 since '2000, and I like it even more now than then. Having voted once with my own, hard-earned money I didn't hesitate to do it again for the E-20, and yes, I'm glad I did.

Top

Web resources

Reviews

Anyone can grab a camera, run around with it for two days, then rephrase manufacturer's press release and specs sheet, throw in some fluff, and call it a "camera review". Unfortunately, that's what most computer magazines are publishing. Majority of their reviewers seem to have no previous experience in photography (and not too much in computers, either).

We are lucky, however, to have a number of Web sites with people who know what they are writing about (well, at least most of the time). Don't look for the big "consumer sites"; these are not very useful. Stick to specialized digital photography ones like these listed below, run by dedicated individuals.

User pages

These pages, run by photography buffs like myself, can provide quite a lot of useful information from people who actually use the equipment on a day-to-day basis. They are not frequently updated, but still worth visiting.

Olympus-sponsored pages

Olympus presence on the Web is just an embarrassment; don't waste your time trying to find any information there.

There is one exception: the Olympus Japan site, with extensive sections on the E-10 and E-20. The only minus is that all this is in Japanese. Still, with help of the Altavista's Babelfish translation engine I was able to find there quite a lot of information not available anywhere else. An entertaining byproduct of a visit there is the Babelfish translation itself, with quite a few unintentional comical effects.

Top


My other articles related to the Olympus E-10 and E-20 cameras

Camedia® and Olympus® are registered trademarks of Olympus Corporation.
This page is not sponsored or endorsed by Olympus (or anyone else) and presents solely the views of the author.


Home: wrotniak.net | Search this site | Change font size

Photo News | The Gallery


Posted 2000/12/10; last updated 2006/02/04 Copyright © 2000-2006 by J. Andrzej Wrotniak