|
Using Your E-500 |
|
|
My other articles related to the |
|
These are some explanations and recommendations on using the Olympus E-500 digital camera. It is a companion to another piece, Customizing Your E-510, E-410, or E-500, which I would recommend reading before (rather than after) this one. Two topics have been excluded from this article: flash photography and image reviewing functions. I am considering separate articles on these subjects, at least on the latter. I am also planning to extend this piece so that it becomes fully applicable to the new E-510; at this moment you just have to assume that most of the information here is applicable to that camera, although the new features (most notably: Live View and Image Stabilization), obviously, are missing.
|
|
Table of Contents This is a rather long article, so I think you may find this table handy in navigating it. | ||
|
Why bother? Yes, you can set your E-500 to AUTO and just keep pressing the release button. But if you wanted to rely on this, you would have bought a point-and-shoot camera with a super zoom, fifty scene modes, movie feature, and an MP3 player thrown in. But no, you wanted creative control; that's why you bought an SLR. You believe that an intelligent human being is capable of making better decisions than a computer program. You want to take your pictures, not to let the camera take them. And, yes, you are right! A remark on terminology: the term point-and-shoot refers to cameras allowing the user no control over the picture-taking process except for framing, zooming, and choosing the moment the picture is taken: just point and shoot. More specifically, I'm talking here about the user setting exposure parameters; this is where I would draw the line. Different "scene modes" do not count: the user still does not know what the camera may change and why. I have seen this term used, sometimes disparagingly, for any non-SLR camera. This only shows illiteracy of the writer; the term is well-established. It is difficult to classify a Graflex or Leica as a P/S, while some consumer SLRs of the past were darned close to P/S, offering only program modes with no override capabilities. Classifying a camera as a point-and-shoot has nothing to do with the format, viewing system, or lens interchangeability. It is all about control, or the lack of it. Actually, most SLRs can emulate a P/S camera when set to an "All Auto" mode, and many P/S models allow for some limited exposure adjustment (like compensation). The borderline may be a bit fuzzy. All settings available in cameras can be roughly divided into two groups:
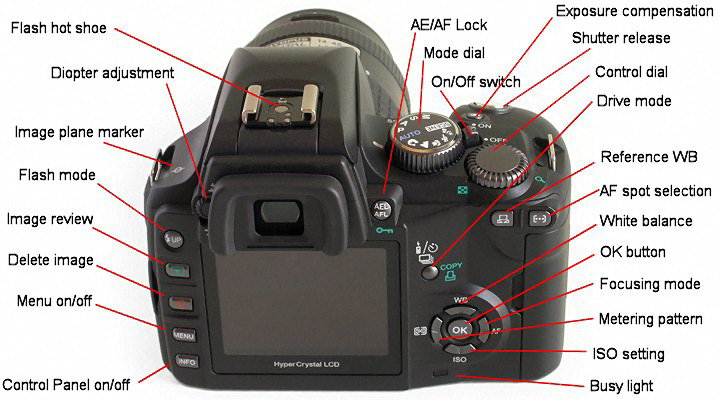
While the dividing line between these groups is not always clear, most parameters, like the ones shown as examples above, leave no doubt. The first group (user preferences) is discussed in another article. Here we focus on the second one: shooting parameters. All external controls of the E-500 (buttons, switches, and dials) are located on the camera's back and top. Here they are, at a glance:
The camera top houses some of the essential controls:
The part of the camera back to the right of the LCD monitor houses quite a number of control buttons:
The buttons to the left of the LCD monitor are, except for the round flash mode button, dedicated to monitor and image review functions.
The round flash mode button, just above these four, serves a dual function:
Note also the diopter adjustment knob, immediately to the left of the viewfinder eyepiece. Surprise: this one is purely mechanical! Using the external control buttons All external control buttons are used in one of two ways:
(The flash button is a mixed case, as described above.) If the control dial is not moved within a short time period after pressing the button, the adjustment screen goes away. This "grace period" can be adjusted to your liking. While the press-and-turn method is the fastest way of making an adjustment, not all functions are accessible this way. Many of those which are not (in addition to those which are) can be accessed from the Control Panel, discussed in the next section. There is nothing wrong with accessing the preference parameters through the menu system, very much like the custom functions in some film SLRs ("set the custom function 5 to setting number 3"). You do it just once. The shooting parameters, though, should be accessible more easily, without scrolling through a menu just to find them. At least this should be the case in a well-designed camera. Ideally, every shooting parameter should be serviced with its dedicated dial, with the dial position showing at a glance the parameter's setting. This is right: the same interface element is used to adjust the setting and to see its current value. This is how it used to be in all classic SLRs. Digital cameras are facing a problem here. First, the number of adjustable parameters is higher than in film cameras, adding variables which were not directly controllable there, like the ISO setting (before: load another film) or color balance (ditto, or put a filter on). Secondly, the manufacturers strive to lower production costs, if only to offset high R&D and prototyping expenses they are incurring while the technology is still evolving fast. Extra buttons and (especially) dials cost more than electronics does, and they take extra room on the camera body. This is why digital cameras are, generally at least, not as obvious, easy, and pleasurable in operation as the classic film ones. In spite of those limitations, the designers of the E-500 did an exemplary job, much better than that on any other camera, except maybe the Minolta Maxxum 7D. The camera differs from all previous Olympus models. First, it inherits from older models two control metaphors:
Second, it adds a new way of doing things, and this may be the most under-advertised feature of the camera:
This may sound like much, but in real life it is almost revolutionary. Sometimes I find it faster to use the CP than a dedicated button, and I usually have a look at the CP anyway, to see all parameters at a glance. Actually, there are two versions of the Control Panel: brief and full; they are toggled with the [INFO] button at the bottom left of the camera's back; the third state is, obviously, Off. In the beginning, right after I bought the E-500, I tended to use the full version more; now, when I'm no longer tweaking the camera, and when my essential preference setup is rather stable, I find the brief version more intuitive in use: if a given setting is not shown there, this means it rather should not be adjusted during a shooting session. Let me go through individual settings and adjustments, starting from those which, I believe, may be used most often. Before that, however, let me describe the procedure of adjusting a setting from the Control Panel; I will be referring to that procedure all over the place.
Before turning the Control Panel off, it is a good habit to verify that the remaining settings are what you want. Forgetting to do that is one of the main reasons of botched pictures. The Control Panel allows you to save images raw (.ORF files, containing the original information as taken off the sensor), as TIFF files (converted to RGB, no compression), or in the common JPEG format (converted to RGB, compressed). For more about this, see a separate article in the Nitty-Gritty section.) While this choice should be rather made at the stage of customizing the camera, not being changed from one shot to another, it will affect a number of shooting adjustments discussed further down. Some of the camera settings do not affect the picture-taking process (i.e., the exposure proper), but are applied only at the stage or raw-to-RGB (TIFF or JPEG) conversion; therefore if you are shooting raw, they will not be really relevant; the decisions are being postponed until the raw development stage in postprocessing on your computer. Even if not applied, these settings are still stored as metadata in your raw ORF files; during the off-camera conversion you may apply them as set, or use other values. In particular, these settings are: white balance, sharpness, contrast, saturation, and tonality (high/low/normal key), including any implicit offsets specific to the selected Picture Mode. The E-500 has also an option to perform the raw-to-RGB conversion in-camera at any time after the raw image has been saved. In such case, the conversion parameters used will be as set when the conversion is done, not as when the picture was taken. Note that the original is retained after the operation. RGB image quality (size and compression) This section is relevant only if you decide to save your images as JPEG files. Even then, I would rather suggest not to change the JPEG settings from one frame to another: this is too much hassle, leaving too much chance for an error. The JPEG format offers three presets, referred to as SHQ (Super-High Quality), HQ (High Quality), and SQ (Standard Quality). The compression can be user-defined for the HQ and SQ formats, and for the latter you can also define the image size in pixels. The options are listed and discussed in another article. The Control Panel allows for quick switching between RAW, TIFF, SHQ, HQ, and SQ settings/presets. I find the HQ preset as defined in the above article OK for most of my uses, and rarely switch to SHQ, only occasionally using the raw ORF format (which may have some advantages if you really know what you are doing when post-converting your images into one of RGB formats). Additional options: RAW+SHQ, RAW+HQ, and RAW+SQ, allow for saving, along with the raw, non-converted, version, a JPEG one in a selected sub-format. Unless you are a busy pro, having to send one copy off to your editor while keeping the full-information original for postprocessing later, I doubt you'll find much use for this feature. Before we go into detailed settings, we have to discuss the most basic one: exposure mode. This can be changed in only one way: by turning the mode dial, located prominently on the camera top. (Readers familiar with exposure modes may want to skip the remainder of this, rather long, section.) The exposure mode dial has a number of indented and marked positions, each linked to a particular way in which the camera will be setting the basic parameters: shutter speed and aperture (in some cases, a few others). Shown on the dial as [Auto], this is basically a program exposure mode (see below), with all adjustments still enabled. It differs from the Program mode in one aspect only: switching to Auto resets most of the exposure settings to defaults. (The settings will not be lost, though: switching back to any other mode will restore them as they were.) The parameters being reset to defaults are:
The flash will also rise by itself when needed in the Auto (only!) mode if the Auto Pop Up option in the All other settings, which can be rather treated as camera customization preferences, are not affected by switching to the Auto mode. (This includes the image parameters assigned to each of the Picture Modes.) While this arrangement makes sense, some may find the approach somewhat confusing. I would recommend using the Auto mode only as a "panic button" in a hurry, when you have modified a large number of settings, and need to revert quickly to something reasonably safe. In my six months with the E-500 I haven't used the Auto mode once, except of playing with it in the very beginning, and again now, to make sure the information in this article is correct. This setting is shown on the dial as [P]. Here things become more predictable. In the program exposure mode the camera sets both shutter speed and aperture, with all other settings adjustable and remembered between mode switching. This is how most of us will use the camera. The exposure program in the E-500 is quite straightforward, at least at a given (non-Auto) ISO setting. Going from low to high light levels, the procedure is as follows.
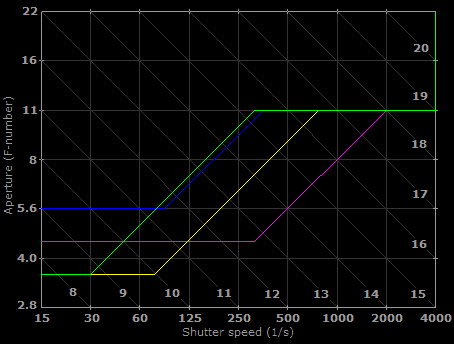
Judging from the exposure graphs provided by Olympus, the shutter speed when the camera starts adjusting both exposure parameters depends on the lens focal length (in case of a zoom, the one currently set), and is set to be one over doubled focal length; for example, for 50 mm it will be 1/100 of a second. This is consistent with the blur-prevention rule of thumb used with 35-mm cameras for the same image angle. (If you would like, you may skip over the detailed discussion of the program exposure. I won't be offended, and you will save a few minutes...) In most of film cameras, the pre-defined F-number used in phase (3) is the maximum value possible for the given lens, so that phase (4) is absent. In the E-System, though, this value has been chosen as F/11. The reason is diffraction: loss of sharpness at smallest aperture openings. The effect depends not on the relative F-stop value, but on the absolute diameter of the lens aperture (measured, say, in millimeters), and this is smaller for cameras with smaller sensors. It is, therefore, preferable to start closing the aperture beyond F/11 only when we run out of fast shutter speeds. The diffraction-limited aperture value may depend on the focal length used (being higher for longer lenses), but the three program curves published by Olympus, for focal lengths ranging from 14 to 54 mm, all bend at F/11. Strangely, the E-300 and E-500 manuals do not include program exposure graphs for the lenses bundled with these cameras, only for the 14-54 mm zoom and 50 mm macro. It is possible that the program selects higher limiting F-stop for longer lenses, but I haven't checked that. |
|
Here are the Olympus program curves I have derived based on the above information, for the two E-500 kit lenses.
The diagonal lines denote EV exposure indices (read: scene brightness): all points on a given line have the same exposure. For example: at EV 16, with the 14-45 mm zoom the program will set 1/500 s at F/11 (regardless of the focal length set), while with the 40-150 mm lens at 150 mm it will use 1/1000 s at F/8. |
|
|
If you understood the verbal description in points (1..4) above, the picture is redundant; you can ignore it and live happily ever after. If ISO is set to Auto, then at the lowest light levels (with the lens fully open) we could expect the program to raise the ISO setting. Not so: the ISO stays at 100 all the time, and the auto-increase is applied only when shooting with flash. The basic autoexposure program, as described above, can also be shifted towards faster or slower shutter speeds. This corresponds to moving the exposure-versus-shutter line described above to the left or to the right. For example, if the regular program comes up with the exposure of 1/60 s at F/8, shifting it by 1 EV towards faster shutter speeds will result in 1/125 s at F/5.6 — this is the same exposure (amount of light on the sensor), achieved with a different parameter combination. Shifting the same exposure by 1 EV towards slower shutters will give 1/30 s at F/11. While some users will find the program shift useful in controlling the depth of field and/or motion blur, the same effect can be achieved just by using aperture priority (or shutter priority) mode. I could easily live without it, but with the market increasingly driven by feature count (or, to use Ken Rockwell's term, measurebators), makers would not dare not to offer it on their models. Shifting the program is done by turning the control dial when the AE system is active (for some time after the shutter release has been half-pressed, or after the picture has been taken); turning the wheel to the right increases shutter speeds. The exposure mode indicator, both in the viewfinder and Control Panel, changes then from "P" to "Ps". It it, unfortunately, too easy to move the wheel by accident and apply the shift without being aware of it. Therefore it is a good habit to check for the "Ps" mark before every picture and remove the shift if it has been dialed in by accident. This may be not so simple as it sounds, as the indicator does not show in which direction the program has been shifted. You may end up dialing even more of a shift when trying to remove it, and the only indicator will be the disappearance of the small "s". It may be faster just to move the mode dial off the Program setting and then back. An arrow icon instead of the ambiguous "s" would be a better indicator. In this mode, shown as [A], you set the aperture (by turning the input dial) and the automation system adjusts the shutter speed to provide proper exposure. While this mode of work is most useful when you want to have some explicit control over the depth of field, many photographers use it all the time. Usually you will be in one of two situations.
Actually, a camera with just aperture priority, and no other exposure modes, would be as usable as one with all different AE modes and dozens of "scene" ones, except that it would be trashed in all reviews, so no manufacturer dares to think about such a model. The last set aperture value is remembered next time you enter the aperture priority mode again. To use the shutter priority, set the mode dial to [S]. Now you will be setting the shutter speed, and the camera adjusts the aperture in order to provide the right exposure. This mode can be used to assure that motion blur is avoided (or, to the contrary, introduced on purpose), As the aperture range extends for just a few EV units (F-stops), the system may easily run out of the adjustment range; this will be shown with the aperture value blinking in the Control Panel and inside the finder. In such case the image will be under- or overexposed, unless you switch to a different shutter speed. If not, the picture will still be taken, improperly exposed as it is. There are two other kinds of behavior possible in such cases: one is just refusing to release the shutter, another, to use the largest or smallest aperture available, and then adjust the shutter as needed to still provide the proper exposure. I believe the second approach works best, and I think Olympus should have used it. The last set shutter speed will be remembered next time you enter the shutter priority mode again. Turn the dial to [M] and the camera will not set either aperture or shutter speed; you are on your own. This is useful in some non-typical situations (like, for example, taking pictures of effects made by moving light sources). I also switch to manual always when shooting the Moon. In short: there are situations when you know better what exposure to use. Not only: with a non-dedicated, auto-thyristor flash you will be setting the shutter to a speed of, say, 1/125 s, the aperture to a value your flash expects, and then the flash will be adjusting its output according to the readings of its own sensor. While this is not exactly a manual exposure (the flash is doing the metering), your camera does not know about it. Until I bought the FL-36 flash, I was using the older FL-40 (which does not communicate with the E-500) in this mode, with very good results and no hassle.
While in the manual mode you adjust the aperture with the input dial (thumbwheel); the same dial will adjust the shutter speed if the The metering system is still working in the manual mode (that's why it is often referred to as "metered manual"), and the difference between your exposure as set, and the one metered, in EV, is shown in the top-right corner of the Control Panel. For example, "-2.3" means that your exposure is 2.3 EV lower than metered. The same information is additionally conveyed on the exposure compensation scale to the heft of the value shown. The shutter and aperture used are remembered when you leave the manual exposure mode, and recalled back when you re-enter it next time. These are pre-packaged sets of settings, supposed to provide good results in particular shooting situations. The approach has its advantages on the mass market, where most camera users never bothered to read a single book on photography. The E-500 includes five such presets (portrait, landscape, close-up, sports, and night scene) accessible directly from the mode dial, and fifteen (!) selectable from the monitor after the dial is set to [SCENE]. The latter option also includes the five accessible from the dial, but they differ in the degree of adjustments the photographer is allowed to introduce.
Unfortunately, there is no detailed information provided on how exactly do the "scene modes" work, even if some information on parameters used is shown in the Control Panel. If you experiment with some of these modes and find they provide results you like, fine. Still, I would rather recommend that you make the decisions, unless you want to use the E-500 as a point-and-shoot camera, in which case buying it might have been a misunderstanding. This is, no doubt, the setting you will be adjusting most often; possibly for every frame. The reason is that, as much as camera makers try, the autoexposure system will never be sure how do you want your picture exposed. There are many reasons for that, enough for a long, separate, article; let me just use one example. Take, under identical lighting conditions, close-up pictures of two flowers: bright and dark. The first will be probably underexposed, the other — overexposed, as the camera will use different exposures in both cases, being unable to tell how much of the overall metered scene brightness is due to the ambient light, and how much to the subject itself. You may be using the best super-duper, 1024-point, fuzzy-logic, whatever, metering system, and the camera simply still does not have a way to tell those two factors apart. The exposures as metered will be different, while they should stay identical: after all, the light did not change. A thinking photographer will use some amount of positive exposure compensation for the first shot, and of negative — for the second. Or, a hand-held exposure meter could be used to measure the incident light, not the light reflected from the subject.
Exposure compensation is implemented in the E-500 in a simple (and quite standard) way: press the See also the section on flash exposure compensation. Don't even think about using the menu system to adjust your ISO setting. Instead, do it from the Control Panel, as described in the Individual Settings section, or with the dedicated button (down-arrow). Adjusting this value up from the default (lowest) ISO 100 is like loading faster film into your film camera. You can use faster shutter speeds and/or smaller apertures (larger F-numbers) at the expense of some increase in noise (in film: grain) and narrowing the dynamic range (maximum highlight-to-shadow ratio the image will convey). The E-500 images at ISO 200 are difficult to tell apart from those at ISO 100; at ISO 400 they are also respectable, noise-wise. You will get usable results at ISO 800, and quite noisy ones at ISO 1600 (well, for a digital SLR, that is). Most times outdoors ISO 100 is recommended, as offering the best tonal range. For reasons described elsewhere, I'm not fond of leaving the ISO setting in the Auto position. Switch to higher ISO if the shutter speed becomes no longer handholdable, and you cannot use a tripod or another form of support. As a rule of thumb, to get the longest "safe" shutter speed, double the (actual) focal length (millimeters) at which you are shooting, and use that as a denominator of the fraction, expressed in seconds. For example: when shooting with the zoom lens at 45 mm, the safe speed will be 1/90 s. Remember that this strongly depends on the photographer. Some people press the shutter release with a convulsive jerk; they should use even faster speeds (or learn how to use a camera); some people can shoot handheld at times ten times longer. It may take some practicing, but is less expensive than buying an image-stabilized lens. While this setting can be modified directly by pressing its semi-dedicated button (also serving as the up-arrow) and turning the wheel, I found myself, more often than not, adjusting it from the Control Panel. This is because I have this habit of using the panel anyway to quickly verify all my settings. In any case I see no reason why would someone use the menu system to do it. All digital cameras allow you to set this to Auto. This is rarely a good thing: the WB metering is prone to the same kind of errors as exposure metering. The camera has really a tough time trying to decide if your picture is reddish because your subject is reddish, or because you are shooting under reddish light. (An additional, external WB sensor, which the E-500 does not have, makes it a bit better, but still.) Having a significant white area in your frame may help some, but not quite. This is why some time ago I switched to using the presets. The discussion which follows is divided, for better readability, into outdoors and indoors sections.
When shooting outdoors, most often I'm using the Sunny (5300 K) preset, shown with a
The other daylight presets, You have to remember to switch to a different setting when taking pictures indoors without a flash. When shooting indoors with flash, leaving the white balance at 5300K should be just fine, but so would be also setting it to Auto. Only when we want to use the ambient (non-flash) light, things are becoming a bit more complicated. Various types of incandescent (as opposed to fluorescent) light sources differ significantly in color temperature (that's measured in degrees Kelvin, and that's what the WB setting compensates for). Halogen lights usually have higher color temperatures than traditional ones, and within the same class lower wattage bulbs have lower color temperature (more reddish light) than higher-wattage ones. There is no one incandescent setting which would fit all these sources equally well. Because of that, you may choose to use the Auto setting when shooting under incandescent light. Under most living room conditions most cameras (including all Olympus models I've tried) tend to undercompensate somewhat, leaving the images on the reddish side. This is not necessarily a wrong thing, as the warmer tint gives the pictures a specific atmosphere. Still, if you want a truer color rendition (whatever "truer" means here; the scene is basking in a reddish light!), you will be better off avoiding the Auto setting. With no doubt, I'm getting the best results with the white balance set by reference (Olympus refers to it as "One Touch WB"), and this will be discussed a bit further down this page.
Under typical incandescent light (read: my living room), the This is described in my E-500 customization article; I wouldn't recommend resorting to this option often: assign the slot to something you will be using most often, and keep it there. Just for the record: you can do it without using the menu system, if not in the most intuitive way:
(The trick in points [3] and [4] also works when the CWB option is selected in the menu.) Another option, also not my top choice, is to introduce WB correction to the incandescent setting (ibidem). Once again, I think this should reflect your preferences rather than the shooting conditions, therefore I am rather against changing it in the field. Reference WB will deliver better results anyway. The situation with fluorescent light is even more confusing. Fluorescent light does not provide a full, continuous spectrum of light wavelengths. Actually, the discharge in fluorescent tubes generates only a number of separate wavelengths; luckily, various tube models available on the market have a layer which absorbs that and re-radiates light in a more continuous spectrum, more pleasing to the eye but still not following a standard black-body (thermal) distribution shape. If you are not a physicist, the only thing you may have to remember of this is that (a) some tubes may provide a kind of light for which color rendition will be a tricky task; (b) color temperatures quoted for those tubes are not actually color temperatures (that's why they are often referred to as "equivalent"), and adjusting your camera for these kinds of light is usually more than just moving the color temperature slider.
All that said, the bottom line is that many cameras provide WB setting for a number of fluorescent tube types. So does the E-500, with no less than three fluorescent presets: Our eye accommodates not only to light intensity, but also to its color, so there is no easy way to guess which of the three fluorescent presets matches best the actual tube type used. There are three ways out of this mess:
The only way to go really wrong under fluorescent light is to use the wrong kind of preset. One day I may come up with a series of comparative samples shot with the E-500 at various settings; for the time being you may refer to such a series I've shot for the Olympus C-5050Z. The easiest way to have the white balance totally messed up is to shoot under mixed light, like in a living room, with some fixtures using fluorescent, and some others — incandescent light sources (and, possibly, with some daylight from the windows thrown in). This almost guarantees that different areas of the image (highlight, shadows) will have different color tints and no smart Auto WB feature, or no amount of correction in postprocessing (unless you want to correct WB differently in different masked areas) will help you here. In such situations the best you can do is to remember to never do it again; you may also convert the image to monochrome just to hide the total WB disaster. This happened to me a couple of times, when doing a quick-job tabletop photography with one kind of light and forgetting the room light fixtures of another kind. Even with the room light being quite weak compared to my tabletop lights (that's why I neglected them), the shadows left by the main source were clearly off-balance. This is the hard (and best) way of learning things... Setting white balance by reference This is my favorite way of setting the white balance for pictures shot indoors. It is fast, reliable and accurate; it worked most of the time in the Olympus E-10/E-20 cameras, was strongly improved in the C-5050Z (that's when I got hooked on it), and continues to work very nicely in the current Olympus SLR models. It may sound like a hassle, but it is not: you do not have to perform the operation before every picture, but only when entering a new interior, with its specific light type (be it incandescent or fluorescent).
Performing the operation takes less time than describing it: point the camera at a neutral (white or gray) surface, hold down the
This not only performs the measurement, but also switches the camera to Strangely, there seems to be no easy way to cancel the operation if you are unhappy with the sample shown; you have to accept the setting or re-try, and only then you can go from Reference WB to something else. If the neutral reference surface is not uniform enough, or contains brightly-colored objects, the camera may display a "WB NG RETRY" warning, but it is not really fussy about it; in my experiments the E-500 was doing that only if I did something really stupid, like having a bright red subject covering most of the frame. Still, I believe that using a uniform, neutral surface is the right way, as it really tells the camera: "this is what I want to be rendered neutral". A piece of white paper, a white tablecloth, or a white shirt should be good enough.
Anyway, the method is really accurate and offers, I believe, the best results, and it is quite fast, requiring just three button presses: This is like choosing between five pre-defined film types (two of these being monochrome). I would recommend these Picture Modes to be set once, tweaked to your liking and then left alone, as described in detail in my E-500 Preferences article. Changing them all the time will lead you to non-predictable results. Even switching between the preset modes should be done in moderation. I would recommend against doing it back and forth within the same shooting session; it will make the results inconsistent; also postprocessing of your images will become more difficult. After gaining some experience with your mode presets you will be able to decide which one to use for which occasion. Actually, I spend 95% of time in my Natural mode. This parameter adjusts the tonality of the image, mostly the mid-tones, towards dark (low-key) or light (high-key). From my limited experience with this feature of the E-500 it looks, however, that the highlights and lowest shadows are also affected. I prefer to apply such effects in postprocessing, leaving this at Normal. Still, feel free to experiment; just remember to go back to Normal when you are done. If you are tempted to switch between different metering patterns while using the camera, don't. Listen to me now and thank me later. Still, if you insist, you can set the pattern either from the Control Panel (both simple and detailed view) or using the button dedicated to this function (left-arrow).
The E-500 offers three metering patterns: From the menu system (only) you can define how the ESP matrix metering will work whenever you switch to it: with or without an emphasis on the area around the AF sensor used. If you follow my customization advice, you will not be giving up the spot-metering capability (a powerful tool when knowingly used), as my recommended presets assign spot-metering to the AE-lock function, activated with the [AEL/AFL] button. Spot metering is intrinsically linked to exposure lock: after all, how often do you have a spot at the standard brightness level exactly in the center of your frame? You just have to lock the exposure when using spot metering, as only you know what do you want to put at the standard gray level; if your settings assign spot metering as the regular (i.e., non-AEL) mode, you will always have to half-press the shutter release and recompose. In my arrangement, you switch to spot just by holding the lock button; if you do not use the lock, you will be using the (safer) matrix or center-weighted pattern. The spot-metering functionality, when used without understanding, leads to unpredictable results. I have received quite a few emails from users of various models, complaining that their exposures are not right, even though they've "switched the camera to the spot-metering mode" (well, it is advertised, so it must be better, whatever it is!). It turns out that those people are using spot metering without AEL lock — this means the camera is setting the exposure based on the very center of the frame, regardless of what actually is there: a white face or a black tuxedo; this is almost as good as not metering the exposure at all, possibly worse, being totally random.
The two extra spot-metering modes ( Auto-exposure and/or autofocus lock Normally, the camera meters the exposure at the moment the shutter release button is half-pressed. The exposure remains locked (i.e., shutter speed and aperture will remain as set at that moment) even if you re-point the camera to a brighter or darker area, as long as the release remains half-pressed. This means instructing the camera: "take a picture here, but estimate the correct exposure in this place, which I (the photographer) consider better for that purpose". A typical use of this feature is when taking a picture with a large area of bright sky: most of the frame is bright, so that the camera may underexpose. If you lock the exposure with the shutter release, the camera will use your pre-set metering pattern as discussed above; it will also lock the autofocus — unless you've changed that when setting your preferences. Another way to lock the exposure is by pressing and holding down the [AEL/AFL] button. This does not lock the autofocus (which may be still locked with the shutter release button, at least in the single AF mode); the method also allows you to assign a different metering pattern to be used when the lock button is pressed; see above, again. The way in which the lock button and shutter release work together (regarding autoexposure and autofocus lock) is customizable; I consider my recommendations to be at least a good starting point. In any case, this is not something you should change from day to day. Using the Control Panel, or the dedicated (right-arrow) button, you can quickly switch between three focusing modes:
Obviously, in most situations you will be using single-frame autofocus (SAF), as it is more accurate and uses less battery, switching to the continuous AF mode only for rapidly moving subjects (sports, children). The manual focus (MF) mode is, well, manual, and I resort to it only with legacy (non-AF) lenses, which must be used with an appropriate adapter. With my middle-aged eyes and the tiny finder in the E-500 (well, just 10% smaller than in competing models, but still small), I trust the AF more. Still, my preference setup for the E-500 introduces an interesting variation on the subject: assigning the [AEL/AFL] lock button to a one-shot autofocus when the camera is in the MF mode: AF on demand. If you are planning to use manual focus, you should try this option (obviously, it will work only with AF lenses).
This option is accessible either from the full version of the Control Panel or via its own dedicated I suspect the system tends to use the center sensor whenever possible: this sensor is sensitive to both vertical and horizontal lines, reverting to one of the side sensors only if the center one does not have enough detail to focus on (the side sensors can focus only on horizontal lines, assuming your frame is positioned horizontally). It may be a matter of your working habits, but I consider the AF point setting not to be a very useful feature, unless the camera is used on a tripod. When shooting from hand, I find it more convenient to check which of the three AF lights blinked, and if I don't like the choice, I may point the camera where needed and lock the focus and exposure with the shutter release button, then re-frame and shoot. The only time I'm using this option is when I want to disable the side spots at all, to gain full control over AF. Checking the red AF confirmation signal in every shot is a good idea anyway. You don't want the camera to focus on distant trees between the heads of your models. You know what you're shooting; the camera doesn't. Anyway, the button is there; I sometimes regret that it cannot be re-assigned to some other function. The name of this setting is a remnant of times when you actually needed to attach a motor drive to your camera in order to shoot serial pictures, without cranking the wind lever before exposures. The E-500 allows you to switch between two drive modes:
The buffer fills up after four frames in raw ORF and TIFF image format modes, as well as in SHQ. For HQ and SQ this depends on image compression and (in the latter case) pixel dimensions. If you use the 1:8 (or 1:12) compression ratio, you will be able to keep shooting until the card is full. In my customization presets, see also below, I recommend setting SQ as 3200×2400 pixels (almost full native resolution) at 1:8; this allows for unlimited frame sequences, and the 1:8 compression is as good as the "high quality" setting on some other SLRs. You have to keep in mind that both exposure and focus are locked before the first frame in the sequence; this makes sequences longer that three or four frames not really useful anyway in action shooting. They may be, however, useful, when you use any of the bracketing functions, as described further down. The "drive settings" also include a self-timer (with 12 or 2 seconds of delay) and infrared remote (no delay or two seconds). Both can be useful in tripod-based shooting, as the E-500 is missing the wired remote option. (I hope Olympus may still come up with one, using the USB/AV socket, which can already be used for remote control from a computer, if you have the optional Olympus Studio software. The wiring is there!) You may switch quickly between both cards plugged into the E-500 (Compact Flash and xD-Picture) right from the Control Panel, using the normal highlight-and-turn metaphor. How and when you do it will depend on your personal preferences. I usually save images to a CF card, using the xD only when running out of space, which happens less and less often as CF capacities increase. CF cards are usually faster; while Olympus recently announced a faster xD type, I will believe that only when I run my own comparison; some earlier claims regarding the xD standard turned out to be overinflated. Another thinkable procedure, which I haven't used yet, may be to shoot to one card, and copy the most valuable images to the other, just to avoid an accidental data loss. Bracketing is a shooting technique where a sequence of images is taken with a value of a particular setting (most often, exposure) slightly changing from one frame in the sequence to another. If the adjustment is done by the camera, not manually by the user, we refer to this as autobracketing. This technique was especially useful in film photography, with no means of checking the results before the film was developed. The E-500 offers bracketing in three variables: autoexposure (with or without flash), color balance, and focus. All three (or four, depending on how you count) are operated in a similar way.
First, the camera has to be set to bracketing mode. This is done from one of the corresponding entries in the Now, things are getting a bit messy. In most film cameras pressing the shutter release once the autobracketing is set will cause the whole frame sequence to be shot. Not so in the E-500: each frame in the sequence requires, by default at least, a separate shutter release operation. (An exception to this is white balance bracketing, described above, where just one frame is shot, but it is then converted to RGB in a number of ways.) This behavior can be modified by setting the drive mode to serial. To shoot the whole sequence at a time you will have to keep the shutter release pressed until the sequence ends, but at least the series will stop after that, even if the button is still pressed. This works fine in the most typical case of exposure bracketing, where the sequence has the fixed length of three frames. It does not, however, in WB and AF bracketing, where the sequences can be longer. Depending on your quality (image compression) setting, the serial mode may run out of buffer space, and the series of quickly shot frames will be interrupted before the whole bracketing sequence is taken. To continue, you have to press the shutter release again. All this means that, whether you are using the serial or single frame mode, you may end up with only a part of the bracketing sequence shot. The next picture you take (right away or the next week, as the bracketing status is not reset by turning the camera off and on again) will have the bracketed parameter adjusted according to its number in the sequence. Therefore, regardless of the kind of bracketing you are using, you have to remember two things:
This is set as AE BKT in the The first frame in the sequence is shot at the nominal exposure (i.e., as measured, plus any exposure compensation dialed in); the second below, and the third above that. Depending on the autoexposure mode, the adjustment is done by changing the shutter speed (aperture priority), aperture (shutter priority), or both (program). Flash autoexposure bracketing works in a very similar fashion, except that it is shown as FL BKT in the menu. A more important difference is that exposure adjustment here is done by modifying the flash output (burst length) rather than shutter speed or aperture. Interestingly, using the "regular" exposure bracketing with flash seems to be working in exactly the same way. Therefore the only reason of having flash bracketing as a separate option might be that it will have no effect when shooting without flash, although, to add to confusion, in such a case a bracketing sequence will still be shot, albeit with all frames exposed identically. My advice: forget the flash bracketing at all; use the regular one instead.
Olympus refers to this as manual focus bracketing, and the feature is accessible as MF BKT from the same Therefore, at the first glance at least, the feature may seem to be of marginal only usefulness, but this is not the case. Yes, I would prefer to see focus bracketing available in the AF mode (where the AF may be done on the critter's whiskers instead of eyes, a meaningful difference with a long lens wide open). A simple work-around, however, allows us to enjoy this functionality. This is achieved by switching to the manual focus mode, but using the AF "on demand", assigned to the AEL/AFL lock button. This assignment is described in my E-500 settings article, and the whole idea is discussed elsewhere, so I will not repeat all details here. Let me only mention, for the record, that focus bracketing offers a choice of five or seven (!) frames, with frame-to-frame differences set to one or two arbitrary "steps".
This bracketing, shown as WB BKT in the This feature is not really useful: if you feel a need to "bracket" the color balance, set the camera to raw image file format and adjust the balance in postprocessing. You do not gain any advantage by using this function, and therefore it is safe to ignore its existence. (Note that the same is not true about exposure bracketing: once a raw image is over- or under-exposed, the lost information cannot be retrieved, therefore shooting raw does not give you any, or almost any, protection.) As I have already mentioned, WB autobracketing can be used "on top" of any other. This may lead to up to sixty-three files saved from a single sequence: seven focus positions times three WB ones in the red/blue plane times another three in the green/magenta dimension. Looks rather excessive. Another quirk of this function is its accessibility even in the raw mode. As a result, up to nine raw .ORF files will be saved, all with exactly the same image data, just with different in-camera WB information, which will usually be overridden anyway in postprocessing. My preference setup disables the flash auto-popup, for a number of reasons. I think anyone who buys an SLR should be legally obliged to know when to use flash. Therefore my customized E-500 requires the flash-up button (top left) to be pressed to raise the built-in flash, and, once raised, the flash will fire every time, regardless of the ambient light. The built-in flash, anyway, should be used for two purposes only:
(Unfortunately, the possible third use, as a fill light with an external unit, is not possible with the latter mounted on the camera's hot-shoe; the mechanical constraints do not allow the built-in flash to be raised then, unlike in the E-300 or E-330.)
Whether with an external or internal unit, there is a question of exposure compensation. A separate My choice is the former ("on top"); refer here for more details on how and why. In such an arrangement you should be using the extra flash compensation only if your images with flash tend to be off the mark as compared to ones without. The Olympus FL-36 flash is a well-matched companion for the E-500. When using it, you have to keep in mind that it has its own compensation setting (set with an external dial in the unit back), and this setting is applied on top of whatever you've set up on the camera — so that the total exposure compensation may be a sum of three separate settings. Flash photography with the E-500 is a separate topic, deserving its own article. In particular, the co-operation between the autoexposure system and the flash unit is somewhat different than I first expected (although for some good reasons). One day I hope to be able to move this section out, and have the new article under way, but no definiotive promises. One thing at a time. This article does not try to replace a full, detailed reference manual the E-500 deserves and is sadly missing. It is just a public service attempt by a single individual, a peer-to-peer effort. If you find any features' descriptions missing or misrepresented, let me know. The article has been significantly expanded and enhanced since the original posting, but it still remains a work in progress. At this moment, my to-do list starts from flash photography and image review. |
|
|
My other articles related to the |
|
Evolt® and Olympus® are registered trademarks of Olympus Corporation.
This page is not sponsored or endorsed by Olympus (or anyone else) and presents solely the views of the author. |
| Home: wrotniak.net | Search this site | Change font size |
| Posted 2006/04/09; last updated 2007/09/13 | Copyright © 2006-2007 by J. Andrzej Wrotniak |
 exposure compensation button. Pressing it allows for the proper
  AF spot selection: press and turn the control dial. The function is described
  Settings 1