Using the camera's flash to take pictures of small objects leads to quite disastrous results, as you may witness every day on the eBay.
I have to take such pictures quite often, for these articles, but, first of all, for my vintage Exakta pages. Some visitors to this site are asking for advice on this subject, so here it is: how to set up your simple yet adequate tabletop studio at home at the minimum expense of money (about $7) and time.
Here is what you need:
- A rectangular sheet of translucent plastic used for kitchen or office fluorescent light fixtures, 2x4 ft in size;
- A can of flat white acrylic spray paint.
I bought both in my local Home Depot store for $5 and $2, respectively.
The plastic sheet has one side dimpled, and the other side smooth. Paint the smooth side white (don't blame the mess on me) and let it dry. Done.
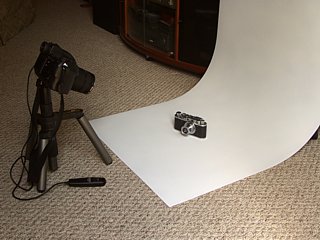
The plastic bends just enough to provide a nice, gradually sloping background for your objects, and when not in use, it can be stored upright behind a bookcase. Any dark smudges resulting from use can be easily cleaned with a cotton ball and rubbing alcohol.
The white sheet not only provides a clean background, but it also diffuses the light, softening it a lot for a more pleasing effect.
The whole shebang at work is shown in this picture.
I've been using this setup for the last two years with good results; the plastic does not crack, neither does the paint, contrary to my original concerns.
Shooting techniques
-
Turn the flash off.
The main trick is not to use the camera's flash. This is easy when you take your tabletop pictures outdoors, in the open shade of your backyard or balcony, with enough light to provide handheld exposure times. For shooting indoors, refer to the next section. What, your latest digital marvel does not allow to disable the flash? Tough. Forget you saw this page.
-
Step the lens down.
Another important point is to maximize the depth of field, so different parts of your subject will be sharp even if they are at varying distance from the camera.
The depth of field in digital cameras is far greater than in film-based ones. Even so, I would recommend setting the F-number to 5.6 or 8.0 on a digital camera (and all the way on a film one). You can do it only if your camera has the aperture priority mode, where you pick the F-number, and camera sets the shutter speed as needed.
If your camera does not offer this mode, you may still get enough depth of field. Just try using as much light as possible for your shooting and hope for the best.
-
Consider a tripod.
If the shutter speed selected by your camera is 1/30s or slower (and indoors it will always be the case), your picture may suffer from the camera shake. Consider getting a tripod. For tabletop applications I'm often recommending the Slik Mini Pro ($25 or so at B&H Photo), as long as you do not need more than 8" or so of height. Shown in the previous picture is the Cullmann Mini Magic which I use to gain more height.
A purist would say you also need a remote release. Only a few digital cameras accept a wired remote, but many use an infrared one which will be equally good. If not, consider using the self-timer to avoid camera shake. Finally, you may try pressing the camera on the tripod down with your hand, and activating the shutter button gently — still better than shooting from hand.
Natural and artificial light
Any direct light is usually not good for tabletop photography; diffused light provides more pleasing results.
Open shade (i.e., with the object hidden from the direct sunlight but with lots of open sky available) is a good source of soft light, and you may often find it in your backyard. (It may also allow you to shoot without a tripod.)
For many reasons you may want to set up your studio indoors. You can still use daylight, arranging your setup next to a large window (or a patio door), but the exposure times will be longer, therefore a tripod will become essential.
The picture at right was taken under these conditions.
To soften the shadows you may use a piece of white paper held on the other side of the subject, away from the window. You will be surprised how much difference it makes.

0.7s at F/8.0, white balance at 7000K
In order to use incandescent (electric bulb) light, you do not have to go for any expensive lightning equipment. Domestic household bulbs may do a good job, as long as their light is diffused. I'm getting very pleasing results with two nightstand lamps equipped with large, tubular paper shades (bought at Ikea for $10 or so apiece).
Unfortunately, the light provided by domestic bulbs is quite reddish (our eye gets used to it, so we barely notice). Your digital camera has a a capability to adjust the white balance automatically, but even with that, the pictures may come out too yellow. Many cameras allow to set the white balance manually, try it.
The Olympus C-5050Z which I'm now using for most of my tabletop photography has a very efficient way of setting the white balance by reference — by pointing the camera at a white area and telling it, via a menu option, "I want this to be white".
This feature in the '5050 works very well, better than in the Olympus E-10 or E-20. I'm getting properly balanced pictures from my nightstand lamp setup; see the example at the right.

1s at F/5.6, white balance by reference
Some tweaking of the white balance may be also used in daylight pictures: without the direct sunlight your pictures may be too cool. Again, many cameras provide a manual "open shade" setting, and the reference setting in the C-5050 handles the situation very nicely.
Learn more
Following my advice will not guarantee that you'll be getting studio-class photographs; still, they will be better than ones shot on your kitchen table with the camera's built-in flash, at the minimum expense of time, hassle, and money.
If you would really like to learn more on the subject, I can recommend A Short Course in Digital Desktop Studio Photography, a book by Rick Ashley and Dennis Curtin, available directly from the Short Courses Web site. The series also includes well-written books on using many popular digital camera models, including the Olympus C-5050Z and E-20, worth checking out.