
|
Panasonic Lumix GX9
|
|
|
My other articles related to the |
|
Update History 2018/07/03 — E-M10 Mk. III added to body and viewfinder comparisons. 2018/07/01 — Completed. Any future additions or modifications will be listed here and marked in the text. 2018/03/01 — A placeholder version: just the basics.
|
|
|
|
| | ||||||
|
Out of the two major supporters of the Micro Four Thirds standard, Panasonic is the one making most (actually: all except one) EVF, rangefinder-style models. The only such camera from Olympus is the Pen F (discounting the other Pens, accepting accessory, externally mounted finders).
|
Here is the newest (as of this writing) hump-less EVF camera from Panasonic, the GX9, announced in February of 2018. IT seems to have a mixed heritage, being derived both from the GX8 and its simplified (if younger) sibling, the GX85 (a.k.a. G80, a.k.a. G7 Mk.II).
Naming the same camera model differently for different markets is a practice I greatly dislike; it is confusing, not to say deceitful, and smells Orwellian (who controls the language, controls thinking).
While Canon seems to be the worst offender here (just an impression, I may be wrong), neither Panasonic, nor Olympus are without blame. What next? Different names depending on U.S. state or E. U. member country? Without getting into all that let me just quickly walk you through the features and specs of the new camera, commenting on them as I go.
| 
| This, clearly, is intended as a compact, yet fully-functional (read: EVF) camera, very much like the GX85 and unlike the GX8. Yes, the latter has environmental sealing, but that's at the expense of being wider and taller. The table below compares the GX9 against its line-up siblings, but also against the Olympus Pen F, an obvious (if more expensive) competitor. In particular, W×H (the lateral footprint, if you want to sound technical), is a good measure of body size (ignoring the depth, not relevant here).
|
At 124×72 mm (W×H) mm, the GX9 body almost exactly matches the Olympus Pen F and the GX85, with the G8 being 15% larger, which is quite significant. Weight-wise. it sits right in-between, being most densely-packed of the bunch.
|
| For users who are looking for a compact general-use, μFT body (travel, hiking, street shooting) this is good news; so it is for those who need a backup (or, generally: second body) to go with their main rig. Some, however, would prefer a bigger, heavier and/or sturdier camera: metal alloy body, more resistant to abuse, dust- and drip-proof, better balanced with heavy lenses, and with more room for easily usable controls. These of us will not be happy with the changes in the GX9. and they will be better served by the flagship Lumix, the G9, another recent addition to the Panasonic line-up.
|
| 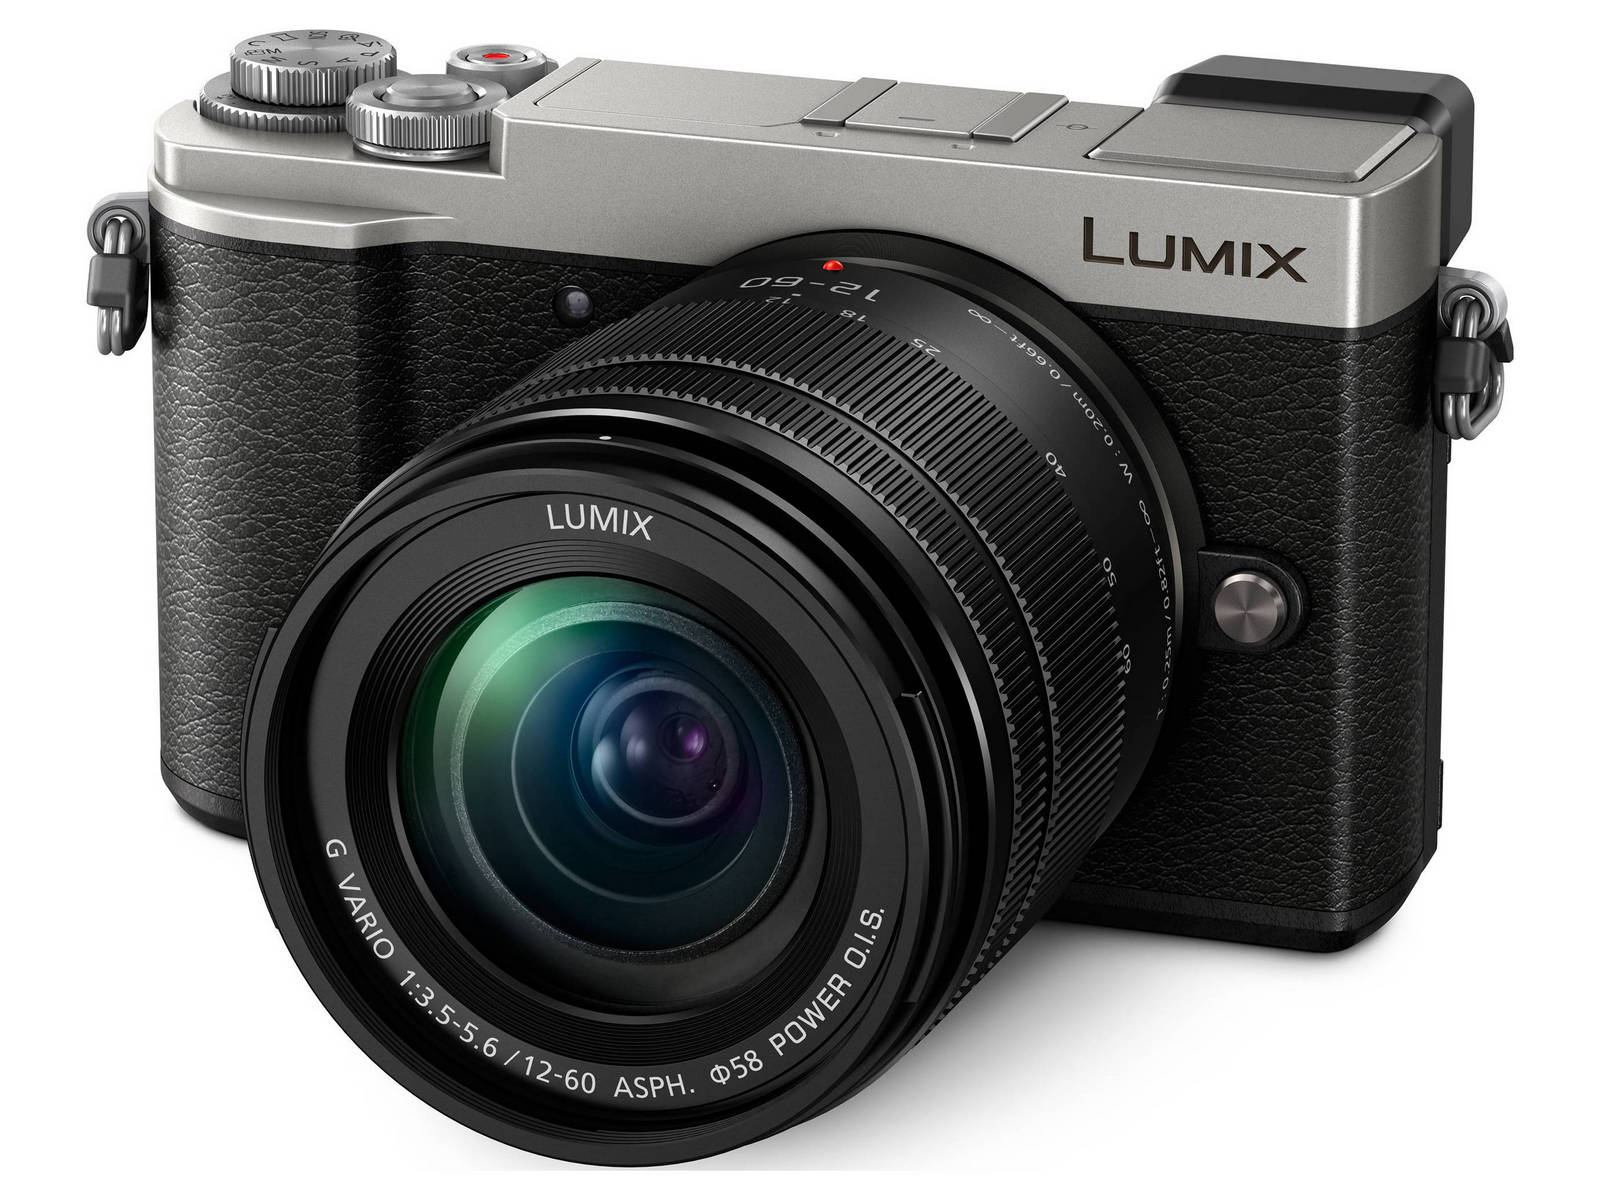
The GX9 body is available in silver (or chrome top)...
| 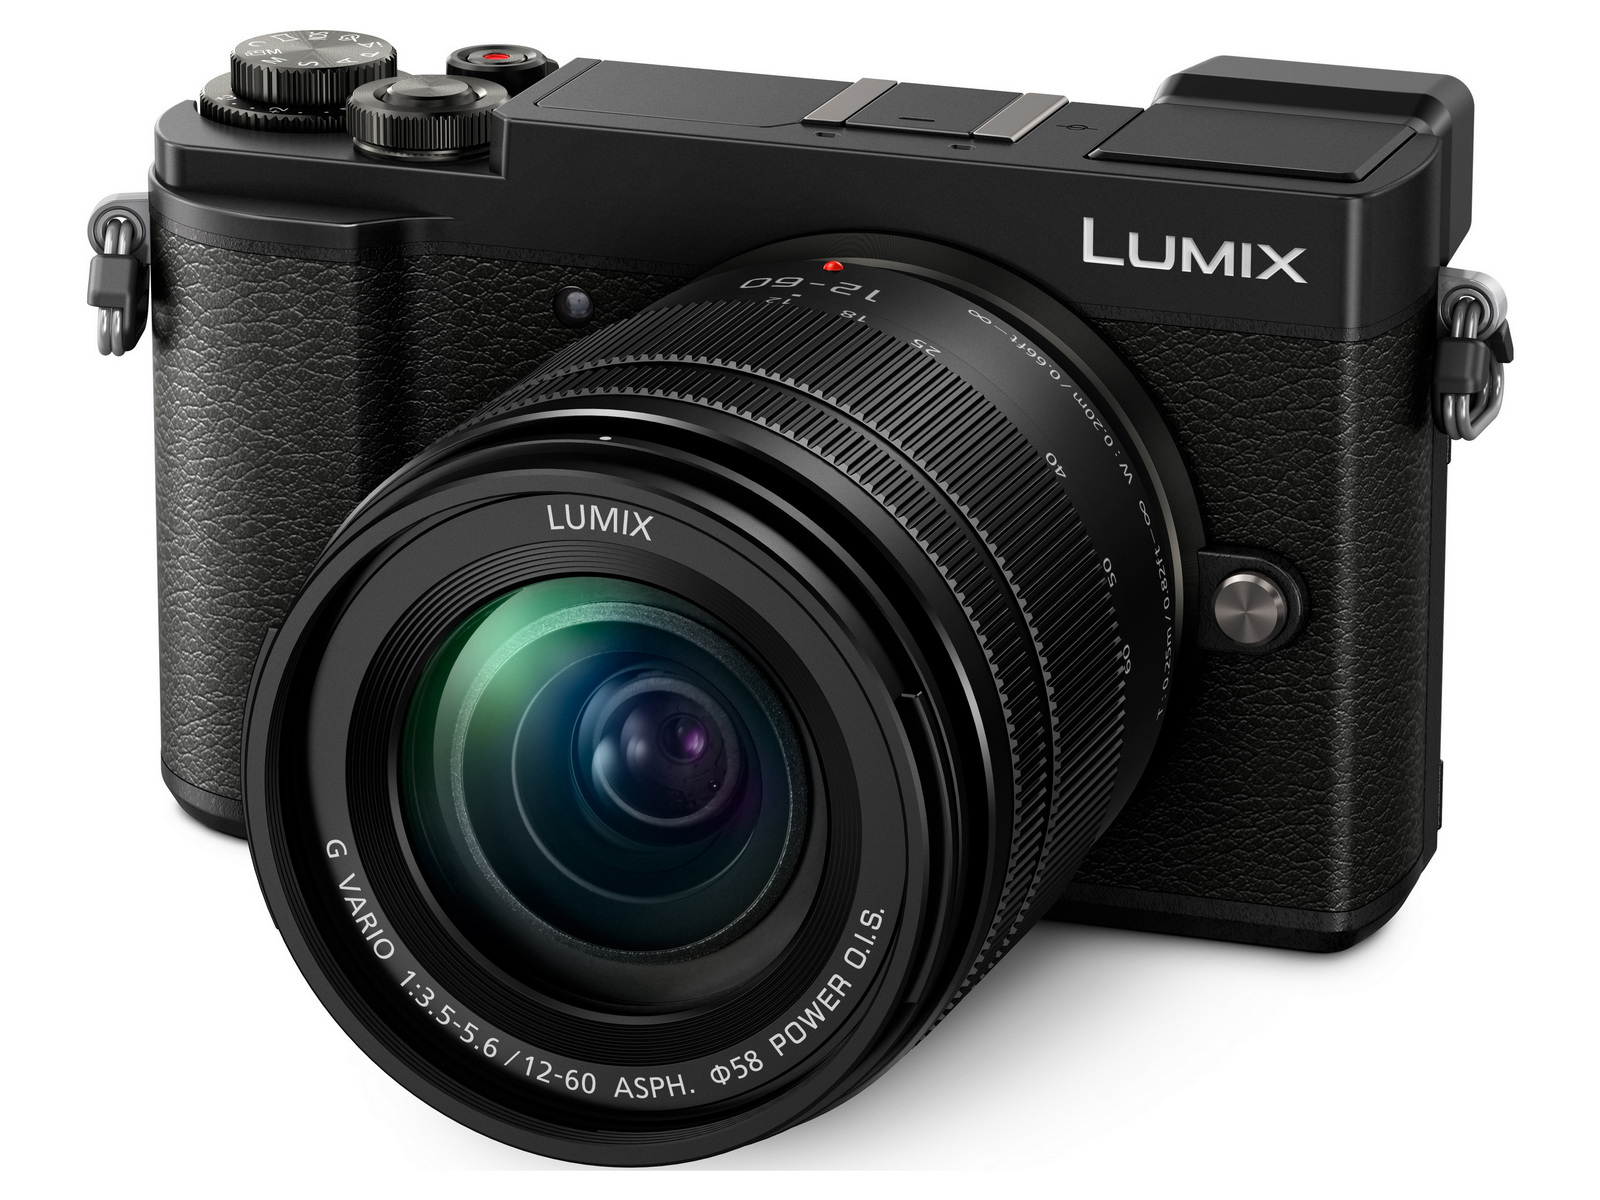
...or entirely in black.
| Aesthetically, I like the GX9 body design: form derived from function, no excessive ornamentation or fashion statements; business-like and understated , but not crude. The camera comes in silver or black finish (with "silver" being rather chrome top on a mostly black body, as seen above). While the silver version is prettier, the black one will be more practical: less chance for camera reflections in shiny parts of the subject. Your pick.
| The small, sculpted body grip may feel too small for some shooters, especially those using larger lenses. The optional HGR2 grip adds 6 mm or so to camera's height and offers a larger front protrusion, but no additional power or control capability.
| 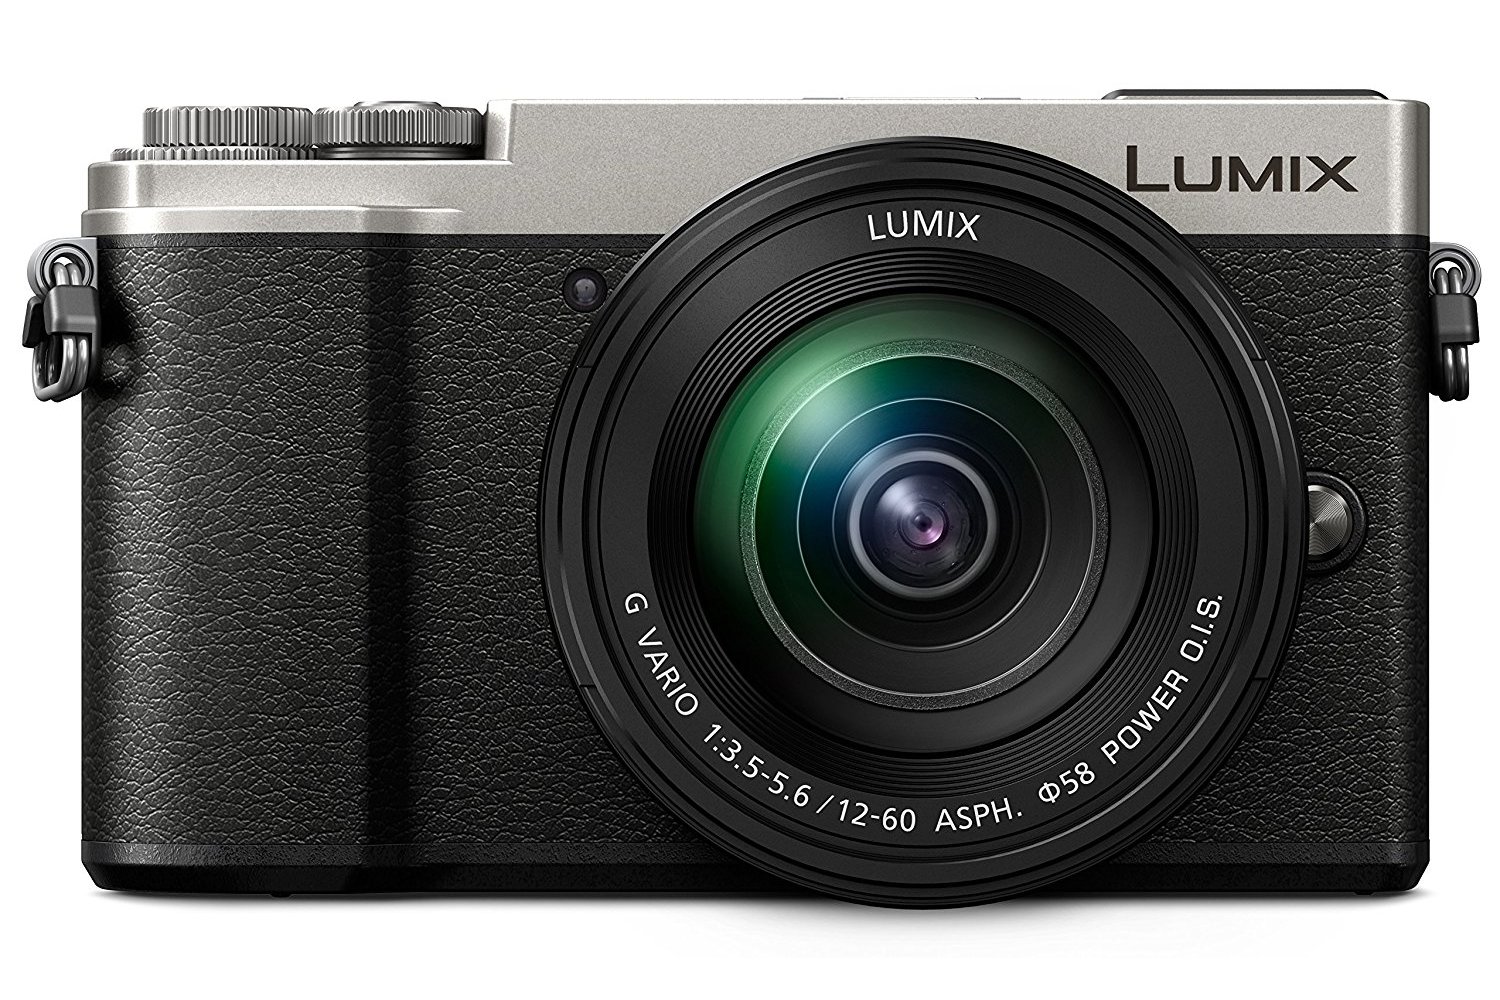
Again, the Puritan layout on the camera's front: a small grip, AF-assist light, and lens lock button
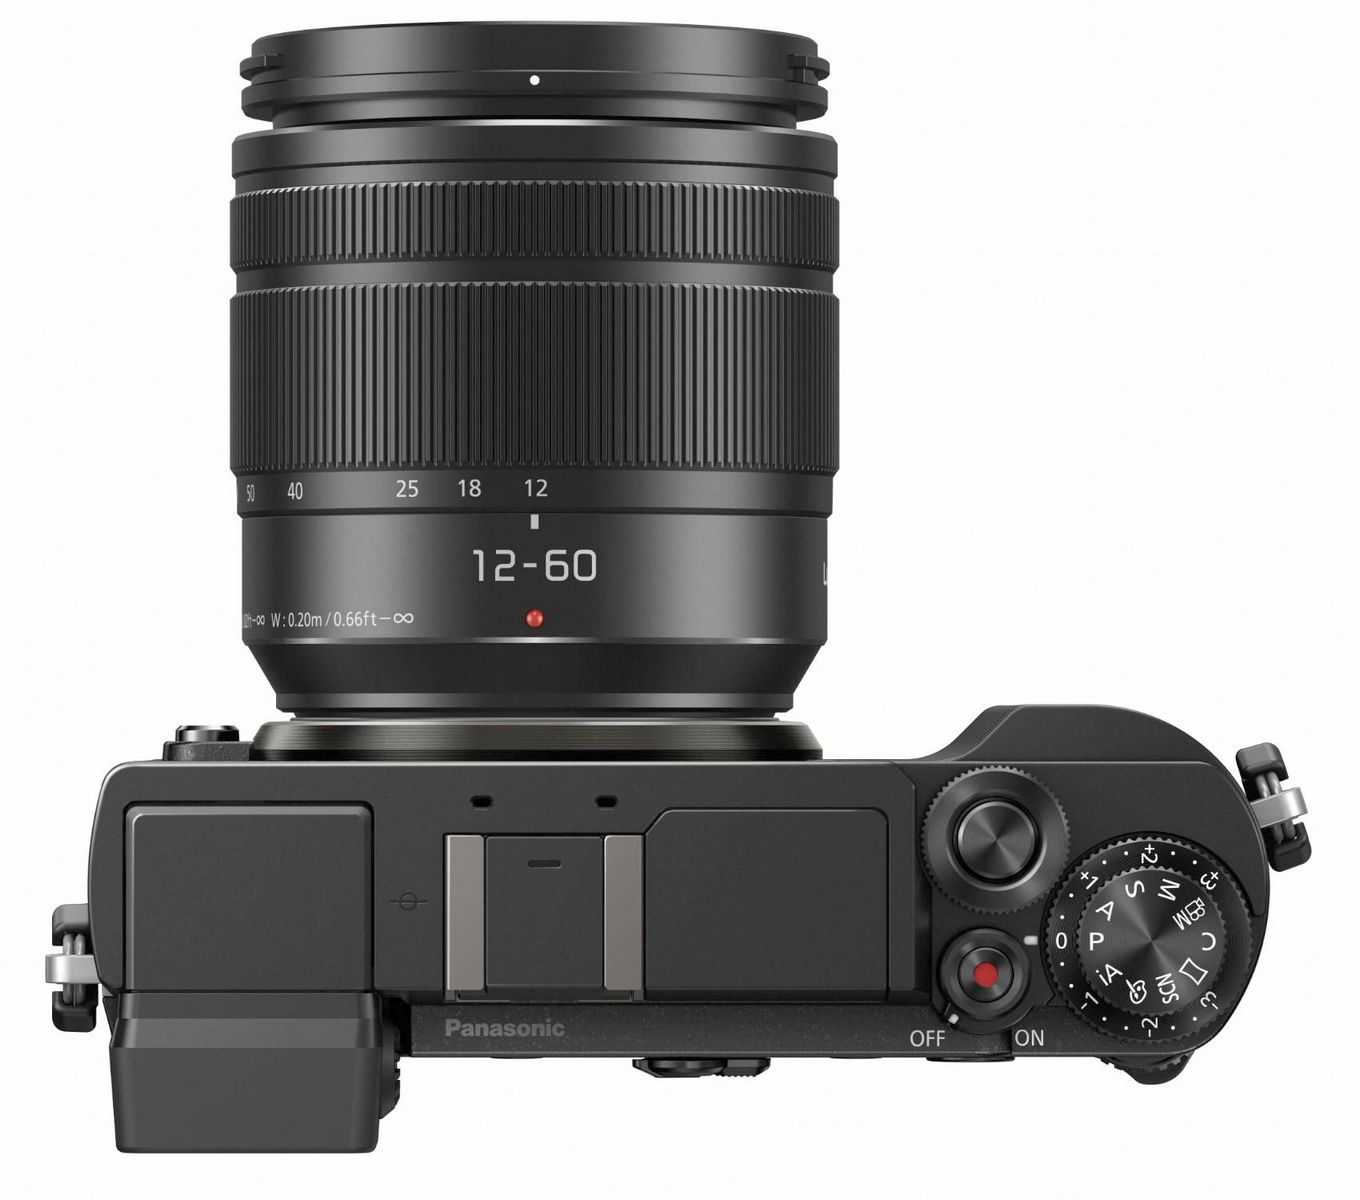
| Body frame: metal alloy or composite? Strangely, this remains unclear, for me at least, and I'm not going to disassemble a friend's GX9 to check. Panasonic's "official" GX9 specs don't even mention this (considering it an irrelevant detail?). Compare that to the specs of the top-of-the-line G9, explicitly listing magnesium alloy construction. All this makes me almost sure that the GX9 body frame is made of some kind of a composite. There is nothing wrong with this, especially in this price range, so why is Panasonic trying to hide this? Boo. Still, some regional Panasonic sites mention magnesium alloy body; for example, on panasonic.hk I found "Magnesium alloy body enable splash-proof / dust-proof performance" (original, unaltered quote, captured 2018/06/19). This is, most probably, wrong; certainly, the GX9 is not element-proof; neither does it use an OLED EVF, mentioned elsewhere in the same page. The top deck layout is exemplary: a good use of available space without being overly crowded. It consists of two parts, quite different both functionally and aesthetically.
| The left, elevated part is used by the tilting finder eyepiece, hot shoe, and pop-up flash (also the image plane marker and two microphone openings). The right, sunken one manages to squeeze in six (!) controls in three co-axial ensembles:
| 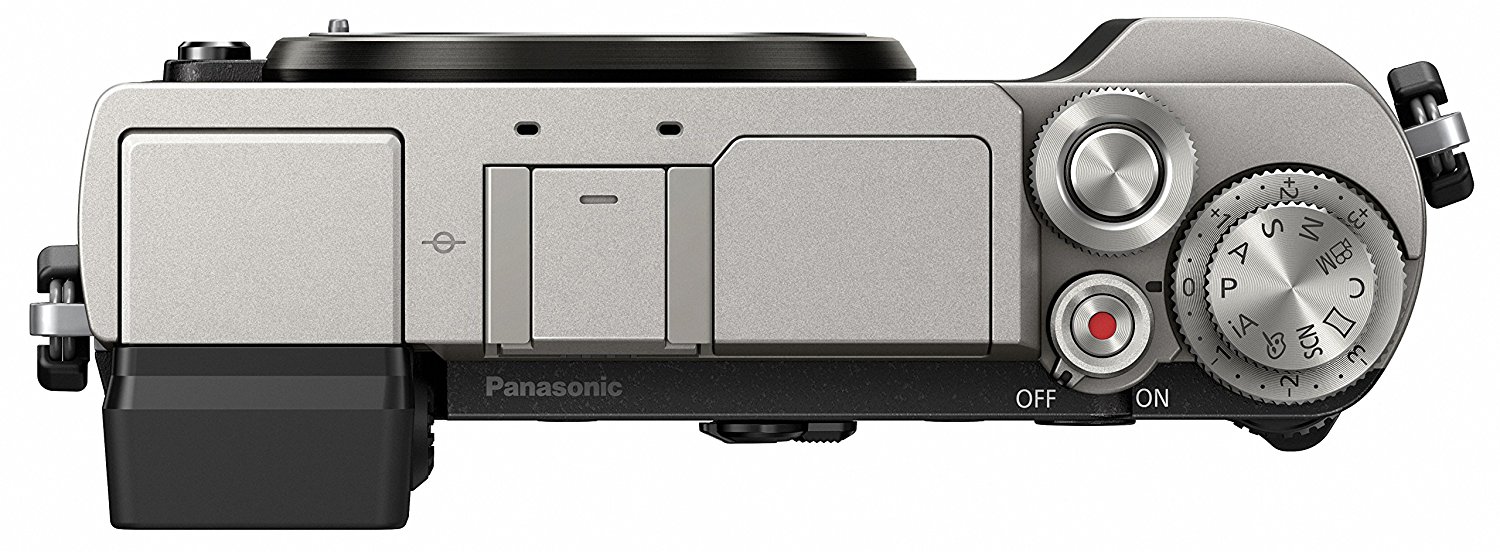
The top deck: clean and functional; predictable.
| Of these, the dedicated, marked exposure compensation dial is what I like most; I consider it essential for any semi-serious camera and too bad Olympus does not have this in their flagship E-M1 II. Interestingly, the Pen F does have this feature, although the GX9 version uses less space.
The camera's back is where most of the action is. It is quite heavily populated and includes, in addition to the EVF eyepiece and a three-inch, tilting monitor (more about both later) a bunch of buttons and other external controls, These are arranged in two distinct groups. One of these is a single row of controls above the monitor. Left to right, they are:
|
| 
The back side is businesslike and quite busy, but nothing can be done, we can't live without all these buttons.
| 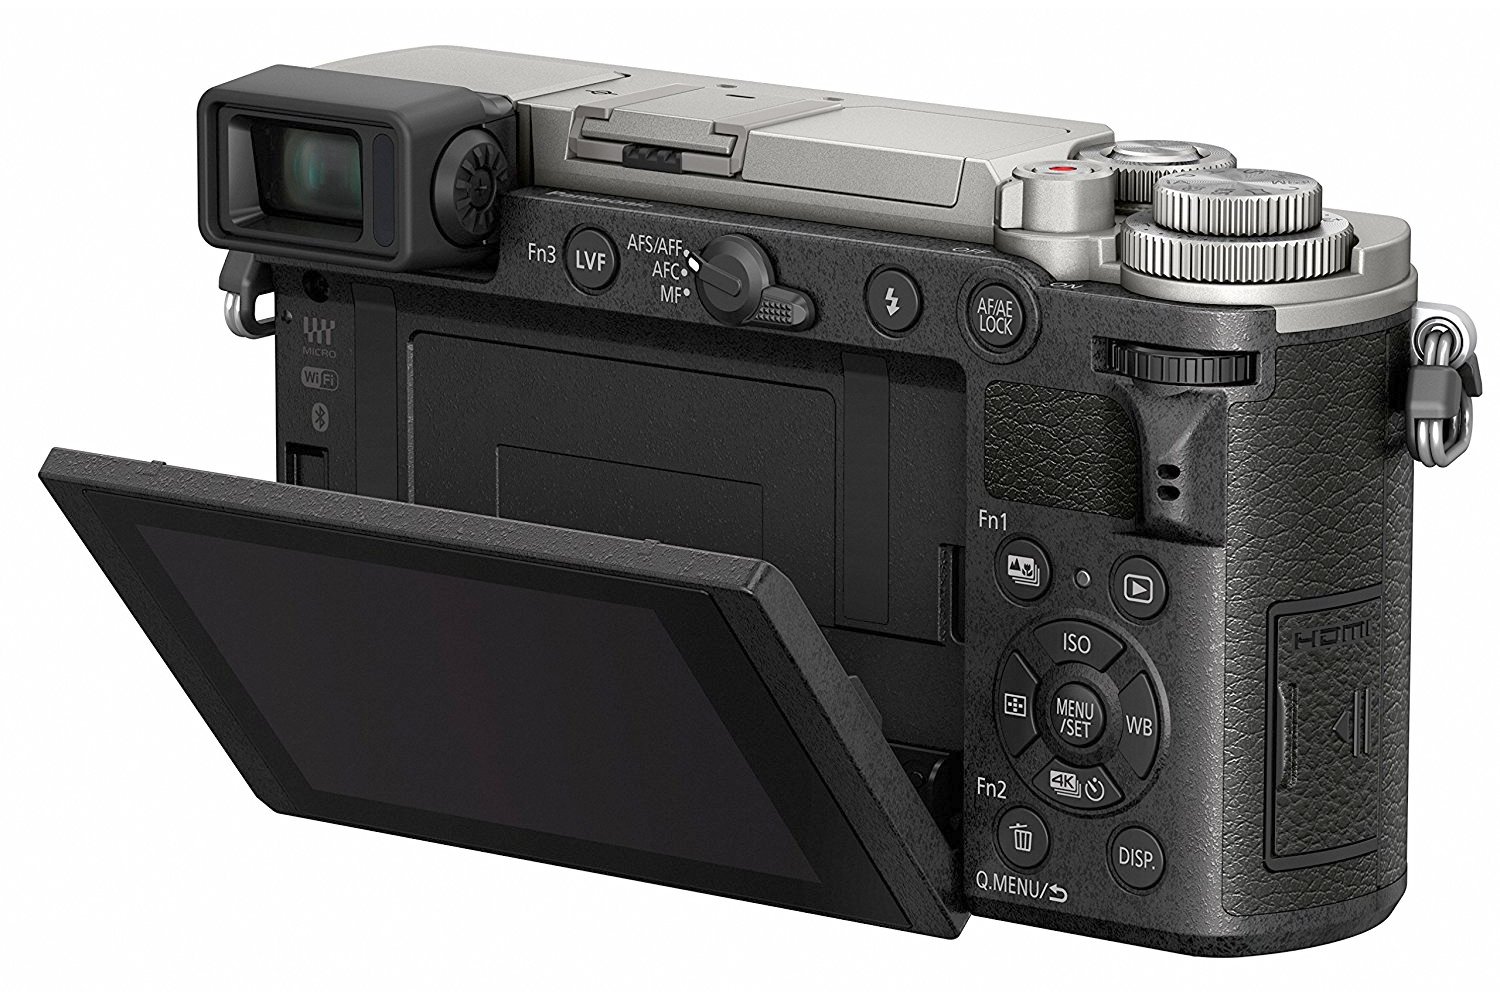
Panasonic did not give in to the swivel police, and the monitor is tilt-only. Common sense prevailing over bragging rights.
| Then there is a group of controls to the right of the monitor, a very common solution. In addition to the arrow cluster (four directions and center), it includes four buttons in a rectangular pattern. Three of those can be found on almost any camera (Play, Delete, Display Mode); the fourth one deals with the Post Focus function. Two can be re-assigned. Each of the arrow keys has a dual functionality. When pressed by itself, it grants access to an assigned setting (ISO, WB, drive and AF modes); after some other keypress opens a setting, the key can be used to move the screen cursor as needed. I'm not very fond of this, admittedly quite common, solution, but I've learned to live with it. Finding room for four extra buttons would not be practical, and the extra complexity is a price many users are willing to pay. The preview image, picked up by the CMOS imager and processed into RGB can be shown on the rear monitor or in the electronic viewfinder (EVF). The selection is made manually, or automated, with use of the eye proximity sensor. Both monitor and EVF have a number of predefined layouts to choose from, plus some other niceties, like 2× and 4× magnification, histogram, or level gauge. The level gauge display looks like a flight simulator HUD; too obtrusive for my taste. I prefer the Olympus implementation. The monitor can be tilted up and down, but not swiveled to the side. I've seen many complaints about this, and I have to disagree, considering it rather an advantage (more compact, easier to use). One situation when swivel is of use is shooting in portrait orientation. So here is a question to complainers: how many times in the last five years have you used monitor swivel (assuming you have this option) when shooting in portrait? The monitor size (diagonal) is 3 inches. The aspect ratio is, however, 3:2, so that a full μFT (4:3) frame will use just 89% of the screen width, with a diagonal of 2.77". This is a more meaningful figure. Not that it is very different, but still. The monitor resolution is 1.24 million RGB dots (roughly 400k pixels); typical for mid-line or better cameras of the last three years or so. The screen is touch-sensitive, but the touch interface can be disabled, which is just fine. The ingenious, tilting EVF has a generous magnification (full-frame equivalent) of .695 and a resolution specified by the manufacturer as "2,760k dots equivalent".
| Let's compare these specs with ones for two other (admittedly larger and more expensive) Panasonic models, including the new G9 flagship, as well as with two Olympus cameras: the (still) top-of the-line E-M II and the small wonder, the Pen F. Note that while the GX9 EVF magnification can not be a match for the larger models (obviously, size constraints), it is clearly higher than in the Pen F, and that is something.
|
|
As it often happens, the devil is in details. Note the word "equivalent" in the specs above. This is a hint that the numbers are not directly comparable. And, indeed, that's the case.
The "classic" LED EVFs (Epson) or OLED ones consist of individual R, G, and B dots placed, next to each other, so each three dots are equivalent to one pixel. In a sequential LCD, however, each dot generates the R, G, and B components one after another, with a frequency of a few hundred cycles per second. Each dot is one pixel, timeshared so to say, with our brain doing the averaging work. Therefore a sequential LCD with 920 thousand dots is, indeed, in terms of resolution, equivalent to a "classic" one with triple this number, or 2,720 thousand dots. There is no misrepresentation here, right? Well, there is, some at least. The EVF aspect ratio is 16:9, while that of the μFT frame — 4:3 (or 12:9). This means that when the camera is set to save raw image files or 4:3 JPEGs, 25% of finder area remains unused, and the effective EVF resolution drops down to 2,070 thousand dots. That's less than 2,360 thousand dots for the Olympus cameras shown above, which have 4:3 EVFs. In the 3:2 JPEG mode the GX9 EVF will use 2,328 thousand dots, while the Olympus models will be wasting about 11% of screen height, with 2,098 thousand dots used. Still, I think the native sensor resolution is the most meaningful base for comparisons. The EVF resolution numbers are not even a secondary issue. I just got tired of writers reporting an "improvement" just because one number is greater than another, without checking what those numbers really mean A more real problem may be in display artifacts sometimes reported, often with non-stationary scenes or rapid camera movement. The magnitude (or perceived magnitude) of these effects may depend on a number of factors: the apparent speed of the motion, display refresh rate, brightness, color; it will even vary from one observer to another. Some people may be bothered by this a lot, some won't even notice. I may belong to the latter group, but my hands-on experience with the GX9 was limited to late-night sessions with artificial light and stationary scenes. This looks like a decent EVF, even if the eyepiece optics could be better. Interestingly, in a side-by-side comparison with the Pen F, the later comes clearly on top, in spite of lower magnification. My advice: check the EVF yourself. If you don't see any objectionable artifacts, you're fine. If you do, think twice. The GX9 uses a CMOS (Live MOS) image sensor following the Micro Four Thirds (μFT) standard, which means the recorded image size is 13×17.3 mm (just a bit less than the Canon APS-C at 14.8×22.2, which some, otherwise quite literate, writers often describe as "much larger"). Importantly, the standard assures compatibility with a vast array of lenses by Panasonic and Olympus, plus a few by other makers. The camera uses ultrasound vibrations to get rid of any dust specs stuck to the sensor (or rather the protective filter in front of it). This approach, originated by Olympus, has proven itself very nicely over the years. This is a 20-megapixel sensor; this means it uses 20 million photosites to collect about 7 megapixels worth of information which is, at the stage of raw-to-RGB conversion, effectively upsampled to 20 megapixels. All manufacturers follow this convention when talking about their sensors, so the numbers are directly comparable (at least for imagers using the Bayer pattern, which means virtually all). Anyway, 20 megapixels is aplenty and requires some quality lenses to be effectively utilized. Moreover, the camera is not using the anti-aliasing (or low-pass) filter in front of the sensor (or, more accurately, the filter it uses no longer has any anti-aliasing effect), and this additionally improves the resolution. The anti-aliasing filter is commonly used for protection against Moiré patterns — zebra stripes arising sometimes when the spatial frequency of some repetitive image detail approaches that of image pixels. It does that by adding some unsharpness to the image, and this, obviously, is a mixed blessing. Some (mostly more recent) cameras do this in the firmware instead, just before or during the raw-to-RGB image conversion. It is not clear which is the case for Panasonic models, so we don't know if it affects raw files. I hope it does; otherwise the feature would not work with third-party raw-handling applications, unless they also implement this feature. The imaging engine has all features we would expect: raw storage, JPEGs at two quality/compression levels (8 and 3 MB) and in various aspect ratios, adjustable sharpening and noise filter, you name it. Most of them will be briefly described now. ISO Using a higher ISO setting allows for shooting at faster shutter speeds (less camera shake) and/or higher F-numbers (greater depth of field and, up to some point, better lens performance) at the expense of higher noise and reduced dynamic range of the image. The camera allows you to set ISO manually in the range from 200 to 25,600 in 1/3 EV increments (which means that 3 steps double the value) or in full 1 EV steps (each doubling the value). I find 1 EV steps more practical: 1/3 EV brings no noticeable change, and the scrolling sequence becomes way too long. ISO 200 is the "native" sensor setting (providing lowest noise, highest dynamic range, and best colors). Additionally, the "extended" setting of ISO 100 can be enabled, at which the dynamiC range suffers a bit; it should be used only if the scene is too bright (for other parameters we chose for some good reason, that is); best forgotten about. There are also two settings which make the camera choose the ISO: Auto and (yes! you've guessed it right, and I'm not inventing it!) iAuto.
By default, both auto ISO modes will raise ISO only up to 3200. While this is a very reasonable value, it can be changed by the user. Generally, I'm staying away from any kind of Auto ISO, as it may use different values within one session or frame sequence, which leads to differences in noise, sharpness, and/or color. This is never a good thing, even if most of those differences are fairly minor. First of all, we have to remember that this color adjustment is performed only when the raw capture is being converted into an RGB image; therefore this section does not apply if you save only raw files. You can not view "raw images", only RGB ones, whether converted in-camera or by some external application in postprocessing. A writer showing you "raw samples" simply has no clue about the subject. Any statement like, for example, "raw images look better than JPEGs" really means "images converted by such-and-such application in such-and-such way look better than those converted by the camera using such-a-such settings". That said, the WB options offered by the GX9 are fairly typical:
In addition, each of these settings can be adjusted in Amber/Blue and Green/Magenta planes. There is also a WB Bracketing function, where one frame is shot, but three JPEGs saved, offset from the "best" in one of the two color planes mentioned above. Frankly, I've never used this on any of my cameras, and I'm not going to on the GX9: adjusting colors in postprocessing is more flexible and easier to control, even starting from a JPEG file. On Panasonic cameras, a Photo Style is the same as a Picture Mode on Olympus ones: basically a set of image-processing parameters's, each style predefined but adjustable. A photographer can switch between styles like in older days they used to switch between films, only without having to carry more than camera bodies The Photo Style tweaks are applied at the raw-to-RGB conversion stage, therefore they don't affect raw files stored, only the resulting JPEGs, if any. Available styles are:
Most of them can be adjusted up or down from the style base value. Here is the full list. Color and monochrome:
Color only:
Monochrome only:
A similar list for Olympus cameras is missing Noise Reduction; an oversight I've been complaining about for twelve years, to no avail.
Here is a group of settings which are supposed to correct in the software some common problems. They are applied regardless of the Photo Style used, and they are all optional. This noise component is sometimes referred to as fixed noise, while Panasonic calls it long shutter noise. It is significant only at exposures of a few seconds or more, depending on ISO. It is usually dealt with by dark frame subtraction; see my noise article. The process may take a while, involving a "dark" (closed-curtain) exposure of the same duration as the original one; it also adds some extra random noise (ibid.). For these reasons it is optional. It will be applied only if the proper option is set and the minimum exposure time (unspecified by Panasonic) is exceeded. This problem is often referred to as shading, or light fall-off. For purely geometrical reasons, pixels more distant from the image center receive less light. even if the scene has uniform brightness. Simply, the image gets darker towards the corners. The original Four Thirds standard dealt with this by using the retrofocus lens design: increasing the rear lens-to-sensor distance more than required by the focal length. For shorter lenses this was necessitated anyway by the need to provide room for the moving SLR mirror. Without that mirror being used in μFT there is less of a reason to use the retrofocus design, and vignetting can be handled simply by applying more gain to the e signal at off-center pixels. A well-behaved μFT lens is supposed to pass to the camera the information how much extra gain is needed at various distances from the center at a given focal length. If it does, the correction can be applied. (Obviously, lenses without electronic interface do not offer this feature.) This happens at a price, though. More gain means more noise. The noise increases towards the corners. Do not panic: the effect is not really objectionable. Still, you may choose not to enable this option; actually I often prefer to leave some vignetting, as it may bring some subjects out. Most optical flaws of a lens decrease as the aperture is being closed down (larger F-numbers); only diffraction (an effect originating at the aperture edges) increases. Worse, its magnitude depends not on the relative aperture (F-number) but the absolute one (diameter, as measured in length units). This is a performance hit for cameras with smaller sensors, for which the diffraction effects kick in at wider apertures. Correcting diffraction effects in software calls for some heavy math hanky-panky beyond capabilities of a camera's firmware, I always thought. This is why introduction of this feature with the GX8 (late 2015) took me, to say the least, by surprise. (It was retained in the GX85 as well as in the current G9 flagship.) This may be quite important, if it really works. I would need a solid set of samples to say anything serious on the subject. There are no explicit options to correct the image for two more optical flaws: chromatic aberration and geometric distortion. This is because both corrections are enabled full-time. Why not? Both are quite simple, involving just redirecting a photosite signal to a different pixel, and neither seems to suffer from undesirable side effects. On the other hand, not having to correct the lens for these flaws makes correcting them for others easier and more effective. It's the bottom line that counts. It remains unclear whether these corrections are introduced already in the raw file (which is technically possible) or only in the converted JPEG (which used to be a common approach). Panasonic offers no information on this subject. There are some other settings, affecting RGB images while not being a part of a Photo Style. My best advice is to ignore everything in this section.
For the last two items I'm just quoting their descriptions from the manual (advanced version). I still have no clue what and how they do, and I've never tried either of them. Finally, there is a group of settings defining not how RGB images are generated, but rather how they are saved as JPEG files.
The situation gets a little bit more complicated with the introduction of the feature often called a digital zoom, which really is a 50% or 25% (linear) crop around frame center. I'm recommending against using it anyway; do it in postprocessing if you must. The exposure automation system uses the real-time information from the image sensor. Data on 1728 (54×32?) metering points is processed, and three metering patterns can be used: matrix, center-weighted and spot.
The basic exposure modes are Program, Aperture Priority, Shutter Priority and Manual (metered). The last one becomes not-so-manual if the All these modes (and then some, keep on reading) are accessible from the Mode Dial on the top. While normally AE is locked by a half-press of the shutter release, it can be also done with the dedicated AE/AF Lock button, located close to where your right thumb usually is. This is very useful if you want to recompose the scene after setting the exposure, or shoot a series of identically exposed frames. In all automated modes you can apply exposure compensation from -3 to +3 EV, in 1/3 EV increments. This is done with a dedicated dial at the far right of the top deck. A quick, easy, and transparent access to this setting is, for me at least, a major factor in judging a camera. That's one of the main reasons why I like the GX9 (or Pen F) so much. The range of exposure compensation can be extended from ±3EV to ±5EV by re-assigning it from the dedicated dial to one of the "regular" dials. if this option is in use, a compensation scale is shown in the monitor when needed. This feature allows for shooting multiple frames with exposures spaced with a given step below, at, and above the one set. The number of frames can be 3, 5, or 7, and the step — ⅓, ⅔, or 1 EV. The parameters adjusted to achieve the desired change in exposure are the same as those used in the given AE mode to set the original value (this includes Auto ISO in Manual, too). You can set the order, in which individual offsets are applied, which may be sometimes useful. More importantly, there is a choice available, whether all bracketed frames are shot at a single press of the release, or one frame at a time. While the second option may be handy in critical, tripod-based applications (less camera shake), the first one will be much more useful in most of more common situations. This "burst bracketing" feature is sadly missing in all Olympus OM-D cameras, including the E-M1 Mk.II. This, for me at least, makes AE Bracketing in this series virtually worthless for practical use. At least Panasonic got it right. Another feature looking for a reason to exist. This works only in AE modes with aperture set by the user, which means Aperture Priority or Manual with Auto ISO. The camera will take 3 or 5 frames in 1 EV steps around the aperture set; alternatively it may do that at all full-stop values. The other parameters (shutter and/or ISO) will be adjusted so that the exposure remains constant; the frames will differ mostly in depth of field and bokeh. Frankly, I never had a compelling need for DoF or bokeh bracketing. On the other hand, being able to shoot a series of image samples for all whole apertures with a single shutter release may be nice for testing purposes (if not beyond). This AE mode, marked as iA on the Mode Dial, is one of the idiotensicher solutions, pushed by most makers on their target market regardless of that market's literacy level. That said, I consider the solution used in the GX9 somewhat less offending that some (most?) others I've seen. (Olympus! Don't pretend you're not here! I'm looking at you!) When the shutter release is half-pressed, some algorithm attempts to detect the type of the scene being viewed. Then an icon denoting this choice is briefly displayed, and shooting parameters deemed appropriate for this scene applied. No adjustments of any kind are possible, just press the big, shiny button. This affects not just the autoexposure, but also other parameters, like, for example, AF mode (including face detection). Most interesting, optionally the choice of scene modes may include two quite exotic ones, referred to as iHandheld Night Shot and iHDR. In both, the camera takes a quick sequence of short-exposure frames, to merge them into a single image — applying a shift to compensate for camera moves between the frames, or varying the exposure to get the HDR effect; see Scene Modes. What I do regret, though, is that Panasonic did not come with an even more catchy name: iHandheld iNight iShot would sound three times as high-tech. Four legs good. My major problem with most of those smart Auto modes is that they don't allow for exposure compensation, and that's one thing I'm not going to give up. The GX9 is better in this aspect: with the mode dial at iAuto (iA, whatever), a press of a button takes you into the Plus version of this mode, where you can enter three adjustments:
I strongly suspect that, in order to keep this part more user-friendly, the manual writers were instructed to avoid all those difficult words like aperture, depth of field, or program shift. Or, for that matter, anything which would indicate what the camera is actually doing. Anyway, if just for the exposure compensation, the Plus is a welcome addition. It also allows to switch between Standard and Monochrome Photo Styles, but no others. These are not just limited to autoexposure settings, but may affect also other aspects of the shooting. The selection is fairly similar to those offered by other camera models. Once a set of shooting and/or imaging parameters has been saved in the Custom slot, it may be switched to at will. My only complaint is that I would really prefer to have two of these. This is very much like the scene modes in some Olympus cameras. Scene type selection is accessed from a thumbnail interface (three different layout), and there are really plenty of them. Here is the complete list. The names should be self-explanatory, and if some are not, no big loss.
|
| This mode is implemented in a fashion similar to the one you can find on some smartphones: point, press, pan, press, done. I don't like it. Not that I mind simplicity, but I would like to have some degree of control without going manual. The only choice left to the photographer is that of the panorama aspect: Standard (4.26:1) or Wide (8.52:1). Stitching is done in-camera, nice. What's not so nice is that produced images are really small: up to 8176×1920 pixels (Standard) or 8176×960 pixels (wide), or 16 and 8 megapixels, respectively. Not enough CPU muscle to handle anything bigger? As such, this panorama mode is a toy rather than a tool; I would have preferred a better one, even if I had to do my stitching on a computer. While this is no iControl, still, Creative must be the next best thing. This is a set of special effect filters which can be applied to images as they are converted to RGB and saved as JPEGs; very similar to Olympus Art Modes and of equally marginal usefulness. Whatever. Out of scope of this document. Having this on the Mode Dial, the designers should have considered an option to assign the red dot button to some other function. Like most non-SLR digital cameras, the GX9 implements a Contrast Detection Auto Focus (CDAF) system, which uses the information picked up from image sensor — no separate data source for the AF. That's different than Phase Detection (PDAF) systems used mostly (and in most) SLRs, and equipped with their own, AF-dedicated light receptors. A PDAF system can determine from a single reading, how far and in which direction out of focus it is; CDAF — only the former. This gives PDAF some advantage in terms of promptness and accuracy of any correction requests sent to lens servos. The difference is usually negligible for static scenes, becoming visible in continuous AF, especially with object tracking. There are also hybrid systems. For example, Olympus E-M1 has a custom image sensor, with some photosites no longer used for imaging, being re-assigned to PDAF instead. The remainder are still work for CDAF, and both parts of the system perform efficiently together. Panasonic uses a proprietary technology, called Depth from Defocus (DFD), claimed to provide some PDAF benefits from what is, basically, a CDAF hardware. It has been used in some of their recent cameras, including the G9 and GX9. To say whether this brings any actual benefits, I would need some hard numbers, plus a description of the procedure used to obtain them. Panasonic provides no such information. So far I was able only to do a quick, casual check with static, well-lit living room scenes, and under those conditions the GX9 AF performance seemed as good as they come. There are some complaints, however, from other writers, especially about tracking AF. There is a downer here: the DFD feature works only with Panasonic μFT lenses, excluding all Olympus glass from the DFD advantages (if any, that is). This is the next step in the process of μFT lens standard segmentation: first image stabilization, now this. It also remains unclear whether DFD is compatible with Panasonic's own lenses released before it was developed and introduced. While this is a legitimate (obvious, I'd say) question, I was unable to find any statements they've made on the subject. Adding all this up, the GX9 uses "CDAF with DFD technology" for autofocusing. 49 AF spots are defined on the image sensor and arranged in a 7×7 matrix. One of the best ways to confuse the user is introducing two almost identical terms for two different yet related things, and then use them extensively in the same context. This is exactly what Panasonic does with the Focus Mode and AF Mode settings. To add insult to injury, guess where a choice between two of the Focus Modes is made? Of all places, in the AF Mode interface screen! The Focus Mode options are Manual (MF), Single AF (AFS), Flexible AF (AFF), and Continuous AF (AFC). The selection is made with a nice three-position lever switch on camera's back, with AFS and AFF sharing the same lever position. The AFS mode is simple: focusing is done and locked at half-pressing of the shutter release (unless the button assigned to AF Lock is used). AFF and AFC, confusingly, look alike: in both the AF is updated continuously on half-press until the shutter fires, except that AFC is predictive, and AFF probably is not. Or, maybe it is, after all. The manual expressly says: When recording using [AFF], [AFC]
Despite the bad English, the meaning seems to be quite clear. Feel free to have a look at p. 96 of the Owner’s Manual for advanced features to see how unclear the manual is on the subject. These differ mostly in the shape, size, and sometimes functionality, of the AF patterns used, built of rectangular CDAF cells, and used to set the focus.
Putting aside the linguistic clumsiness of some of these names, the naming lacks logic: is "area" a single AF cell, or is it a block of 9 such cells? (This depends whether the term is used in item #1 or #3). Could we have some responsible adult to read the manual bfore it is released? The patterns, if applicable, can be resized and/or moved around. Their outlines can be set to show full-time or just when the AF was established. Digital cameras use two different mechanisms of timing the exposure: mechanical and electronic. Some allow you to choose between both (the GX9 is in his group)), and some — even to use different ones to start and end the same exposure (Olympus E-M1). Both ways have their pros and cons. A mechanical shutter works differently on EVF cameras than on SLRs. The shutter stays open full-time while the image sensor is used for preview; then, when the shutter is about to be released, it is closed, and the sensor prepared for exposure. Only then the actual exposure happens, and after it ends, the image information is picked up from he sensor, after which the shutter opens again for viewing. In an SLR there is no initial closing and final re-opening, as viewing is done with the shutter closed. This saves us some camera shake, but the swinging mirror adds some, the bottom line may differ. The GX9 shutter itself is of the focal-plane type (described and discussed here). It runs vertically, top-to-bottom of the imager, therefore capturing the bottom of the scene first (at shutter speeds when it matters, and in landscape camera orientation). This often leads to geometric distortions of fast-moving objects.
The available shutter speeds (manual or auto exposure) range from 60 seconds to 1/4000 s, which is reasonable for a mid-tier camera. The fastest shutter for which the whole frame is open at some time instant is about 1/250 s (flash synchronization up to There is also a T setting (manual only): press the shutter release to start and to end an exposure of up to 30 minutes. s According to Panasonic, the GX9 focal-plane shutter has been redesigned compared to previous models, reducing the "shutter shock" by 90%, i.e. by a factor of 10. This would have been a meaningful number, was it specified whether it is a reduction in energy or in amplitude of camera vibrations, or maybe in something else. Still, I have no doubt the new shutter is greatly improved (GX8 seemed to have some problems here). I just dislike being fed meaningless numbers. In this approach, the electric charge (photosite response) is reset, accumulated, collected and digitized while the light is reaching the image sensor uninterrupted. I have no idea how this is done, except that the signal is picked from one row of photosites after another, so that each row is slightly shifted in time with respect to the previous one. As a result, we are dealing with something like a focal-plane shutter, with possible geometric distortions (sometimes referred to as "rolling shutter"); see above and, again, here. There is one difference, though. The time needed for a full-height image scan is quite long. Let me assume it to be 1/60 s (that's the value for the Olympus E-M1 II and, most probably, Panasonic G9) four times longer than it takes the mechanical shutter to travel the frame height. Distortions will be, all other things equal, four times as pronounced.
Electronic shutter speeds range from one second (less above ISO 3200) to Squeezing a pop-up flash (in addition to viewfinder) into a camera this small was something. At GN 4.2m (ISO 100), this is not a powerhouse. Note the ISO rating, though; it is below the native ISO 200 of the sensor; it is used in the specs only by an agreement, to make the data for various units comparable. We could equally well say the GN is 6.0 m (ISO 200) or 8.4 (ISO 400). In the last case we're talking F/4.0 from the distance of 2.1 m, with the tiny unit as the sole light source. Handy in an emergency. This flash will also work just fine as a fill light at small distances outdoors, nicely softening the shadows. Last but not least, it will work as a trigger for Panasonic or Olympus (or other compatible) remote-control units. The unit is small but not stupid. Here are the other specs.
One thing missing here, as compared to Olympus OM-D models, is the FP (multi-burst) firing mode, allowing for flash synchronization at any shutter speed. This in not really a problem, anyway: I've used this feature once in the last ten years. The first three of these are quite standard, and while I'm yet to be convinced about the remaining two, they meet the basic requirement of not standing in my way if I choose not to use them, so be it.
The camera can take a specified number of pictures with a specified time interval between them. It may even enter the sleep state between frames, to wake up when the next one is due. When the resulting images are being reviewed, they can be used to create a video clip. A related function, Stop Motion Animation has a similar functionality, except that frames are triggered manually. It also allows you to view the previous frame (or two) superimposed over the one about to be taken. Those few of us who are into animation will find it very useful. In this mode, the camera will take up to four pictures, superimposing them into a single JPEG frame. (It may also add up to three pictures to a raw image file, previously shot.) There is an option to adjust the exposure of component frames down, to keep the total (roughly, at least) right; otherwise the photographer is supposed to know what he/she is doing, and the set exposure is applied. A typical example: each of the component images shows a person on a dark background, placed in a different area of the frame. This will require no adjustment: each frame should be exposed as it were the only one. I consider this feature as redundant. Combining individual frames into a multiple exposure is much better done in postprocessing in a photo editor, with more control over how the frames are blended, and a freedom to try different versions out. With the HDR option enabled, the camera shoots a fast sequence of three frames: one exposed as metered, one below, and one above this level. Then they are combined into one JPEG of a higher dynamic range (which, by the way, is not quite true). The three individual frames are not preserved. You can select the exposure offset between frames (1, 2, or 3 EV) or leave it at Auto, for the camera to choose, based on AE matrix readings. The subject should be stationary, and a tripod is recommended. at a burst rate of 6 FPS, though, the time between the first frame and the last one is just ⅓s, so you can get away handholding the sequence, especially with IS on. Additionally, the Auto Align option makes the camera detect image shift between frames, adjusting the frames as needed to provide a more accurate match. The HDR effect became a fad in the last few years. 90% of images in my Amazon Fire Stick screen saver are using it. The problem is that the overall dynamic range of the HDR image is not greater than that of a "regular" JPEG, being limited by the display type and the image standard. We may stretch some sub-range of tonality (say, open up the shadows) only at the expense of narrowing another sub-range (like reducing contrast in the mid-tones). There are some tricks, like expanding the range region by region, but then, we have to move whole regions up or down, in order to keep all within the unbreakable overall constraints. Not until we have a better image data standard, capable of storing images with more dynamic range, and better physical displays, capable of showing those images, will we experience a real HDR. (By the way, there is lots of progress in both those areas, driven mostly by the video streaming industry.) This used to be a mess within the small Micro Flout Thirds universe. While Olympus went for a body-based solution, using small sensor movements to compensate for camera shake, Panasonic chose to implement a lens-based solution, where the compensation is done by moving some optical elements in a given lens. While both solutions have their advantages, I prefer, by far, the Olympus approach. First of all, the concept is more elegant, and the experience taught me that elegant solutions usually work better, in the long run at least. It is also less expensive (if you are using multiple lenses, but not only), works with any lens, and does not age so fast: most photographers update their camera bodies more often than lenses. Then it became a real mess. Panasonic introduced in-body IS to its cameras, while Olympus released a few (premium) lenses with in-lens IS. Both makers support Dual IS (the use of both IS types at the same time), but only within the same ecosystem. More, some stabilized Panasonic lenses do support the Dual IS on Panasonic cameras, some don't. Regardless of that, Panasonic claims a quite significant effect if the GX9 five-axis, in-body IS: 4 EV, which means 16× longer handholdable exposures, as measured with a CIPA standard procedure. This, however is a result with the kit zoom at 60 mm, and my own results show IS to be more effective at longer focal lengths. More, my procedure, which I know and trust, usually shows the IS effectiveness being 1-2 EV less than the CIPA procedure shows. Thus, my best guess would be 2.5 EV at 60 mm, 2 EV or so for a "standard" (20-30 mm) one. There is an option to select whether stabilization is performed just in the vertical direction (suitable for panning) or in the horizontal one as well (stationary camera). The camera uses a single SD card. In addition to the "plain" SD, both SDHC (up to 32 GB) and SDXC (up to 128 GB) standards are supported, so is the UHS speed protocol. Looks like Panasonic is up to date in this department. Some movie formats may have particular card speed requirements. I'm not going into that, as I'm not covering video in this article. The screen GUI in the GX9 is actually quite good, better than most I've seen. The individual settings screens, showing in response to body buttons being pressed, are quite easy to understand and use; no big complaints here. The same can be said about information displayed on top of the image preview. To put it mildly, I'm not enthusiastic about a touch interface on cameras. Still, GX9 offers one. Luckily, this interface can be enabled at four different levels, with the lowest one supporting only switching between different display tabs, so this is my obvious choice. The menu system is used for multiple purposes: setting shooting parameters, activating some less-frequently used options, or customization of the camera. There are six menu branches at the top level:
The structure is quite logical and usually there is no doubt, where to look for a given option or setting; my only problem is that individual menus are rather too long. For example, the [REC] menu, dealing with still shooting, sets over 30 different parameters and options in a flat structure, without branching. Some extra effort here could help. That said, I like this menu system more than that on the recent Olympus cameras. The display can be used to access images (or video clips) stored on the memory card. This includes, first of all, the standard Replay functionality: browsing, grid/calendar, zoom, scroll, delete. The image display can be switched between a few formats, differing in the amount of image information shown. Pretty much a common approach. Raw image files can be converted into RGB (JPEG files). This is a full shebang: almost all imaging parameters can be altered here (except, obviously, ISO. but including Photo Style and its components); those which are left alone will default to "as set in shooting" values. There is also a notable Brightness Correction option here, with a ±2EV range. It should not be confused with (or, worse, used instead of) exposure compensation, or adjustment applied at the time of shooting. Raw image files do not have enough headroom over the standard RGB for this to make a really significant difference. This seems to be the only way to convert a GX9 raw file into a JPEG with use of the Panasonic image engine; doing it in postprocessing you have to use a third-party software (this includes SilkyPix, included with the camera). Other editing options (crop, resample, object removal) are of dubious advantage; it is much better, for many reasons, to apply them in postprocessing. I'm equally skeptical about the image-tagging functions, applying a title, text stamp, or rating. A separate group of functions deals with image groups, like those created with Time Lapse or Post Focus: image selection, merging, or converting into video clips. The GX9 offers both wired and wireless connectivity, designed and documented in a way a bit too convoluted for my liking; the manual uses more than 50 pages for this subject (mostly wireless). Thus, I'm not going into any details here; just some basics. An ingenious door, hiding into camera body when open, covers two ports: microHDMI Type D for external displays (including 4K support) and Micro-USB 2.0. The latter can be used to connect the camera to a computer (file transfer) or to a printer (PicBridge). This camera supports WiFi and Bluetooth (including the recent Low Energy Bluetooth). There is an iOS/android application, Panasonic Image. It allows the phone to be used as a remote control for the camera, including image preview and parameter setting. It will also copy images, or do some basic editing. The bad news is that the application is poorly designed and buggy. Compared to it, the OI Share by Olympus is a gem. Alternatively, plain WiFi can be used to access network directories for file transfers in both directions. The camera can also make remote copies of image files as they are created.
The GX9 uses a compact DMW-BLG10PP lithium-ion battery. The charge stored is 1025 mAh, which at 7.2 v is 7.4 Wh of energy. For comparison, the BLN-1, used by the Pen-F, stores 8.8 Wh, which is 19% more, but not a deal-breaker. EVF cameras are quite power-hungry (image capture and display done 60 or so times a second, without even one picture taken, so the most meaningful number here will be the number of frames you can shoot on a single battery charge. This measurement is supposed to be done using a standard procedure, developed by CIPA, a photo trade organization, so the results should be comparable between cameras. The CIPA battery rating for the GX2 is 260 frames. That's rather in the lower part of the spectrum. For the Pen F the number is 330 frames, or 19% more, again. It turns out both cameras are equally efficient, using about 27 mAh per frame. Actually, I could live with 260 frames. The actual performance should be better, anyway, because the CIPA method assumes a 50% use of flash. For real emergencies, the GX9 offers a draconian energy-saving mode, capable of 900 or so frames per charge, at the expense of disabling or turning off some features, mostly display-related, at every opportunity. I'd rather carry a spare battery around. The camera's micro-USB port can be used to recharge the battery without removing it. It requires a standard 5V USB power socket, capable of delivering at least 1 ampere of current. A wall changer meeting these requirements comes with the camera (and so does a proper USB cable). Recharging a depleted battery with this charger takes just above three hours. There is also an external power supply option; the details remain unclear. The GX9 is sold, in the U.S. at least, only as a bundle with the 12-60/3.5-5.6 "standard zoom" lens. As "kit" lens specs go, this is a very attractive one:
Last time I checked, it was offered by B&H at $500; bundled with the GX9 body at the combined price of $1000, this becomes a most attractive deal! There are two manuals available for the GX9: "basic" and "advanced". Both exist in two versions, differing slightly in the title (Operating Instructions vs. Owner's Manual and different ordering of otherwise identical, at the first glance at least, text). For the second versions of both, see the links at the end. The basic manual is, indeed, very basic; it contains nothing you wouldn't figure out by playing with camera for some time. The advanced one is quite detailed in enumerating various options, settings, and functions; less so in describing what they do, and completely blank on how. That's wrong — for a camera aimed, partly at least for an enthusiast's market. This market will not be satisfied with a description like "Just switch to the iDingus.X mode and press the button to get tack-sharp, life-like images of thrilling action in vibrant, lifelike colors"; it would prefer to know what the said iDingus.X actually does, more or less at least, and maybe even how. (Okay, I've invented this example, but check the manual for similar ones.) While these complaints may be dismissed as a matter of corporate market policy, or just my taste, what comes next is a real wrecking ball. This is the language. The English used in these manual is not just bad, or ugly. (A bad, ugly cat is still fine with me, as long as it will catch mice.) It is often just incomprehensible; I have found passages which can be understood in two diametrically opposite ways. Try to find in the Advanced Manual, what is the difference between two (out of three) autofocus modes: Flexible (AFF) and continuous (AFC). Then do some googling and check Panasonic discussion groups. You will see that hundreds of people had the same problem, and there is still no definitive answer available. At least not from the manufacturer. Not in the manual. This is even more irritating once you notice how much work went into the manuals. Nice, detailed drawings, but, first of all, accurate and comprehensive, hyperlinked indexing, perhaps better than any I've seen to date in this kind of manual. It's a shame to see that effort wasted, not to mention the inconvenience (or impossibility) of getting the information needed to take full advantage of this, very attractive, camera. This is a very well-designed, nicely built and well-performing camera, with sensibly balanced features, and at a price very hard to resist. It will be especially (but not only) attractive to those who are looking for a smaller, lighter body for specific uses (travel, hiking, street photography), or as a second/backup option in their μFT system, or just don't feel like lugging around something bigger and heavier. Its most direct competition within the Micro Four Thirds field, comes from Olympus:
| |||||||||||||||||||||||||||||||||||||||||||||||||||||||||||||||||||||||||||||||||||||||||||||||||||||
|
This page is not sponsored or endorsed by Panasonic (or anyone else) and presents solely the views of the author. |
|
|
My other articles related to the |
| Home: wrotniak.net | Search this site | Change font size |
| Posted 2018/03/01; last update 2018/07/03 | Copyright © 2018 by J. Andrzej Wrotniak |